最近開發中要做一個類似微信聊天的工單系統客服中心界面(安卓版)所以想著也模仿一個鴻蒙版(基于 Java UI 的,JS UI 版本的后期更新哈) 那么廢話不多數說我們正式開始。
具體實現
mainabiilty 布局文件:
<DependentLayout
xmlns:ohos="http://schemas.huawei.com/res/ohos"
ohos:height="match_parent"
ohos:width="match_parent"
ohos:alignment="center"
ohos:orientation="vertical">

<DependentLayout
ohos:id="$+id:company_page_dl"
ohos:height="50vp"
ohos:width="match_parent"
ohos:orientation="horizontal"
ohos:align_parent_bottom="true"
>

<Button
ohos:id="$+id:main_my_btn"
ohos:width="match_content"
ohos:height="match_content"
ohos:text="發送"
ohos:text_size="35vp"
ohos:align_parent_right="true"
ohos:background_element="$graphic:background_btn"
>
Button>
<TextField
ohos:id="$+id:main_textfiled"
ohos:width="match_parent"
ohos:height="match_parent"
ohos:hint="請輸入你的消息"
ohos:vertical_center="true"
ohos:text_size="50"
ohos:left_of="$id:main_my_btn"
ohos:layout_alignment="left"
>
TextField>
DependentLayout>

<ListContainer
ohos:above="$id:company_page_dl"
ohos:id="$+id:main_list"
ohos:height="match_parent"
ohos:width="match_parent"
>
ListContainer>

DependentLayout>
觀察布局文件,我們可以看到寫了一個列表控件 ListContainer 來裝載發送出去的消息和接收到的消息。然后底部寫了一個 TextField 控件來處理用戶的輸入和一個 button 來觸發發送的動作。
邏輯代碼
我們初始化對應控件并且 listContainer 和適配器綁定到一起:
privatevoidinitview(){
listContainer=(ListContainer)findComponentById(ResourceTable.Id_main_list);
textField=(TextField)findComponentById(ResourceTable.Id_main_textfiled);
mainbtn=(Button)findComponentById(ResourceTable.Id_main_my_btn);
mainbtn.setClickedListener(this);
myProvider=newMyProvider(data,getAbility());
listContainer.setItemProvider(myProvider);
myProvider.notifyDataChanged();//有新消息時,刷新ListView中的顯示
}
①初始默認假數據
我們方便展示就寫了 3 條假數據僅供展示:
privatevoidinitMsg(){
Msgmsg1=newMsg("你好",Msg.RECEIVED);
data.add(msg1);
Msgmsg2=newMsg("你好呀",Msg.SENT);
data.add(msg2);
Msgmsg3=newMsg("很高興認識你",Msg.RECEIVED);
data.add(msg3);
}
②用戶輸入邏輯:
@Override
publicvoidonClick(Componentcomponent){
content=textField.getText().toString();
switch(component.getId()){
caseResourceTable.Id_main_my_btn:
if(!flag){
Msgmsg=newMsg(content,Msg.SENT);
data.add(msg);
flag=true;
}else{
Msgmsg=newMsg(content,Msg.RECEIVED);
data.add(msg);
flag=false;
}
myProvider.notifyDataChanged();//有新消息時,刷新ListView中的顯示
textField.setText("");//清空輸入框的內容
break;

default:
break;

}

}
我們通過一個布爾值 flag 來做一個開關處理用戶輸入的,動作輪流來處理是接收到消息還是發送出消息。發送消息:
Msgmsg=newMsg(content,Msg.SENT);
data.add(msg);
接收消息:
Msgmsg=newMsg(content,Msg.RECEIVED);
data.add(msg);
bena 類
packagecom.example.imdemo.bean;

publicclassMsg{

publicstaticfinalintRECEIVED=0;//收到一條消息

publicstaticfinalintSENT=1;//發出一條消息

privateStringcontent;//消息的內容

privateinttype;//消息的類型

publicMsg(Stringcontent,inttype){
this.content=content;
this.type=type;
}

publicStringgetContent(){
returncontent;
}

publicintgetType(){
returntype;
}
}
我們分別定義了 2 個常量和 2 個變量來處理我們的消息邏輯。
適配器
適配器 item.xml 布局:
<DirectionalLayout
xmlns:ohos="http://schemas.huawei.com/res/ohos"
ohos:height="match_content"
ohos:width="match_parent"
ohos:orientation="vertical">
<DirectionalLayout
ohos:id="$+id:left_layout"
ohos:height="match_content"
ohos:width="match_content"
ohos:layout_alignment="left"
ohos:background_element="$graphic:background_blue"
ohos:left_margin="5vp"
ohos:visibility="visible"
ohos:top_margin="10vp"
>

<Text
ohos:id="$+id:left_msg"
ohos:height="match_content"
ohos:width="match_content"
ohos:text="哈哈哈測試"
ohos:text_color="#fff"
ohos:text_size="20vp"
ohos:margin="10vp"
>
Text>

DirectionalLayout>


<DirectionalLayout
ohos:id="$+id:right_Layout"
ohos:height="match_content"
ohos:width="match_content"
ohos:layout_alignment="right"
ohos:background_element="$graphic:background_red"
ohos:right_margin="5vp"
ohos:visibility="visible"
>
<Text
ohos:id="$+id:right_msg"
ohos:height="match_content"
ohos:width="match_content"
ohos:text="哈哈哈測試"
ohos:text_color="#fff"
ohos:text_size="20vp"
ohos:margin="10vp"
>
Text>
DirectionalLayout>
DirectionalLayout>
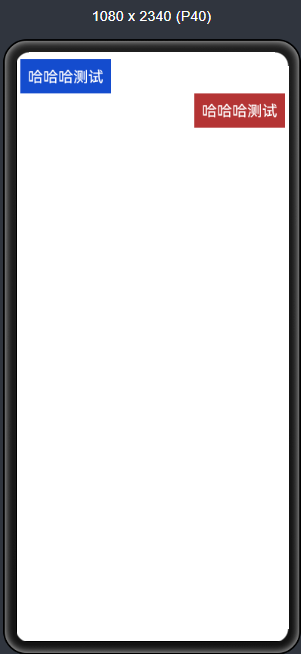
item 布局預覽效果:
 適配器邏輯代碼:
packagecom.example.imdemo.provider;
importcom.example.imdemo.ResourceTable;
importcom.example.imdemo.bean.Msg;
importohos.aafwk.ability.Ability;
importohos.agp.components.*;
importjava.util.List;
publicclassMyProviderextendsBaseItemProvider{
privateListlist;
privateAbilityability;
publicMyProvider(Listlist,Abilityability) {
this.list=list;
this.ability=ability;
}
@Override
publicintgetCount(){
returnlist.size();
}
@Override
publicObjectgetItem(inti){
returnlist.get(i);
}
@Override
publiclonggetItemId(inti){
returni;
}
@Override
publicComponentgetComponent(inti,Componentcomponent,ComponentContainercomponentContainer){
ViewHodlerhodler=null;
Msgmsg=list.get(i);
if(component==null){
component=LayoutScatter.getInstance(ability).parse(ResourceTable.Layout_item,null,false);
hodler=newViewHodler();
hodler.leftLayout=(DirectionalLayout)component.findComponentById(ResourceTable.Id_left_layout);
hodler.rightLayout=(DirectionalLayout)component.findComponentById(ResourceTable.Id_right_Layout);
hodler.leftMsg=(Text)component.findComponentById(ResourceTable.Id_left_msg);
hodler.rightMsg=(Text)component.findComponentById(ResourceTable.Id_right_msg);
component.setTag(hodler);
}else{
hodler=(ViewHodler)component.getTag();
}
System.out.println("type--->"+msg.getType());
if(msg.getType()==Msg.RECEIVED){
System.out.println("左邊消息");
//如果是收到的消息,則顯示左邊消息布局,將右邊消息布局隱藏
hodler.leftLayout.setVisibility(0);
hodler.rightLayout.setVisibility(1);
hodler.leftMsg.setText(msg.getContent());
}elseif(msg.getType()==Msg.SENT){
System.out.println("右邊消息");
//如果是發出去的消息,顯示右邊布局的消息布局,將左邊的消息布局隱藏
hodler.rightLayout.setVisibility(0);
hodler.leftLayout.setVisibility(1);
hodler.rightMsg.setText(msg.getContent());
}
returncomponent;
}
classViewHodler{
DirectionalLayoutleftLayout;
DirectionalLayoutrightLayout;
TextleftMsg;
TextrightMsg;
}
}
我們通過在 getComponent 方法中通過小標 i 來遍歷集合然后拿到里面每一個對應里面的 type 屬性來判斷是顯示左邊布局還是右邊布局。
也就是對應的發送消息和接收消息的 UI,我們通過簡單布局顯示影藏來實現消息的左右兩邊顯示效果,到此整個仿微信聊天的布局 UI 效果就講完了 。
總結
鴻蒙的仿微信聊天 UI 效果實現起來相對比較簡單,其實還有一種辦法那就是 ListContainer 的多布局也是通過 bean 里面的標識來顯示左右不同的布局實現聊天界面的效果。因為篇幅有限這里就不展開講了有興趣的同學可以私下研究。最后希望我的文章能幫助到各位解決問題,以后我還會貢獻更多有用的代碼分享給大家。
項目地址:
https://gitee.com/qiuyu123/hms_im_demo
編輯:jq
聲明:本文內容及配圖由入駐作者撰寫或者入駐合作網站授權轉載。文章觀點僅代表作者本人,不代表電子發燒友網立場。文章及其配圖僅供工程師學習之用,如有內容侵權或者其他違規問題,請聯系本站處理。
舉報投訴
-
JAVA
+關注
關注
19文章
2959瀏覽量
104553 -
JS
+關注
關注
0文章
78瀏覽量
18074 -
ui
+關注
關注
0文章
204瀏覽量
21342 -
鴻蒙
+關注
關注
57文章
2312瀏覽量
42747
原文標題:鴻蒙版微信聊天UI效果實現!
文章出處:【微信號:gh_834c4b3d87fe,微信公眾號:OpenHarmony技術社區】歡迎添加關注!文章轉載請注明出處。
發布評論請先 登錄
相關推薦
Linux微信4.0.0版發布,功能再升級
近日,備受矚目的Linux微信4.0.0版本終于迎來了正式發布。此次版本更新不僅帶來了多項實用功能,還實現了與Windows、macOS公測版本的功能一致和更新同步,為用戶帶來了更加便捷
深耕鴻蒙生態,國科微旗艦芯片獲“鴻蒙4.0”首款認證
7月9日,國科微宣布旗下超高清視頻解碼及商顯芯片通過OpenHarmony4.0版本兼容性測評,獲頒鴻蒙生態產品兼容性證書。其中,國科微GK6323V100C是業界首款通過鴻蒙4.0兼

最新開源代碼證實!“鴻蒙原生版”微信正在積極開發中
半年來,許多國產 APP 都相繼推出“鴻蒙原生版”,但卻始終沒看見國民級應用——微信的身影。
對此,坊間傳言稱華為鴻蒙和微
發表于 05-08 17:08
實錘!騰訊終于擁抱鴻蒙生態,微信鴻蒙原生版本即將上線
大家都知道, 目前已知純血鴻蒙星河版next將于今年6月份開啟Bate版本的測試 ,也就是說原生鴻蒙系統快上線了。 而目前對于鴻蒙生態的發展,大家最關心的恐怕只有騰訊系的微
發表于 04-30 21:14
【JAVA UI】【HarmonyOS】【Demo】 鴻蒙如何進行 xml 解析
【鴻蒙】鴻蒙如何進行數據解析 【問題描述】有時候我們從服務器獲取是 xml 格式數據,我們需要將 xml 轉化成 model 對象,該如何使用呢?下面舉個例子說明一下,將分以下幾步進行 1.準備條件
鴻蒙開發-HarmonyOS UI架構
報錯,說因為有agconnect的依賴,Previewer編譯失敗。
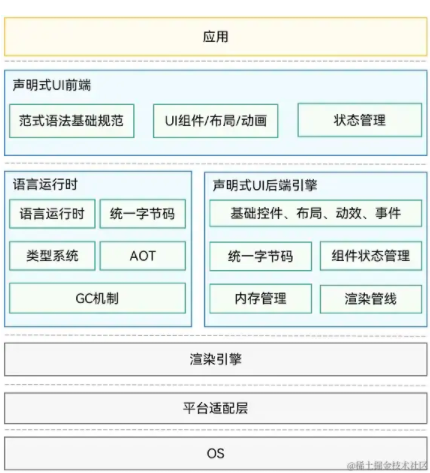
我們可以看到Index和數據獲取的邏輯強耦合在了一起。沒有專注于他自身的UI布局的功能。
數據請求扔給另一個類
發表于 02-16 16:38
HarmonyOS SDK,助力開發者打造煥然一新的鴻蒙原生應用
六大領域的開發能力,為開發者帶來簡潔、高效的開發體驗,開發者只需通過 API 調用即可實現豐富的鴻蒙原生應用功能和獨特體驗。同時,在開發效率上,HarmonyOS SDK 更進一步,通過整合開發高頻
發表于 01-19 10:31


 鴻蒙版微信聊天UI效果實現!



評論