該項目為實時系統(tǒng),僅允許通過授權(quán)/受邀人員,使用人臉識別或NFC卡。
工作步驟:
人臉接近對講機
看著相機
系統(tǒng)將臉與授權(quán)人進行比較
如果找到對應(yīng)的數(shù)據(jù),那么門就會打開,允許一個人可以進入
還有另一種通過方式;
持有通行卡的人將其放置到RFID位置,如果在其數(shù)據(jù)庫中找到此卡的代碼,門就會打開
準備
繼電器連接
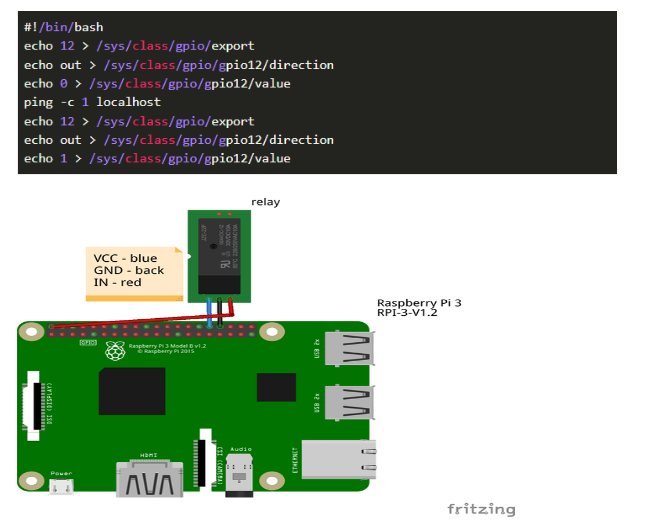
將繼電器連接到RPI3。在我的例子中,我使用GPIO12引腳作為數(shù)據(jù),5v作為電源,你可以選擇任何GND。
您可以使用shell腳本測試中繼,只需創(chuàng)建一個簡單的sh腳本:

粘貼下面的代碼并運行它。
腳本代碼:
相機連接
連接相機模塊并在raspi-config中啟用它:
從終端打開工具:raspi-config

選擇Enablecamera并點擊Enter,然后轉(zhuǎn)到,系統(tǒng)Finish將提示您重新啟動。
要測試系統(tǒng)是否已安裝并正常工作,請嘗試以下命令:

LED連接
將您的LED連接到您想要的任何GPIO+GND。在我的例子中,我將GPIO16用于綠色LED,將GPIO26用于紅色。完成后,測試:
為綠色和紅色LED創(chuàng)建2個簡單的Python腳本,內(nèi)容如下:
綠燈.py

紅色led2.py
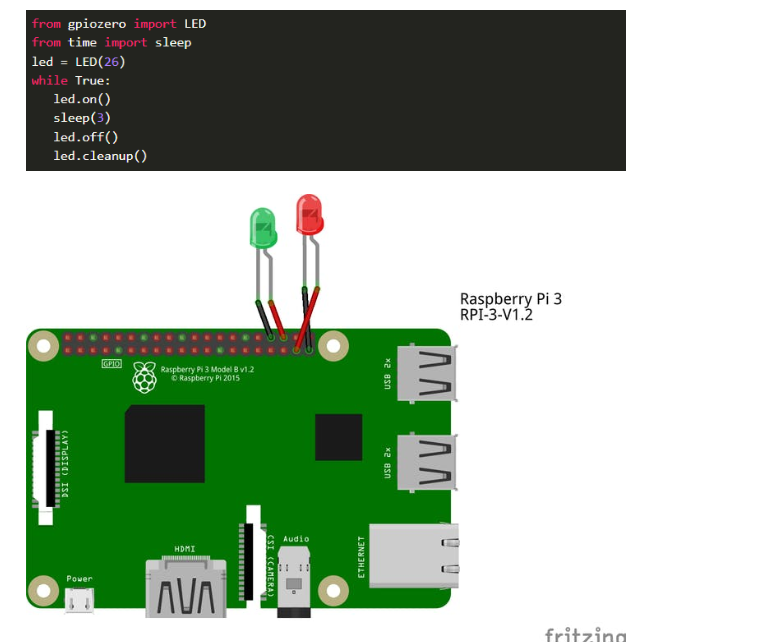
接著就可以進行測試了。如果LED發(fā)光,則一切正常。

人臉識別腳本
pip3使用(或用于Python2)從pypi安裝此模塊:pip2

例如,在 Documents 中創(chuàng)建目錄“pic”和“unknown”,并在其中放置一些您認識的人的面部照片。就我而言,它是(“/home/pi/Documents/pic/”)和(“/home/pi/Documents/unknown/”)。
使用以下代碼創(chuàng)建一個 python 腳本:
import face_recognition
import picamera
import numpy as np
import os
camera = picamera.PiCamera()
camera.resolution = (320, 240)
output = np.empty((240, 320, 3), dtype=np.uint8)
print("Loading known face image(s)")
ep_image = face_recognition.load_image_file("/home/pi/Documents/pic/ep.jpg")
ep_face_encoding = face_recognition.face_encodings(ep_image)[0]
vl_image = face_recognition.load_image_file("/home/pi/Documents/pic/vl.jpg")
vl_face_encoding = face_recognition.face_encodings(vl_image)[0]
face_locations = []
face_encodings = []
while True:
print("Capturing image.")
camera.capture(output, format="rgb")
face_locations = face_recognition.face_locations(output)
print("Found {} faces in image.".format(len(face_locations)))
face_encodings = face_recognition.face_encodings(output, face_locations)
for face_encoding in face_encodings:
match = face_recognition.compare_faces([ep_face_encoding,vl_face_encoding], face_encoding)
name = ""
os.system("python /home/pi/led2.py &")
import time
date_string = time.strftime("%Y-%m-%d-%H:%M:%S")
camera.capture("/home/pi/Documents/unknown/image-" + date_string + ".jpg")
測試

RFID連接
引腳:
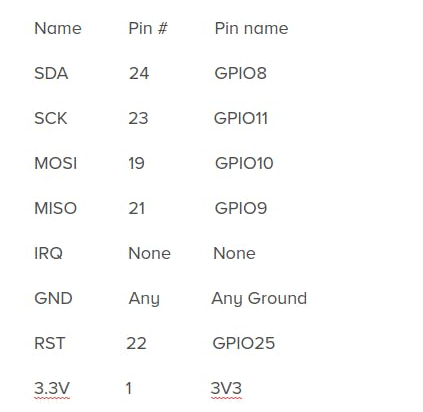
我們需要這個以將我們的RFID模塊連接到RaspberryPi1。
ready:

read.py :當腳本找到授權(quán)卡時,它在遠程 RPI 3 上打開用戶圖片(運行 LED 腳本),然后開門。
import MFRC522
import signal
import os
continue_reading = True
MIFAREReader = MFRC522.MFRC522()
cardA = [46,44,187,26,163]
cardB = [176,203,130,124,133]
cardC = [20,38,121,207,132]
def end_read(signal, frame):
global continue_reading
continue_reading = False
print "Ctrl+C captured, ending read."
MIFAREReader.GPIO_CLEEN()
signal.signal(signal.SIGINT, end_read)
while continue_reading:
(status,TagType) = MIFAREReader.MFRC522_Request(MIFAREReader.PICC_REQIDL)
if status == MIFAREReader.MI_OK:
print "Card detected"
(status,backData) = MIFAREReader.MFRC522_Anticoll()
if status == MIFAREReader.MI_OK:
print "Card read UID: "+str(backData[0])+","+str(backData[1])+","+str(backData[2])+","+str(backData[3])+","+str(backData[4])
if backData == cardA:
print "Evghenii"
os.system("sshpass -p *password* ssh root@10.0.0.60 fbi -T 1 -d /dev/fb1 -noverbose /home/pi/Documents/pic/ep.jpg")
os.system("sshpass -p *password* ssh root@10.0.0.60 /home/pi/Documents/open.sh 2>/dev/null")
# os.system("sshpass -p *password* ssh root@10.0.0.60 sleep 2")
os.system("sshpass -p *password* ssh root@10.0.0.60 killall fbi")
elif backData == cardB:
print "Vlad"
os.system("sshpass -p *password* ssh root@10.0.0.60 fbi -T 1 -d /dev/fb1 -noverbose /home/pi/Documents/pic/vl.jpg")
os.system("sshpass -p *password* ssh root@10.0.0.60 /home/pi/Documents/open.sh 2>/dev/null")
# os.system("sshpass -p *password* ssh root@10.0.0.60 sleep 2")
os.system("sshpass -p *password* ssh root@10.0.0.60 killall fbi")
elif backData == cardC:
print "is Card C"
else:
print "wrong Card"
os.system("sshpass -p *password* ssh root@10.0.0.60 /home/pi/led2.py 2>/dev/null")
- 使用這個例子:

按鈕 + 通訊
#!/usr/bin/python
import RPi.GPIO as GPIO
from subprocess import call
from datetime import datetime
import time
import os
shutdownPin = 29
shutdownMinSeconds = 5
# button debounce time in seconds
debounceSeconds = 0.01
GPIO.setmode(GPIO.BOARD)
GPIO.setup(shutdownPin, GPIO.IN, pull_up_down=GPIO.PUD_UP)
buttonPressedTime = None
def buttonStateChanged(pin):
global buttonPressedTime
if not (GPIO.input(pin)):
# button is down
if buttonPressedTime is None:
buttonPressedTime = datetime.now()
else:
# button is up
if buttonPressedTime is not None:
elapsed = (datetime.now() - buttonPressedTime).total_seconds()
buttonPressedTime = None
if elapsed >= shutdownMinSeconds:
call(['shutdown', '-r', 'now'], shell=True)
elif elapsed >= debounceSeconds:
os.system("bash /home/pi/timed.sh")
# subscribe to button presses
GPIO.add_event_detect(shutdownPin, GPIO.BOTH, callback=buttonStateChanged)
while True:
# sleep to reduce unnecessary CPU usage
time.sleep(5)
功能.sh
#!/bin/bash
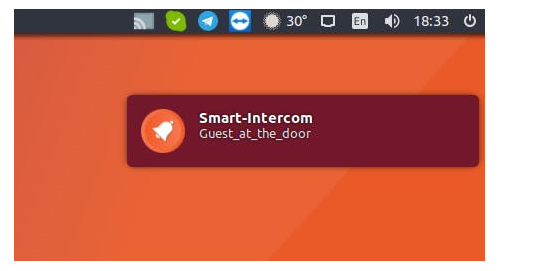
sshpass -p password ssh epogonii@ipadress -p1337 notify-send -i /usr/share/icons/gnome/32x32/actions/ring2.png Smart-Intercom Guest_at_the_door
DISPLAY=:0.0 XAUTHORITY=/home/pi/.Xauthority /usr/bin/feh --hide-pointer -x -q -D 5 -B black -F /home/pi/doorway.png &
sh /home/pi/Documents/open.sh > log.out 2> /dev/null
DISPLAY=:0.0 XAUTHORITY=/home/pi/.Xauthority xdotool key "x"
sh /home/pi/tgphoto.sh FaceRec /var/www/html/last.jpg > log.out 2> /dev/null
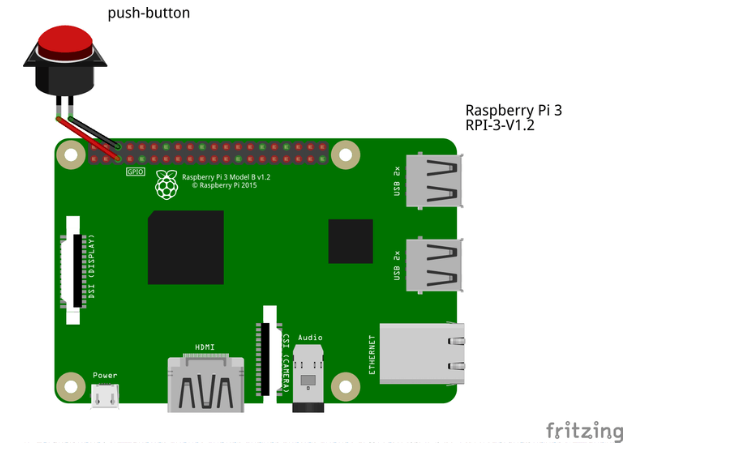
此處為智能對講增加了按鈕。它會將您的最后一張照片發(fā)送給通訊機器人,并向Ubuntu桌面PC發(fā)送通知。
為按鈕添加計時
為了通過按鈕在特定時間禁用入口,我制作了以下bash腳本:
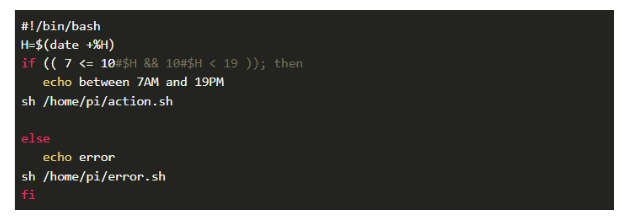
action.sh-早上7點到晚上19??點開門
error.sh-在晚上19??點到早上7點之間停止使用,顯示限制圖像error.sh腳本

-
樹莓派
+關(guān)注
關(guān)注
116文章
1699瀏覽量
105525 -
智能門禁系統(tǒng)
+關(guān)注
關(guān)注
0文章
15瀏覽量
5049 -
樹莓派3B+
+關(guān)注
關(guān)注
0文章
3瀏覽量
757
發(fā)布評論請先 登錄
相關(guān)推薦
樹莓派型號3B+與型號3B比一比
樹莓派3b,為什么是32位的armv7
請問樹莓派3B有沒有wifi模塊的能支持自建AP么?
怎樣利用樹莓派3B去控制28步進電機?
樹莓派3B的硬件配置有哪些
在樹莓派3B上運行64位系統(tǒng)的測評詳細說明
樹莓派3b調(diào)mjpg-streamer庫實現(xiàn)監(jiān)控功能

OpenHarmony Dev-Board-SIG專場:OpenHarmony樹莓派3B移植技術(shù)分享

rt-smart移植分析:從樹莓派3b入手


 如何利用樹莓派3B實現(xiàn)智能門禁對講系統(tǒng)的設(shè)計




評論