生命周期
Flutter 的生命周期其實有兩種: StatefulWidget 和 StatelessWidget。 這兩個是 Flutter 的兩個基本組件,名稱已經很好表明了這兩個組件的功能:有狀態和無狀態。StatelessWidget
StatelessWidget 是無狀態組件,它的生命周期非常簡單,只有一個 build,如下:對于 StatelessWidget 來說只渲染一次,之后它就不再有任何改變。class WidgetA extends StatelessWidget {Widget build(BuildContext context) {return ...;}}
StatefulWidgetStatelessWidget 是有狀態組件,我們討論的生命周期也基本指它的周期,如圖:由于無狀態組件在執行過程中只有一個 build 階段,在執行期間只會執行一個 build 函數,沒有其他生命周期函數,因此在執行速度和效率方面比有狀態組件更好。所以在設計組件時,要考慮業務情況,盡量使用無狀態組件。
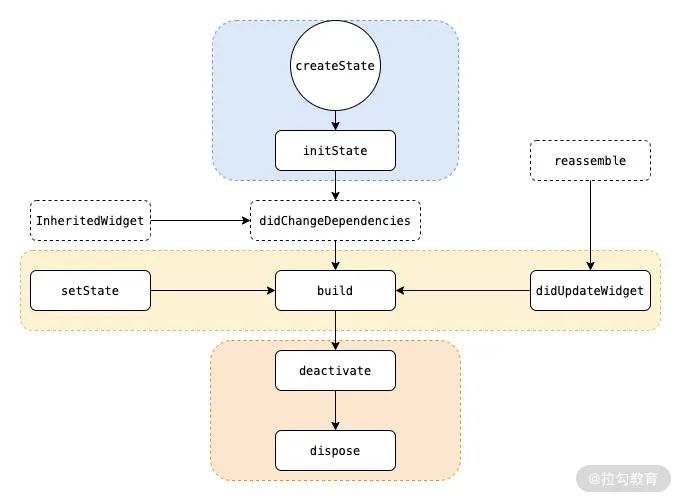
包含以下幾個階段:
- createState該函數為 StatefulWidget 中創建 State 的方法,當 StatefulWidget 被調用時會立即執行 createState。
- initState
- 該函數為 State 初始化調用,因此可以在此期間執行 State 各變量的初始賦值,同時也可以在此期間與服務端交互,獲取服務端數據后調用 setState 來設置 State。
- didChangeDependencies該函數是在該組件依賴的 State 發生變化時,這里說的 State 為全局 State,例如語言或者主題等,類似于前端 Redux 存儲的 State。
- build主要是返回需要渲染的 Widget,由于 build 會被調用多次,因此在該函數中只能做返回 Widget 相關邏輯,避免因為執行多次導致狀態異常,注意這里的性能問題。
- reassemble主要是提供開發階段使用,在 debug 模式下,每次熱重載都會調用該函數,因此在 debug 階段可以在此期間增加一些 debug 代碼,來檢查代碼問題。
- didUpdateWidget該函數主要是在組件重新構建,比如說熱重載,父組件發生 build 的情況下,子組件該方法才會被調用,其次該方法調用之后一定會再調用本組件中的 build 方法。
- deactivate在組件被移除節點后會被調用,如果該組件被移除節點,然后未被插入到其他節點時,則會繼續調用 dispose 永久移除。
- dispose永久移除組件,并釋放組件資源。
State 改變時組件如何刷新
先來看看下方的代碼:
class MyHomePage extends StatefulWidget {_MyHomePageState createState() => _MyHomePageState();}class _MyHomePageState extends State<MyHomePage> {int _counter = 0;void _incrementCounter() {setState(() {_counter++;});}Widget build(BuildContext context) {return Scaffold(body: Center(child: Column(mainAxisAlignment: MainAxisAlignment.center,children: [WidgetA(_counter),WidgetB(),WidgetC(_incrementCounter)],),),);}}class WidgetA extends StatelessWidget {final int counter;WidgetA(this.counter);Widget build(BuildContext context) {return Center(child: Text(counter.toString()),);}}class WidgetB extends StatelessWidget {Widget build(BuildContext context) {return Text('I am a widget that will not be rebuilt.');}}class WidgetC extends StatelessWidget {final void Function() incrementCounter;WidgetC(this.incrementCounter);Widget build(BuildContext context) {return RaisedButton(onPressed: () {incrementCounter();},child: Icon(Icons.add),);}}
我們有三個 Widget,一個負責顯示 count,一個按鈕改變 count,一個則是靜態顯示文字,通過這三個 Widget 來對比比較頁面的刷新邏輯。
上面代碼中,三個 Widget 是在 _MyHomePageState 的 build 中創建的,執行后點擊按鈕可以發現三個 Widget 都刷新了。
在 Flutter Performance 面板上選中 Track Widget Rebuilds 即可看到
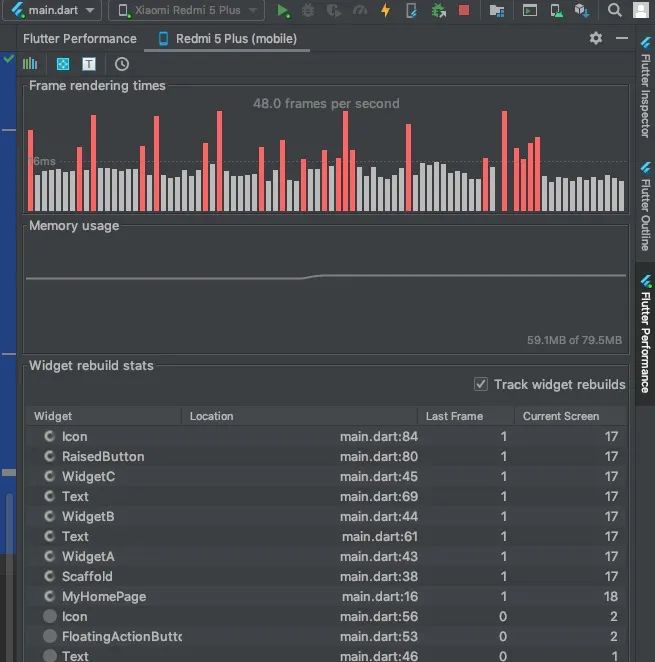
雖然三個 Widget 都是無狀態的 StatelessWidget,但是因為 _MyHomePageState 的 State 改變時會重新執行 build 函數,所以三個 Widget 會重新創建,這也是為什么 WidgetA 雖然是無狀態的 StatelessWidget 卻依然可以動態改變的原因。
所以: 無狀態的 StatelessWidget 并不是不能動態改變,只是在其內部無法通過 State 改變,但是其父 Widget 的 State 改變時可以改變其構造參數使其改變。實際上確實不能改變,因為是一個新的實例。
下面我們將三個組件提前創建,可以在 _MyHomePageState 的構造函數中創建,修改后代碼如下:
class_MyHomePageStateextendsState<MyHomePage>{int _counter = 0;Listchildren; _MyHomePageState(){children = [WidgetA(_counter),WidgetB(),WidgetC(_incrementCounter)];}void _incrementCounter() {setState(() {_counter++;});}Widget build(BuildContext context) {return Scaffold(body: Center(child: Column(mainAxisAlignment: MainAxisAlignment.center,children: children,),),);}}
再次執行,發現點擊沒有任何效果,Flutter Performance 上可以看到沒有 Widget 刷新 (這里指三個 Widget,當然 Scaffold 還是刷新了)。
這是因為組件都提前創建了,所以執行 build 時沒有重新創建三個 Widget,所以 WidgetA 顯示的內容并沒有改變,因為它的 counter 沒有重新傳入。
所以,不需要動態改變的組件可以提前創建,build 時直接使用即可,而需要動態改變的組件實時創建。
這樣就可以實現局部刷新了么?我們繼續改動代碼如下:
我們只將 WidgetB 和 WidgetC 重新創建,而 WidgetA 則在 build 中創建。執行后,點擊按鈕 WidgetA 的內容改變了,查看 Flutter Performance 可以看到只有 WidgetA 刷新了,WidgetB 和 WidgetC 沒有刷新。class_MyHomePageStateextendsState{ int _counter = 0;Widget b = WidgetB();Widget c ;_MyHomePageState(){c = WidgetC(_incrementCounter);}void _incrementCounter() {{_counter++;});}@overrideWidget build(BuildContext context) {return Scaffold(body: Center(child: Column(mainAxisAlignment: MainAxisAlignment.center,children: [WidgetA(_counter),b,c],),),);}}

所以: 通過提前創建靜態組件 build 時直接使用,而 build 時直接創建動態 Widget 這種方式可以實現局部刷新。
注意:只要 setState,_MyHomePageState 就會刷新,所以 WidgetA 就會跟著刷新,即使 count 沒有改變。比如上面代碼中將 setState 中的 _count++ 代碼注釋掉,再點擊按鈕雖然內容沒有改變,但是 WidgetA 依然刷新。
這種情況可以通過 InheritedWidget 來進行優化。
InheritedWidget
InheritedWidget 的作用什么?網上有人說是數據共享,有人說是用于局部刷新。我們看官方的描述:
Baseclassforwidgetsthatefficientlypropagateinformationdownthetree.
可以看到它的作用是 Widget 樹從上到下有效的傳遞消息,所以很多人理解為數據共享,但是注意這個 "有效的",這個才是它的關鍵,而這個有效的其實就是解決上面提到的問題。
那么它怎么使用?
先創建一個繼承至 InheritedWidget 的類:
class MyInheriteWidget extends InheritedWidget{final int count;MyInheriteWidget({ this.count, Widget child}) : super(child: child);static MyInheriteWidget of(BuildContext context){return context.dependOnInheritedWidgetOfExactType(); }bool updateShouldNotify(MyInheriteWidget oldWidget) {return oldWidget.count != count;}}
這里將 count 傳入。重點注意要實現 updateShouldNotify 函數,通過名字可以知道這個函數決定 InheritedWidget 的 Child Widget 是否需要刷新,這里我們判斷如果與之前改變了才刷新。這樣就解決了上面提到的問題。
然后還要實現一個 static 的 of 方法,用于 Child Widget 中獲取這個 InheritedWidget,這樣就可以訪問它的 count 屬性了,這就是消息傳遞,即所謂的數據共享 (因為 InheritedWidget 的 child 可以是一個 layout,里面有多個 widget,這些 widget 都可以使用這個 InheritedWidget 中的數據)。
然后我們改造一下 WidgetA:
classWidgetAextendsStatelessWidget{Widget build(BuildContext context) {final MyInheriteWidget myInheriteWidget = MyInheriteWidget.of(context);return Center(child: Text(myInheriteWidget.count.toString()),);}}
這次不用在構造函數中傳遞 count 了,直接通過 of 獲取 MyInheriteWidget,使用它的 count 即可。
最后修改 _MyHomePageState:
class _MyHomePageState extends State{ int _counter = 0;Widget a = WidgetA();Widget b = WidgetB();Widget c ;_MyHomePageState(){c = WidgetC(_incrementCounter);}void _incrementCounter() {{_counter++;});}@overrideWidget build(BuildContext context) {return Scaffold(body: Center(child: Column(mainAxisAlignment: MainAxisAlignment.center,children: [MyInheriteWidget(count: _counter,child: a,),b,c],),),);}}
注意,這里用 MyInheriteWidget 包裝一下 WidgetA,而且 WidgetA 必須提前創建,如果在 build 中創建則每次 MyInheriteWidget 刷新都會跟著刷新,這樣 updateShouldNotify 函數的效果就無法達到。
執行,點擊按鈕,可以發現只有 WidgetA 刷新了 (當然 MyInheriteWidget 也刷新了)。如果注釋掉 setState 中的 _count++ 代碼,再執行并點擊發現雖然 MyInheriteWidget 刷新了,但是 WidgetA 并不刷新,因為 MyInheriteWidget 的 count 并未改變。
下面我們改動一下代碼,將 WidgetB 和 C 都放入 MyInheriteWidget 會怎樣?
@overrideWidget build(BuildContext context) {return Scaffold(body: Center(child: Column(mainAxisAlignment: MainAxisAlignment.center,children: [MyInheriteWidget(count: _counter,child: Column(children: [a,b,c],),),],),),);}}
MyInheriteWidget 的 child 是一個 Column,將 a、b、c 都放在這下面。執行會發現依然是 WidgetA 刷新,B 和 C 都不刷新。這是因為在 B 和 C 中沒有執行 MyInheriteWidget 的 of 函數,就沒有執行 dependOnInheritedWidgetOfExactType,這樣其實就沒構成依賴,MyInheriteWidget 就不會通知它們。
如果我們修改 WidgetC,在 build 函數中添加一行 MyInheriteWidget.of(context); 那么雖然沒有任何使用,依然會跟著刷新,因為建立了依賴關系就會被通知。
InheritedWidget 會解決多余的刷新問題,比如在一個頁面中有多個屬性,同樣有多個 Widget 來使用這些屬性,但是并不是每個 Widget 都使用所有屬性。如果用最普通的實現方式,那么每次 setState (無論改變哪個屬性) 都需要刷新這些 Widget。但是如果我們用多個 InheritedWidget 來為這些 Widget 分類,使用相同屬性的用同一個 InheritedWidget 來包裝,并實現 updateShouldNotify,這樣當改變其中一個屬性時,只有該屬性相關的 InheritedWidget 才會刷新它的 child,這樣就提高了性能。
InheritedModel
InheritedModel 是繼承至 InheritedWidget 的,擴充了它的功能,所以它的功能更加強大。具體提現在哪里呢?
通過上面我們知道,InheritedWidget 可以通過判斷它的 data 是否變化來決定是否刷新 child,但是實際情況下這個 data 可以是多個變量或者一個復雜的對象,而 child 也不是單一 widget,而是一系列 widget 組合。比如展示一本書,數據可能有書名、序列號、日期等等,但是每個數據可能單獨變化,如果用 InheritedWidget,每種數據就需要一個 InheritedWidget 類,然后將使用該數據的 widget 包裝,這樣才能包裝改變某個數據時其他 widget 不刷新。
但是這樣的問題就是 widget 層級更加復雜混亂,InheritedModel 就可以解決這個問題。InheritedModel 最大的功能就是根據不同數據的變化刷新不同的 widget。下面來看看如何實現。
首先創建一個 InheritedModel:
這里我們傳入兩個 count,除了實現 updateShouldNotify 方法,還需要實現 updateShouldNotifyDependent 方法。這個函數就是關鍵,可以看到我們判斷某個數據是否變化后還判斷了 dependencies 中是否包含一個關鍵詞:class MyInheriteModel extends InheritedModel<String>{final int count1;final int count2;MyInheriteModel({ this.count1, this.count2, Widget child}) : super(child: child);static MyInheriteModel of(BuildContext context, String aspect){return InheritedModel.inheritFrom(context, aspect: aspect);}bool updateShouldNotify(MyInheriteModel oldWidget) {return count1 != oldWidget.count1 || count2 != oldWidget.count2;}bool updateShouldNotifyDependent(MyInheriteModel oldWidget, Setdependencies) {return (count1 != oldWidget.count1 && dependencies.contains("count1")) ||(count2 != oldWidget.count2 && dependencies.contains("count2"));}}
count1!=oldWidget.count1&&dependencies.contains("count1")
這個關鍵詞是什么?從哪里來?后面會提到,這里先有個印象。
然后同樣需要實現一個 static 的 of 函數來獲取這個 InheritedModel,不同的是這里獲取的代碼變化了:
InheritedModel.inheritFrom(context,aspect:aspect);
這里的 aspect 就是后面用到的關鍵字,而 inheritFrom 會將這個關鍵字放入 dependencies,以便 updateShouldNotifyDependent 來使用。后面會詳細解釋這個 aspect 完整作用。
然后我們改造 WidgetA:
class WidgetA extends StatelessWidget {Widget build(BuildContext context) {final MyInheriteModel myInheriteModel = MyInheriteModel.of(context, "count1");return Center(child: Text(myInheriteModel.count1.toString()),);}}
可以看到,這里定義了 aspect。
然后因為有兩個 count,所以我們再新增兩個 Widget 來處理 count2:
class WidgetD extends StatelessWidget {Widget build(BuildContext context) {final MyInheriteModel myInheriteModel = MyInheriteModel.of(context, "count2");return Center(child: Text(myInheriteModel.count2.toString()),);}}class WidgetE extends StatelessWidget {final void Function() incrementCounter;WidgetE(this.incrementCounter);Widget build(BuildContext context) {return RaisedButton(onPressed: () {incrementCounter();},child: Icon(Icons.add),);}}
這里可以看到 WidgetD 的 aspect 與 WidgetA 是不同的。
最后修改 _MyHomePageState:
class _MyHomePageState extends State{ int _counter = 0;int _counter2 = 0;Widget a = Row(children: [WidgetA(),WidgetD()],);Widget b = WidgetB();Widget c ;Widget e ;_MyHomePageState(){c = WidgetC(_incrementCounter);e = WidgetE(_incrementCounter2);}void _incrementCounter() {{_counter++;});}void _incrementCounter2() {{_counter2++;});}@overrideWidget build(BuildContext context) {return Scaffold(body: Center(child: Column(mainAxisAlignment: MainAxisAlignment.center,children: [MyInheriteModel(count1: _counter,count2: _counter2,child: a,),b,c,e],),),);}}
WidgetD 和 E 是處理 count2 的,A 和 C 則是處理 count。而 MyInheriteModel 的 child 不是單一 Widget,而是一個 Row,包含 WidgetD 和 A。
執行代碼,可以發現點擊 WidgetC 的時候,只有 WidgetA 刷新了 (當然 MyInheriteModel 也刷新);而點擊 WidgetD 的時候,只有 WidgetE 刷新了。這樣我們就實現了 MyInheriteModel 中的局部刷新。 其實原理很簡單,aspect 就相當于一個標記,當我們通過 InheritedModel.inheritFrom(context, aspect: aspect); 獲取 MyInheriteModel 時,實際上將本 Widget 依賴到 MyInheriteModel,并且將這個 Widget 標記。這時候如果 data 改變,遍歷它的所有依賴時,會通過每個依賴的 Widget 獲取它對應的標記集 dependencies,然后觸發 updateShouldNotifyDependent 判斷該 Widget 是否刷新。 所以在 InheritedModel (其實是 InheritedElement) 中存在一個 map,記錄了每個依賴的 Widget 對應的 dependencies,所以一個 Widget 可以有多個標記,因為 dependencies 是一個 Set,這樣就可以響應多個數據的變化 (比如多個數據組成一個 String 作為文本顯示)。 上面其實可以用兩個 InheritedWidget 也可以實現,但是布局越復雜,就需要越多的 InheritedWidget,維護起來也費時費力。 所以可以看到 InheritedModel 使用更靈活,功能更強大,更適合復雜的數據和布局使用,并且通過細分細化每一個刷新區域,使得每次刷新都只更新最小區域,極大的提高了性能。InheritedNotifier
InheritedNotifier 同樣繼承至 InheritedWidget,它是一個給 Listenable 的子類的專用工具,它的構造函數中要傳入一個 Listenable (這是一個接口,不再是之前的各種數據 data),比如動畫 (如 AnimationController),然后其依賴的組件則根據 Listenable 進行更新。 首先還是先創建一個 InheritedNotifier:class MyInheriteNotifier extends InheritedNotifier<AnimationController>{MyInheriteNotifier({Key key,AnimationController notifier,Widget child,}) : super(key: key, notifier: notifier, child: child);static double of(BuildContext context){return context.dependOnInheritedWidgetOfExactType().notifier.value; }}
這里提供的 of 函數則直接返回 AnimationController 的 value 即可。
然后創建一個 Widget:
classSpinnerextendsStatelessWidget{Widget build(BuildContext context) {return Transform.rotate(angle: MyInheriteNotifier.of(context) * 2 * pi,child: Text("who!!"),);}}
內容會根據 AnimationController 進行旋轉。
修改 WidgetA:
然后修改 _MyHomePageState:class WidgetA extends StatelessWidget {Widget build(BuildContext context) {return Center(child: Text("WidgetA"),);}}
運行會看到 Text 在不停的旋轉,當然如果有其他 Widget 可以看到并不跟著刷新。class _MyHomePageState extends Statewith SingleTickerProviderStateMixin { AnimationController _controller;@overridevoid initState() {super.initState();_controller = AnimationController(vsync: this,duration: Duration(seconds: 10),)..repeat();}@overrideWidget build(BuildContext context) {return Scaffold(body: Center(child: Column(mainAxisAlignment: MainAxisAlignment.center,children: [WidgetA(),MyInheriteNotifier(notifier: _controller,child: Spinner()),],),),);}}
總之 InheritedNotifier 是一個更細化的工具,聚焦到一個具體場景中,使用起來也更方便。
Notifier
最后再簡單介紹一下 Notifier,考慮一個需求: 頁面 A 是列表頁,而頁面 B 是詳情頁,兩個頁面都有點贊操作和顯示點贊數量,需要在一個頁面點贊后兩個頁面的數據同時刷新。這種情況下就可以使用 Flutter 提供另外一種方式 —— Notifier。
Notifier 其實就是訂閱模式的實現,主要包含 ChangeNotifier 和 ValueNotifier,使用起來也非常簡單。通過 addListener 和 removeListener 進行訂閱和取消訂閱 (參數是無參無返回值的 function),當數據改變時調用 notifyListeners(); 通知即可。
ValueNotifier 是更簡單的 ChangeNotifier,只有一個數據 value,可以直接進行 set 和 get,set 時自動執行 notifyListeners(),所以適合單數據的簡單場景。
當時注意 Notifier 只是共享數據并通知變化,并不實現刷新,所以還要配合其他一并實現。比如上面的 InheritedNotifier (因為 Notifier 都繼承 Listenable 接口,所以兩個可以很簡單的配合使用),或者第三方庫 Provider (web 開發的習慣) 等等。
審核編輯 :李倩
-
函數
+關注
關注
3文章
4306瀏覽量
62431 -
代碼
+關注
關注
30文章
4748瀏覽量
68356 -
State
+關注
關注
0文章
5瀏覽量
7659
原文標題:Flutter 組件的生命周期、State 管理及局部重繪 | 開發者說·DTalk
文章出處:【微信號:Google_Developers,微信公眾號:谷歌開發者】歡迎添加關注!文章轉載請注明出處。
發布評論請先 登錄
相關推薦
隆基綠能刷新光伏晶硅組件效率世界紀錄
什么是存儲器的刷新
Jlink-V9固件刷新工具-J-link固件刷新
HarmonyOS實戰開發-合理選擇條件渲染和顯隱控制
HarmonyOS開發案例:【排行榜頁面】


 State改變時組件如何刷新


評論