為了讓任何項目活躍起來,我們需要使用傳感器。傳感器充當(dāng)所有嵌入式應(yīng)用的眼睛和耳朵,它幫助數(shù)字微控制器了解這個真實模擬世界中實際發(fā)生的事情。在本教程中,我們將學(xué)習(xí)如何將超聲波傳感器HC-SR04與PIC微控制器連接。
HC-SR04是一種超聲波傳感器,可用于測量2厘米至450厘米(理論上)之間的距離。該傳感器已通過安裝到許多涉及障礙物檢測、距離測量、環(huán)境映射等的項目中證明了自己的價值。在本文的最后,您將了解該傳感器的工作原理,以及如何將其與PIC16F877A微控制器連接以測量距離并將其顯示在LCD屏幕上。聽起來很有趣吧!!所以讓我們開始吧...
所需材料:
帶編程設(shè)置的 PIC16F877A 單片機(jī)
液晶16*2顯示屏
超聲波傳感器 (HC-SR04)
連接線
超聲波傳感器如何工作?
在我們進(jìn)一步討論之前,我們應(yīng)該知道超聲波傳感器的工作原理,以便我們可以更好地理解本教程。本項目中使用的超聲波傳感器如下所示。
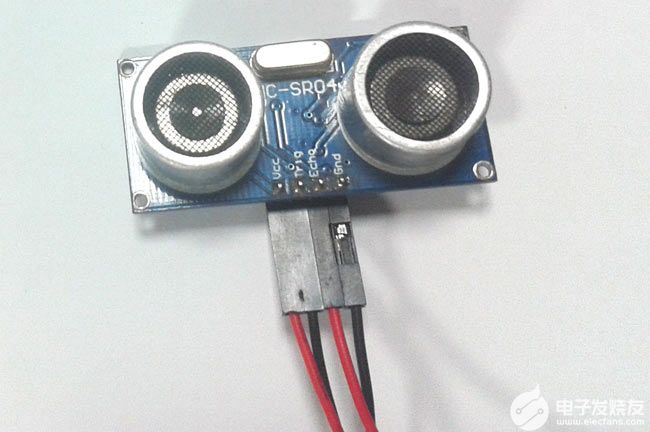
正如你所看到的,它有兩個圓形的眼睛,像投影一樣,四個針從中伸出來。兩個眼睛狀的投影是超聲波(以下簡稱US波)發(fā)射器和接收器。發(fā)射器以 40Hz 的頻率發(fā)射美國波,該波在空氣中傳播并在感應(yīng)到物體時被反射回來。接收機(jī)觀察到返回的波。現(xiàn)在我們知道這個波被反射并回來所需的時間,美國波的速度也是普遍的(3400cm/s)。使用這些信息和下面的高中公式,我們可以計算所覆蓋的距離。
Distance = Speed × Time
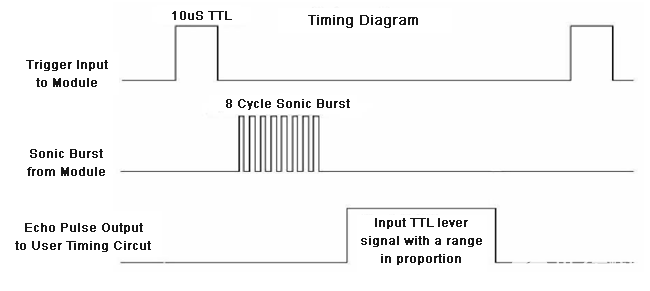
現(xiàn)在我們知道了美國傳感器的工作原理,讓我們?nèi)绾问褂盟膫€引腳將其與任何MCU / CPU接口。這四個引腳分別是Vcc,觸發(fā)器,回聲和接地。該模塊工作在+5V電壓下,因此Vcc和接地引腳用于為模塊供電。另外兩個引腳是我們用來與MCU通信的I / O引腳。觸發(fā)引腳應(yīng)聲明為輸出引腳,并設(shè)置為高電平 10uS,這將以 8 周期聲波的形式將 US 波傳輸?shù)娇諝庵小R坏┯^察到波,回波引腳將在美國的波返回傳感器模塊所花費的確切時間間隔內(nèi)變?yōu)楦唠娖健R虼耍薊cho 引腳將被聲明為輸入,并且將使用計時器來測量引腳的高電平。這可以通過下面的時序圖進(jìn)一步理解。
電路圖:
超聲波傳感器與PIC16F877A接口的完整電路圖如下所示:
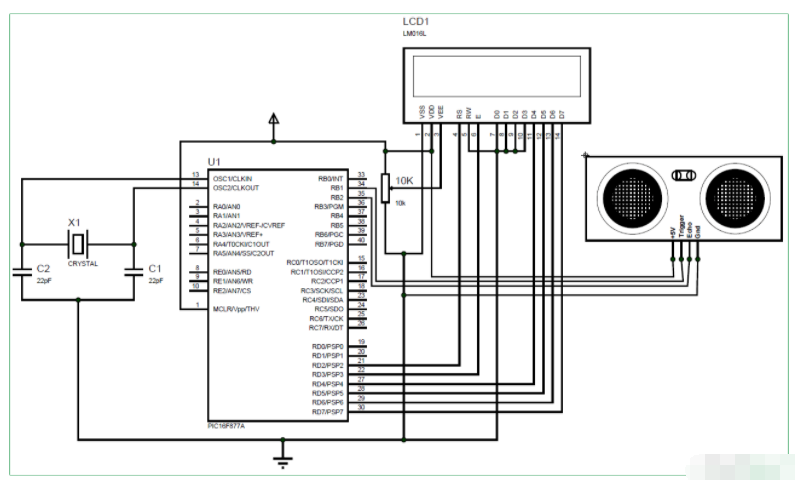
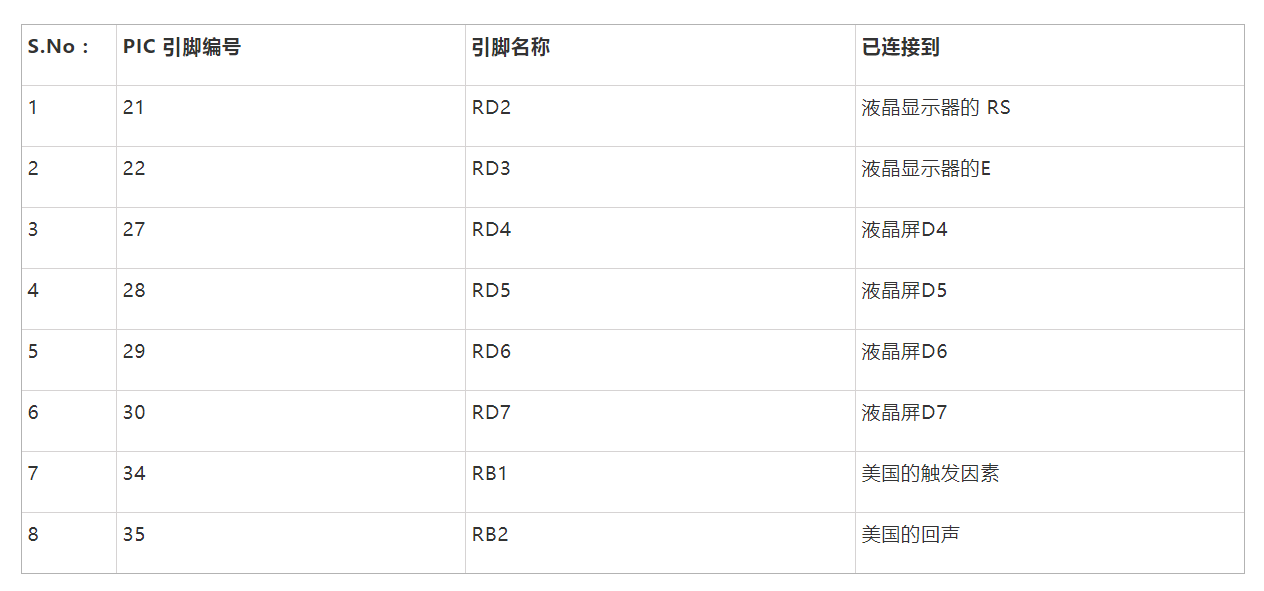
如圖所示,該電路只涉及LCD顯示屏和超聲波傳感器本身。美國傳感器可由+5V供電,因此直接由7805穩(wěn)壓器供電。傳感器有一個輸出引腳(觸發(fā)引腳)連接到引腳 34 (RB1),輸入引腳(回波引腳)連接到引腳 35 (RB2)。完整的引腳連接如下表所示。
對 PIC 微控制器進(jìn)行編程:
本教程的完整程序在本頁末尾給出,下面我將代碼解釋為小意思的完整塊供您理解。
在內(nèi)部,主要功能我們像往常一樣從初始化IO引腳和其他寄存器開始。我們定義LCD和美國傳感器的IO引腳,并通過將其設(shè)置為在1:4預(yù)標(biāo)量下工作并使用內(nèi)部時鐘(Fosc / 4)來啟動定時器1寄存器
TRISD = 0x00; //PORTD declared as output for interfacing LCD
TRISB0 = 1; //Define the RB0 pin as input to use as interrupt pin
TRISB1 = 0; //Trigger pin of US sensor is sent as output pin
TRISB2 = 1; //Echo pin of US sensor is set as input pin
TRISB3 = 0; //RB3 is output pin for LED
T1CON=0x20; //4 pres-scalar and internal clock
定時器1是PIC16F877A中使用的16位定時器,T1CON寄存器控制定時器模塊的參數(shù),結(jié)果將存儲在TMR1H和TMR1L中,因為它是16位結(jié)果,前8個將存儲在TMR1H中,接下來的8個存儲在TMR1L中。此定時器可以分別使用 TMR1ON=0 和 TMR1ON=1 打開或關(guān)閉。
現(xiàn)在,計時器可以使用了,但是我們必須將美波從傳感器中發(fā)送出去,為此,我們必須將觸發(fā)引腳保持高電平10uS,這是通過以下代碼完成的。
Trigger = 1;
__delay_us(10);
Trigger = 0;
如上面的時序圖所示,Echo引腳將保持低電平,直到波返回,然后在波返回所需的確切時間內(nèi)變?yōu)楦唠娖讲⒈3指唠娖健_@個時間必須由定時器1模塊測量,可以通過以下行完成
while (Echo==0);
TMR1ON = 1;
while (Echo==1);
TMR1ON = 0;
測量時間后,結(jié)果值將保存在寄存器TMR1H和TMR1L中,這些寄存器必須進(jìn)行杵狀收集以獲得16位值。這是通過使用下面的行完成的
time_taken = (TMR1L | (TMR1H<<8));
此time_taken將以字節(jié)形式顯示,要獲得實際時間值,我們必須使用以下公式。
Time = (16-bit register value) * (1/Internal Clock) * (Pre-scale)
Internal Clock = Fosc/4
Where in our case,
Fosc = 20000000Mhz and Pre-scale = 4
Hence the value of Internal Clock will be 5000000Mhz and the value of time will be
Time = (16-bit register value) * (1/5000000) * (4)
= (16-bit register value) * (4/5000000)
= (16-bit register value) * 0.0000008 seconds (OR)
Time = (16-bit register value) * 0.8 micro seconds
在我們的程序中,16位寄存器的值存儲在變量time_taken中,因此下面的行用于以微秒為單位計算time_taken
time_taken = time_taken * 0.8;
接下來,我們必須找到如何計算距離。眾所周知,距離=速度*時間。但是這里的結(jié)果應(yīng)該除以 2,因為波同時覆蓋了發(fā)射距離和接收距離。我們波(聲音)的速度是34000厘米/秒。
Distance = (Speed*Time)/2
= (34000 * (16-bit register value) * 0.0000008) /2
Distance = (0.0272 * 16-bit register value)/2
所以距離可以用厘米計算,如下所示:
distance= (0.0272*time_taken)/2;
計算距離和時間的值后,我們只需在LCD屏幕上顯示它們即可。
使用PIC和超聲波傳感器測量距離:
建立連接并上傳代碼后,實驗設(shè)置應(yīng)如下圖所示。
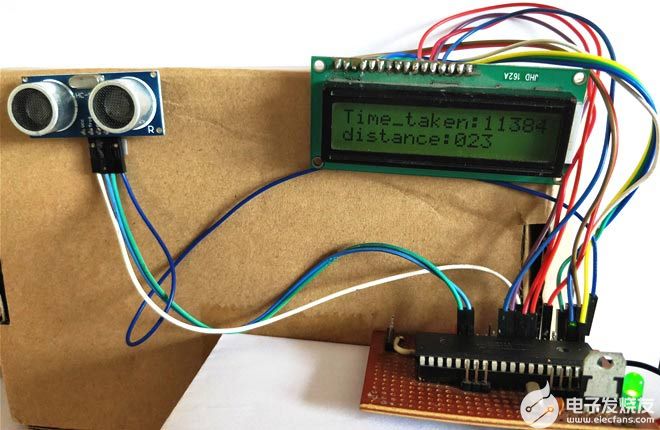
現(xiàn)在在傳感器之前放置一個對象,它應(yīng)該顯示對象與傳感器的距離。您還可以注意到波傳輸和返回所花費的時間以微秒為單位。
/*
Interfacing Ultrasonic sensor with PIC16F877A
* Code by: B.Aswinth Raj
* Dated: 19-07-2017
* More details at: www.CircuitDigest.com
*/
#define _XTAL_FREQ 20000000
#define RS RD2
#define EN RD3
#define D4 RD4
#define D5 RD5
#define D6 RD6
#define D7 RD7
#define Trigger RB1 //34 is Trigger
#define Echo RB2//35 is Echo
#include
#pragma config FOSC = HS // Oscillator Selection bits (HS oscillator)
#pragma config WDTE = OFF // Watchdog Timer Enable bit (WDT disabled)
#pragma config PWRTE = ON // Power-up Timer Enable bit (PWRT enabled)
#pragma config BOREN = ON // Brown-out Reset Enable bit (BOR enabled)
#pragma config LVP = OFF // Low-Voltage (Single-Supply) In-Circuit Serial Programming Enable bit (RB3 is digital I/O, HV on MCLR must be used for programming)
#pragma config CPD = OFF // Data EEPROM Memory Code Protection bit (Data EEPROM code protection off)
#pragma config WRT = OFF // Flash Program Memory Write Enable bits (Write protection off; all program memory may be written to by EECON control)
#pragma config CP = OFF // Flash Program Memory Code Protection bit (Code protection off)
//LCD Functions Developed by Circuit Digest.
void Lcd_SetBit(char data_bit) //Based on the Hex value Set the Bits of the Data Lines
{
if(data_bit& 1)
D4 = 1;
else
D4 = 0;
if(data_bit& 2)
D5 = 1;
else
D5 = 0;
if(data_bit& 4)
D6 = 1;
else
D6 = 0;
if(data_bit& 8)
D7 = 1;
else
D7 = 0;
}
void Lcd_Cmd(char a)
{
RS = 0;
Lcd_SetBit(a); //Incoming Hex value
EN = 1;
__delay_ms(4);
EN = 0;
}
void Lcd_Clear()
{
Lcd_Cmd(0); //Clear the LCD
Lcd_Cmd(1); //Move the curser to first position
}
void Lcd_Set_Cursor(char a, char b)
{
char temp,z,y;
if(a== 1)
{
temp = 0x80 + b - 1; //80H is used to move the curser
z = temp>>4; //Lower 8-bits
y = temp & 0x0F; //Upper 8-bits
Lcd_Cmd(z); //Set Row
Lcd_Cmd(y); //Set Column
}
else if(a== 2)
{
temp = 0xC0 + b - 1;
z = temp>>4; //Lower 8-bits
y = temp & 0x0F; //Upper 8-bits
Lcd_Cmd(z); //Set Row
Lcd_Cmd(y); //Set Column
}
}
void Lcd_Start()
{
Lcd_SetBit(0x00);
for(int i=1065244; i<=0; i--) ?NOP(); ??
Lcd_Cmd(0x03);
__delay_ms(5);
Lcd_Cmd(0x03);
__delay_ms(11);
Lcd_Cmd(0x03);
Lcd_Cmd(0x02); //02H is used for Return home -> Clears the RAM and initializes the LCD
Lcd_Cmd(0x02); //02H is used for Return home -> Clears the RAM and initializes the LCD
Lcd_Cmd(0x08); //Select Row 1
Lcd_Cmd(0x00); //Clear Row 1 Display
Lcd_Cmd(0x0C); //Select Row 2
Lcd_Cmd(0x00); //Clear Row 2 Display
Lcd_Cmd(0x06);
}
void Lcd_Print_Char(char data) //Send 8-bits through 4-bit mode
{
char Lower_Nibble,Upper_Nibble;
Lower_Nibble = data&0x0F;
Upper_Nibble = data&0xF0;
RS = 1; // => RS = 1
Lcd_SetBit(Upper_Nibble>>4); //Send upper half by shifting by 4
EN = 1;
for(int i=2130483; i<=0; i--) ?NOP(); ?
EN = 0;
Lcd_SetBit(Lower_Nibble); //Send Lower half
EN = 1;
for(int i=2130483; i<=0; i--) ?NOP();?
EN = 0;
}
void Lcd_Print_String(char *a)
{
int i;
for(i=0;a[i]!='';i++)
Lcd_Print_Char(a[i]); //Split the string using pointers and call the Char function
}
/*****End of LCD Functions*****/
int time_taken;
int distance;
char t1,t2,t3,t4,t5;
char d1,d2,d3;
int main()
{
TRISD = 0x00; //PORTD declared as output for interfacing LCD
TRISB0 = 1; //DEfine the RB0 pin as input to use as interrupt pin
TRISB1 = 0; //Trigger pin of US sensor is sent as output pin
TRISB2 = 1; //Echo pin of US sensor is set as input pin
TRISB3 = 0; //RB3 is output pin for LED
T1CON=0x20;
Lcd_Start();
Lcd_Set_Cursor(1,1);
Lcd_Print_String("Ultrasonic sensor");
Lcd_Set_Cursor(2,1);
Lcd_Print_String("with PIC16F877A");
__delay_ms(2000);
Lcd_Clear();
while(1)
{
TMR1H =0; TMR1L =0; //clear the timer bits
Trigger = 1;
__delay_us(10);
Trigger = 0;
while (Echo==0);
TMR1ON = 1;
while (Echo==1);
TMR1ON = 0;
time_taken = (TMR1L | (TMR1H<<8)); ?
distance= (0.0272*time_taken)/2;
time_taken = time_taken * 0.8;
t1 = (time_taken/1000)%10;
t2 = (time_taken/1000)%10;
t3 = (time_taken/100)%10;
t4 = (time_taken/10)%10;
t5 = (time_taken/1)%10;
d1 = (distance/100)%10;
d2 = (distance/10)%10;
d3 = (distance/1)%10;
Lcd_Set_Cursor(1,1);
Lcd_Print_String("Time_taken:");
Lcd_Print_Char(t1+'0');
Lcd_Print_Char(t2+'0');
Lcd_Print_Char(t3+'0');
Lcd_Print_Char(t4+'0');
Lcd_Print_Char(t5+'0');
Lcd_Set_Cursor(2,1);
Lcd_Print_String("distance:");
Lcd_Print_Char(d1+'0');
Lcd_Print_Char(d2+'0');
Lcd_Print_Char(d3+'0');
}
return 0;
}
-
PIC微控制器
+關(guān)注
關(guān)注
0文章
17瀏覽量
7390 -
超聲波傳感器
+關(guān)注
關(guān)注
18文章
577瀏覽量
35900 -
HC-SR04
+關(guān)注
關(guān)注
9文章
82瀏覽量
42577
發(fā)布評論請先 登錄
相關(guān)推薦
超聲波傳感器HC-SR04測距實例軟件
如何對基于STM32F103VET6的超聲波傳感器HC-SR04進(jìn)行測距呢
HC-SR04超聲波測距模塊原理
HC-SR04超聲波具有哪些參數(shù)應(yīng)用
如何將HC-SR04超聲波與樹莓派連接
HC-SR04超聲波傳感器模塊的示例代碼資料合集
帶有HC-SR04的超聲波傳感器陣列
Zephyr RTOS和HC-SR04超聲波傳感器開源

超聲波傳感器HC-SR04(Arduino項目)


 如何將超聲波傳感器HC-SR04與PIC微控制器連接


評論