[本文適用于Autojs Pro 9.x版本]
對于需要寫UI的腳本來說,使用安卓的xml方式去寫一個好看的UI出來,在autojs中就顯得過于艱難,雖說autojs在很早之前就支持了安卓原生的方式寫UI,但對于只會js的我來說還是太難了...
但不知道從哪個版本起,autojs中封裝了一個jsBridge... ,這樣就能直接在webview的html文件中直接和autojs進行交互, 相比xml,autojs的用戶中我感覺更多的用戶是偏向于web前端的, 習慣了 html+css+js的開發, 那么今天就使用一個簡單的示例來描述一下怎么在AutojsPro版本中使用html來寫UI界面
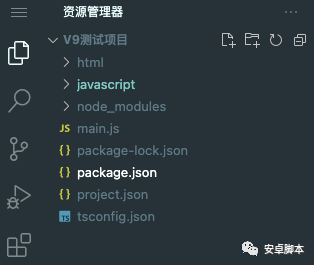
首先我們先創建一個v9的項目,簡單規劃一下目錄結構:

main.js文件內容如下:
"ui";
$ui.layout(

        "web" w="*" h="*">class="hljs-name"webview>
    class="hljs-name"vertical>
);


const jsBridge = $ui.web.jsBridge;
const webRoot = $files.join( $files.cwd(), "html" );
//在webview中加載本地的html文件
$ui.web.loadUrl( `file://${webRoot}/index.html` );


//在autojs的控制臺輸出webview控制臺的消息
$ui.web.events.on( "console_message", ( event, msg ) => {
    console.log( msg.message() );
} );
//在webview中調用autojs的方法
jsBridge.handle( 'show-log', () => {
    $app.startActivity( "console" );
} )
.handle( "main", () => {
    main();
} )
.handle( "setStatusBarColor", ( event, color ) => {
    //根據web頁面的背景色來設置安卓任務欄背景色
    $ui.statusBarColor( color );
} )


function main() {
    //這里寫自動化腳本邏輯
    console.show();
    console.log( "這里執行了autojs的自動化腳本邏輯" );
    sleep( 1000 );
    console.info( "這里執行了autojs的自動化腳本邏輯" );
    sleep( 1000 );
    console.error( "這里執行了autojs的自動化腳本邏輯" );
    sleep( 1000 );
    console.log( "腳本執行結束" );
    sleep( 2000 );
    console.hide();
}
使用jsBridge的handle來定義一個方法供html調用
在html目錄下的index.html中即可使用html代碼來構建一個漂亮的UI界面了,和在瀏覽器中開發并沒有什么不同,但是如果你需要使用jQuery的話,需要注意符號需要變更一下,因為在autojs中也是用了符號(并且不能修改),所以只能修改一下jq的$符號
使用jQuery的示例:
html>
<html lang="en">
<head>
    <meta charset="UTF-8">
    <meta http-equiv="X-UA-Compatible" content="IE=edge">
    <meta name="viewport" content="width=device-width, initial-scale=1.0">
    <title>Document<span class="hljs-name"title>
    <script src="autojs://sdk/v1.js"><span class="hljs-name"script>
    <script src="../javascript/jquery-3.6.1.min.js"><span class="hljs-name"script>
    <style type="text/css">
         body {background:#FFFFFF;color:#333;margin:0 auto;padding:0;}
         div{margin:0 auto;padding:0}
        .main button {width: 120px;height: 50px;}
        .bottom {width:100%;}
        .bottom .start {position:fixed;bottom:0px;width:100%;height:56px;display:block;}
<span class="hljs-name"style>
<span class="hljs-name"head>
<body>
    <div class="main">
        <button type="button">打開日志界面<span class="hljs-name"button>
    <span class="hljs-name"div>
    <div class="bottom">
        <button type="button" class="start">運行腳本<span class="hljs-name"button>
    <span class="hljs-name"div>


    <script>
        //注意這里需要轉換一下jq的$符號
        var $jq = jQuery.noConflict();
        $jq( function() {
            //點擊頁面的button會打開autojs的控制臺顯示日志
            $jq( ".main button" ).click( function() {
                $autojs.invoke( "show-log" );
            } )
            //根據頁面body的背景色來設置安卓任務欄的顏色
            // var bgColor = $jq( "body" ).css( "background-color" )
            // console.log( bgColor );
            $autojs.invoke( "setStatusBarColor", "#FFFFFF" );
            //點擊開始按鈕,運行腳本邏輯
            $jq( ".start" ).click( function() {
                $autojs.invoke( "main" );
            } );
        } );
如此在html中, 你即可與autojs進行交互了, 上面的例子中,使用jq,當然你也可以使用vue來開發頁面, 亦或者使用vue-cli框架開發,具體的請參考app中的示例部分,這里不做演示, 趕緊copy代碼自己試一試吧.
必須注意的是: 在html中的head部分必須引入一個內部的js文件
<script src="autojs://sdk/v1.js">class="hljs-name"script>
-
XML
+關注
關注
0文章
188瀏覽量
33047 -
ui
+關注
關注
0文章
204瀏覽量
21342 -
安卓
+關注
關注
5文章
2122瀏覽量
57038
發布評論請先 登錄
相關推薦


 如何在Autojs中優雅的使用webView


評論