前言
不知道大家的項目是否都有對接口API進行自動化測試,反正像我們這種小公司是沒有的。由于最近一直被吐槽項目質量糟糕,只能研發自己看看有什么接口測試方案。那么在本文中,我將探索如何使用 Rest Assured 自動化 API 測試,Rest Assured 是一個基于 Java 的流行的用于測試 RESTful API 的庫。
什么是Rest Assured?
Rest Assured 是一個基于 Java 的開源庫,主要用于測試RESTful API。它為編寫測試用例提供了一種簡單直觀的 DSL(領域特定語言),這使得開發人員可以輕松編寫和維護自動化測試。Rest Assured支持 GET、POST、PUT、DELETE、PATCH 等各種 HTTP 方法,并且可以輕松與流行的測試框架(如 TestNG 和 JUnit)集成。
github地址 :https://github.com/rest-assured/rest-assured
安裝Rest Assured
在maven中引入相關依賴
<dependency>
  <groupId>io.rest-assured<span class="hljs-name"groupId>
  <artifactId>rest-assured<span class="hljs-name"artifactId>
  <version>5.3.0<span class="hljs-name"version>
  <scope>test<span class="hljs-name"scope>
<span class="hljs-name"dependency>
Rest Assured結構
Rest Assured代碼的整體結構分為 3 個主要部分:
- Given
Given是 API 測試的先決條件,可以在其中設置測試所需的一切,例如URL、請求頭或參數,或任何需要滿足的先決條件。- 可以在“
Given”中設置的內容:URL、請求頭、請求參數和請求正文。
- When
When是實際向服務器發送 HTTP 請求并獲得響應的時間。可以在When中定義請求方法,如GET、POST、PUT等。
- Then
Then是您檢查從服務器獲得的響應并確保它符合您的預期的地方。在這您可以檢查狀態代碼、響應正文、標頭或任何其他對您的測試很重要的內容。
Show Me Code
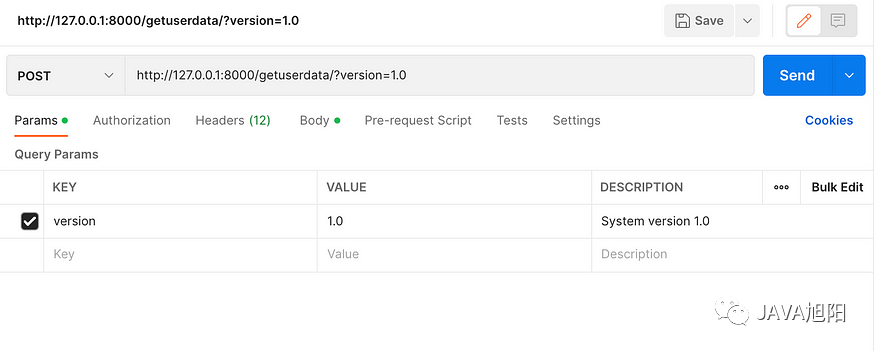
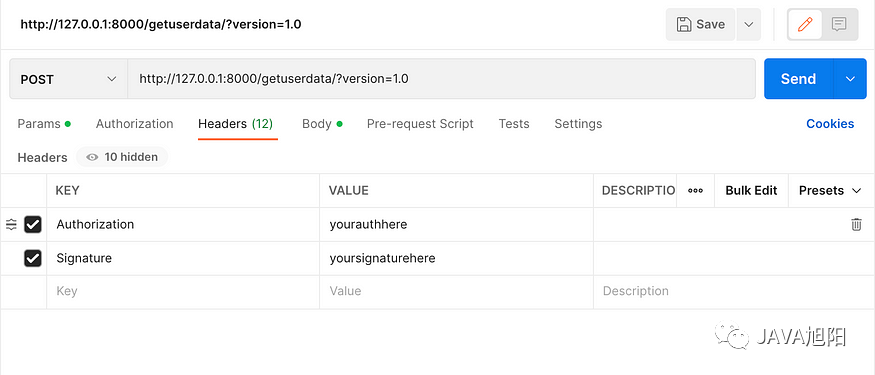
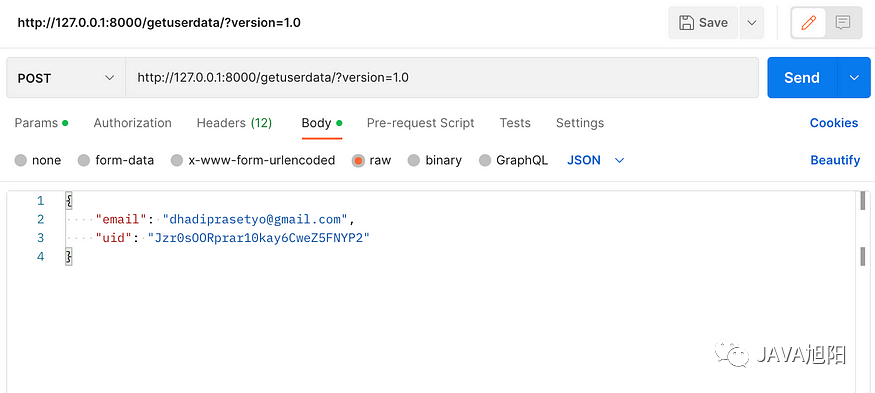
我們現在通過一個例子來演示下如何使用Rest Assured,首先我們看下postman的例子:
- 請求參數
- 請求頭
- 請求體
現在我們用Rest Assured這個框架來測試下上面postman的這個接口。
import io.restassured.builder.RequestSpecBuilder;
import io.restassured.response.Response;
import io.restassured.specification.RequestSpecification;
import org.testng.annotations.Test;

import static io.restassured.RestAssured.given;
import static org.hamcrest.Matchers.equalTo;
import static org.hamcrest.Matchers.lessThan;

public class TestRestAssured {
    @Test
    public void testMyApi() {
        String jsonBody = "{"email":"dhadiprasetyo@gmail.com","uid":"Jzr0sOORprar10kay6CweZ5FNYP2"}";

        Response response = given().baseUri("http://127.0.0.1:8000")
            .queryParam("version", "1.0")
            .header("Authorization", "yourauthhere")
            .header("Signature", "yoursignaturehere")
            .body(jsonBody)
            .when().post("/getuserdata/")
            .then().assertThat().statusCode(200)
            .header("Content-Type", "application/json")
            .header("Cache-Control", "max-age=3600")
            .body("name", equalTo("Darmawan Hadiprasetyo"))
            .time(lessThan(5000L))
            .extract().response();
    }
}
- 首先我們在
given()中設置前置條件
given().baseUri("http://127.0.0.1:8000")
    .queryParam("version", "1.0")
    .header("Authorization", "yourauthhere")
    .header("Signature", "yoursignaturehere")
    .body(jsonBody)
- 然后在
when()中定義請求方法,本例中為POST
.when().post("/getuserdata/")
- 然后我們從我們的請求中斷言狀態代碼、標頭、正文和響應時間
.then().assertThat().statusCode(200)
    .header("Content-Type", "application/json")
    .header("Cache-Control", "max-age=3600")
    .body("name", equalTo("Darmawan Hadiprasetyo"))
    .time(lessThan(5000L))
    .extract().response();
如何提取響應體?
例如,這將是我們對之前請求的回應:
{
  "name": "alvin",
  "role": "SDET"
}
以下是我們如何提取這些數據:
JsonPath responseBody = response.jsonPath();
String fullName = responseBody.getString("name");
String role = responseBody.getString("role");
統一抽象封裝
在大多數情況下,需要測試許多 API,但前提條件相同,例如 BaseURL、參數和請求頭等,為了消除代碼中的冗余,我們可以統一抽象封裝一個 RequestSpecification 類作為我們的規范構建器,并在我們的其他測試中重用它,如下所示:
import io.restassured.builder.RequestSpecBuilder;
import io.restassured.path.json.JsonPath;
import io.restassured.response.Response;
import io.restassured.specification.RequestSpecification;
import org.testng.annotations.Test;

import static io.restassured.RestAssured.given;
import static org.hamcrest.Matchers.equalTo;
import static org.hamcrest.Matchers.lessThan;

public class TestRestAssured {
    public static RequestSpecification requestSpecification() {
        return new RequestSpecBuilder().setBaseUri("http://127.0.0.1:8000")
            .addQueryParam("version", "1.0")
            .addHeader("Authorization", "yourauthhere")
            .addHeader("Signature", "yoursignaturehere")
            .build();
    }

    @Test
    public void testMyApi() {
        String jsonBody = "{"email":"dhadiprasetyo@gmail.com","uid":"Jzr0sOORprar10kay6CweZ5FNYP2"}";

        Response response = given().spec(requestSpecification())
            .body(jsonBody)
            .when().post("/getuserdata/")
            .then().assertThat().statusCode(200)
            .header("Content-Type", "application/json")
            .header("Cache-Control", "max-age=3600")
            .body("name", equalTo("Darmawan Hadiprasetyo"))
            .time(lessThan(5000L))
            .extract().response();

        JsonPath responseBody = response.jsonPath();
        String fullName = responseBody.getString("name");
        String linkedIn = responseBody.getString("linkedin");
        String role = responseBody.getString("role");
    }
}
現在,您可以在具有相同前提條件的任何其他需要的測試中重用 requestSpecification() 方法。查看與我們之前代碼的區別:
// previous
Response response = given().baseUri("http://127.0.0.1:8000")
    .queryParam("version", "1.0")
    .header("Authorization", "yourauthhere")
    .header("Signature", "yoursignaturehere")
    .body(jsonBody)
    .when().post("/getuserdata/")

    // then
    Response response = given().spec(requestSpecification())
        .body(jsonBody)
        .when().post("/getuserdata/")
通過使用 given().spec(),我們的代碼現在變得簡單多了。
-
JAVA
+關注
關注
19文章
2958瀏覽量
104544 -
API
+關注
關注
2文章
1485瀏覽量
61814 -
自動化
+關注
關注
29文章
5512瀏覽量
79100
發布評論請先 登錄
相關推薦


 如何自動化測試你的接口?




評論