0.前言
? 100ASK_V853-PRO開發(fā)板的V853芯片集成Arm Cortex-A7和RISC-V E907 雙CPU,玄鐵E907 是一款完全可綜合的高端 MCU 處理器。它兼容 RV32IMAC 指令集,提供可觀的整型性能提升以及高能效的浮點(diǎn)性能。E907 的主要特性包括:單雙精度浮點(diǎn)單元,以及快速中斷響應(yīng)。下圖為RISC-V E907 核的介紹。
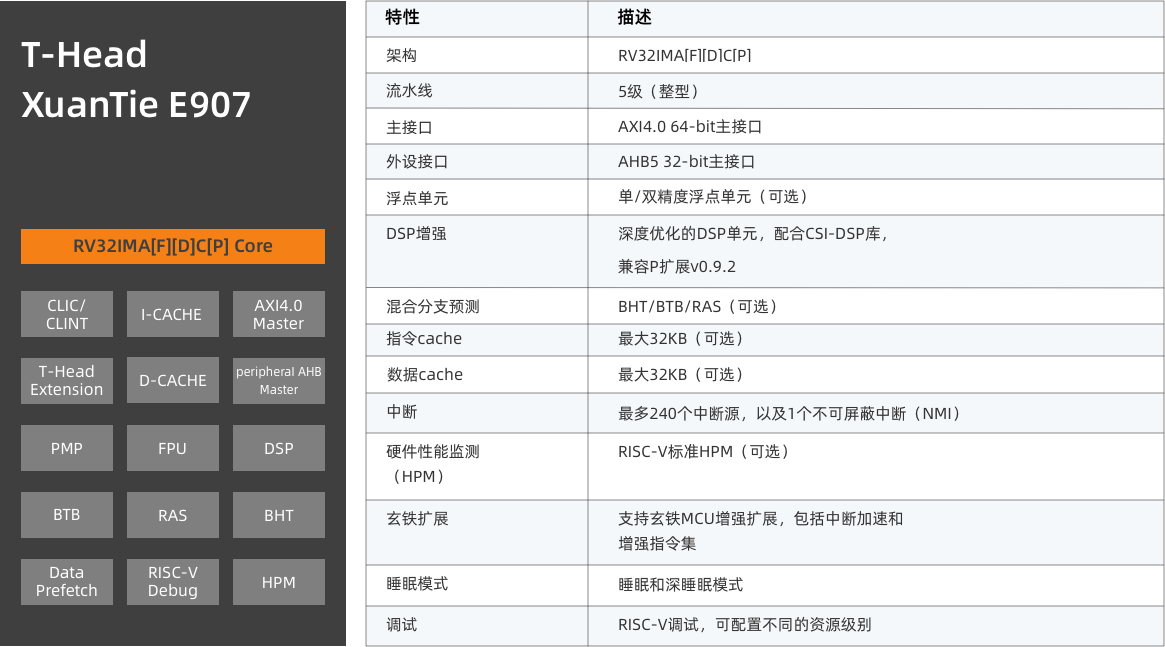
本章主要講述如何E907小核進(jìn)行開發(fā)并與Arm A7大核進(jìn)行通信。
平頭哥E907官網(wǎng):https://www.t-head.cn/product/E907?spm=a2ouz.12986968.0.0.7bfc2cbdcYnL2b
E907芯片資源下載中心:https://occ.t-head.cn/community/download?id=3916180248689188864
全志E907開發(fā)指南:https://tina.100ask.net/SdkModule/Linux_E907_DevelopmentGuide-01/
Yuzuki大佬的V85x E907 小核開發(fā)與使用:https://www.gloomyghost.com/live/20230215.aspx
1.配置E907環(huán)境
E907_RTOS BSP包:https://github.com/YuzukiHD/Yuzukilizard/tree/master/Software/BSP/e907_rtos
感謝Yuzuki大佬的V851S的倉庫提供的E907_RTOS源碼,這里我將E907開發(fā)包放在百度網(wǎng)盤中,方便大家獲取。鏈接為:
鏈接:https://pan.baidu.com/s/1TX742vfEde9bMLd9IrwwqA?pwd=sp6a
提取碼:sp6a
您可以在百度網(wǎng)盤的V853資料光盤中09_E907開發(fā)包中獲取到e907_rtos.tar.gz
1.1 編譯E907源碼
將下載完成的E907開發(fā)包放在任意目錄下,假設(shè)放在/home/book/workspaces目錄下
book@100ask:~/workspaces$ ls
e907_rtos.tar.gz
解壓e907源碼壓縮包,輸入tar -xzvf e907_rtos.tar.gz ,例如:
book@100ask:~/workspaces$ tar -xzvf e907_rtos.tar.gz
e907_rtos/
e907_rtos/README.md
e907_rtos/rtos/
e907_rtos/rtos/LICENSE
e907_rtos/rtos/toolchain/
e907_rtos/rtos/toolchain/riscv64-elf-x86_64-20201104/
e907_rtos/rtos/toolchain/riscv64-elf-x86_64-20201104/libexec/
e907_rtos/rtos/toolchain/riscv64-elf-x86_64-20201104/libexec/gcc/
...
解壓完成后,進(jìn)入e907源碼目錄
book@100ask:~/workspaces$ cd e907_rtos/
book@100ask:~/workspaces/e907_rtos$ ls
README.md  rtos  rtos-hal
進(jìn)入rtos/source/目錄下
book@100ask:~/workspaces/e907_rtos$ cd rtos/source/
book@100ask:~/workspaces/e907_rtos/rtos/source$ ls
disfunc.sh  ekernel   envsetup.sh  Kbuild   Kconfig.melis     Makefile      modules.order  platform.txt  scripts
drivers     emodules  include      Kconfig  Kconfig.platform  melis-env.sh  out            projects      tools
配置編譯環(huán)境變量,輸入source melis-env.sh
book@100ask:~/workspaces/e907_rtos/rtos/source$ source melis-env.sh
輸入lunch選中對應(yīng)的開發(fā)板
book@100ask:~/workspaces/e907_rtos/rtos/source$ lunch

You're building on Linux 100ask 5.4.0-148-generic #165~18.04.1-Ubuntu SMP Thu Apr 20 01:14:06 UTC 2023 x86_64 x86_64 x86_64 GNU/Linux

Lunch menu... pick a combo:
The supported board:
    1. v851-e907-lizard
    2. v851-e907-lizard-tinymaix
    3. v853-e907-100ask
    4. v853-e907-100ask-tinymaix
What is your choice?
此時(shí)輸入3,并按回車。選擇v853-e907-100ask方案,選擇完成后會如下所示
book@100ask:~/workspaces/e907_rtos/rtos/source$ lunch

You're building on Linux 100ask 5.4.0-148-generic #165~18.04.1-Ubuntu SMP Thu Apr 20 01:14:06 UTC 2023 x86_64 x86_64 x86_64 GNU/Linux

Lunch menu... pick a combo:
The supported board:
    1. v851-e907-lizard
    2. v851-e907-lizard-tinymaix
    3. v853-e907-100ask
    4. v853-e907-100ask-tinymaix
What is your choice? 3
You have select v853-e907-100ask
============================================
Project Based On Platform sun20iw3p1 v853-e907-100ask
============================================
此時(shí)即可進(jìn)行編譯,輸入make
book@100ask:~/workspaces/e907_rtos/rtos/source$ make
scripts/kconfig/conf  --silentoldconfig Kconfig
  CHK     include/config/kernel.release
  CHK     include/generated/uapi/melis/version.h
fatal: not a git repository (or any parent up to mount point /)
Stopping at filesystem boundary (GIT_DISCOVERY_ACROSS_FILESYSTEM not set).
fatal: not a git repository (or any parent up to mount point /)
Stopping at filesystem boundary (GIT_DISCOVERY_ACROSS_FILESYSTEM not set).
fatal: not a git repository (or any parent up to mount point /)
Stopping at filesystem boundary (GIT_DISCOVERY_ACROSS_FILESYSTEM not set).
fatal: not a git repository (or any parent up to mount point /)
Stopping at filesystem boundary (GIT_DISCOVERY_ACROSS_FILESYSTEM not set).
  UPD     include/generated/uapi/melis/version.h
  CHK     include/generated/utsrelease.h
  CC      sysconfig.fex
  CC      ekernel/arch/common/common.o
  LD      ekernel/arch/common/built-in.o
  AS      ekernel/arch/riscv/sunxi/blobdata.o
  LD      ekernel/arch/riscv/sunxi/built-in.o
  LD      ekernel/arch/riscv/built-in.o
  LD      ekernel/arch/built-in.o
  LD      ekernel/built-in.o
  LD [M]  ekernel/melis30.o
/home/book/workspaces/e907_rtos/rtos/source/../toolchain/riscv64-elf-x86_64-20201104//bin/riscv64-unknown-elf-ld: ekernel/melis30.o: section .dram_seg.stack lma 0x43c3a2b8 adjusted to 0x43c3a34c
  OBJCOPY ekernel/melis30.bin
  RENAME  ekernel/melis30.o ----> ekernel/melis30.elf
/home/book/workspaces/e907_rtos/rtos/source/../toolchain/riscv64-elf-x86_64-20201104//bin/riscv64-unknown-elf-strip: ekernel/stW7SdkR: section .dram_seg.stack lma 0x43c3a2b8 adjusted to 0x43c3a34c

   text    data     bss     dec     hex filename
 221280   17132   25488  263900   406dc ekernel/melis30.elf

  pack    melis

#### make completed successfully (11 seconds) ####
編譯完成后會在當(dāng)前目錄的ekernel/下生成一個(gè)melis30.elf文件,該文件即可用于啟動小核。
1.2 E907配置項(xiàng)
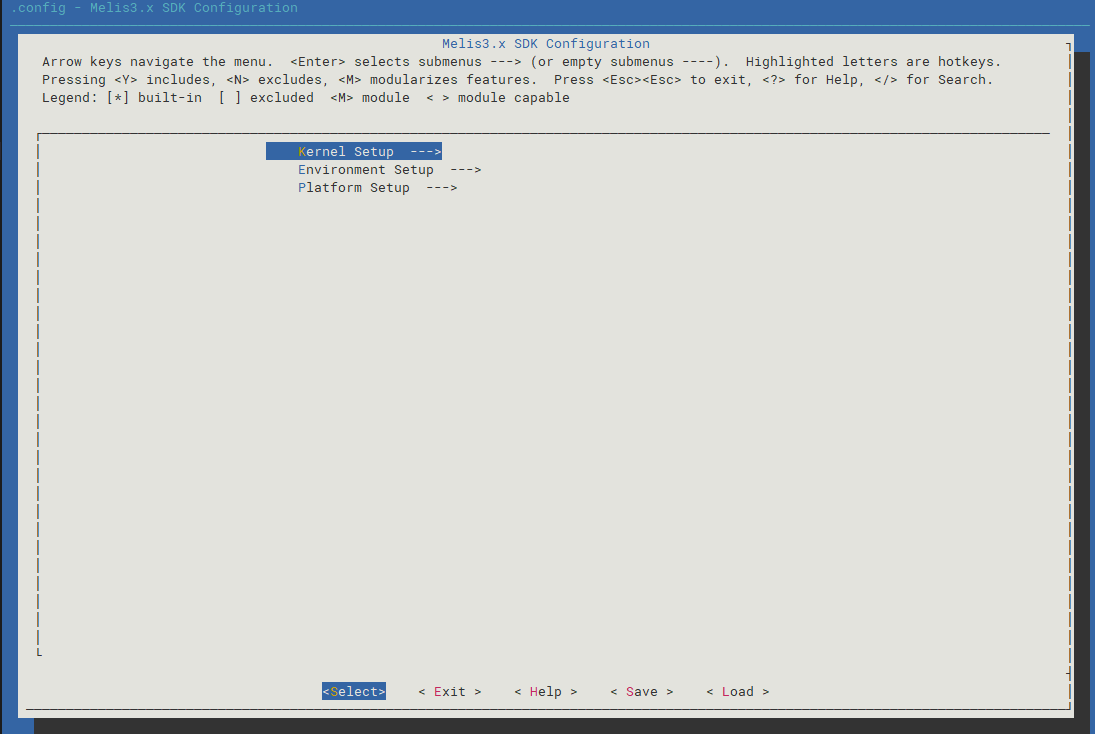
? E907開發(fā)包的配置與Tina SDK的配置類似,在e907_rtos/rtos/source目錄下,執(zhí)行make menuconfig
例如:
book@100ask:~/workspaces/e907_rtos/rtos/source$ make menuconfig
執(zhí)行完成后會進(jìn)入如下界面:
2.加載E907小核
2.1 Tina配置
2.1.1 設(shè)備樹配置
? 在Tina根目錄下,進(jìn)入設(shè)備樹目錄
book@100ask:~/workspaces/tina-v853-open$ cd device/config/chips/v853/configs/100ask/
編輯設(shè)備樹
book@100ask:~/workspaces/tina-v853-open/device/config/chips/v853/configs/100ask$ vi board.dts
在設(shè)備樹文件中找到E907相關(guān)的設(shè)備樹節(jié)點(diǎn),設(shè)備樹默認(rèn)設(shè)置為:
reserved-memory {
                e907_dram: riscv_memserve {
                        reg = <0x0 0x48000000 0x0 0x00400000>;
                        no-map;
                };

                vdev0buffer: vdev0buffer@47000000 {
                        /* 256k reserved for shared mem pool */
                        compatible = "shared-dma-pool";
                        reg = <0x0 0x47000000 0x0 0x40000>;
                        no-map;
                };

                vdev0vring0: vdev0vring0@47040000 {
                        reg = <0x0 0x47040000 0x0 0x20000>;
                        no-map;
                };

                vdev0vring1: vdev0vring1@47060000 {
                        reg = <0x0 0x47060000 0x0 0x20000>;
                        no-map;
                };
        };

        e907_rproc: e907_rproc@0 {
                compatible = "allwinner,sun8iw21p1-e907-rproc";
                clock-frequency = <600000000>;
                memory-region = <&e907_dram>, <&vdev0buffer>,
                                                <&vdev0vring0>, <&vdev0vring1>;

                mboxes = <&msgbox 0>;
                mbox-names = "mbox-chan";
                iommus = <&mmu_aw 5 1>;

                memory-mappings =
                /* DA            len         PA */
                        /* DDR for e907  */
                        < 0x48000000 0x00400000 0x48000000 >;
                core-name = "sun8iw21p1-e907";
                firmware-name = "melis-elf";
                status = "okay";
        };

        rpbuf_controller0: rpbuf_controller@0 {
                compatible = "allwinner,rpbuf-controller";
                remoteproc = <&e907_rproc>;
                ctrl_id = <0>;  /* index of /dev/rpbuf_ctrl */
                iommus = <&mmu_aw 5 1>;
                status = "okay";
        };

        rpbuf_sample: rpbuf_sample@0 {
                compatible = "allwinner,rpbuf-sample";
                rpbuf = <&rpbuf_controller0>;
                status = "okay";
        };
由于我們需要使用uart3打印E907小核的打印信息,為防止內(nèi)核搶占uart3,所以需要禁用uart3節(jié)點(diǎn)
&uart3 {
        pinctrl-names = "default", "sleep";
        pinctrl-0 = <&uart3_pins_active>;
        pinctrl-1 = <&uart3_pins_sleep>;
        uart-supply = ;
        status = "okay";
};
修改設(shè)備樹復(fù)用
uart3_pins_active: uart3@0 {
                allwinner,pins = "PH0", "PH1";
                allwinner,function = "uart3";
                allwinner,muxsel = <5>;
                allwinner,drive = <1>;
                allwinner,pull = <1>;
        };

        uart3_pins_sleep: uart3@1 {
                allwinner,pins = "PH0", "PH1";
                allwinner,function = "gpio_in";
                allwinner,muxsel = <0>;
        };
2.1.2 內(nèi)核配置
在Tina根目錄下,執(zhí)行make kernel_menuconfig,例如:
book@100ask:~/workspaces/tina-v853-open$ make kernel_menuconfig
1.使能硬件支持
進(jìn)入內(nèi)核配置界面后,進(jìn)入Device Drivers 目錄,選中Mailbox Hardware Support,如下圖所示
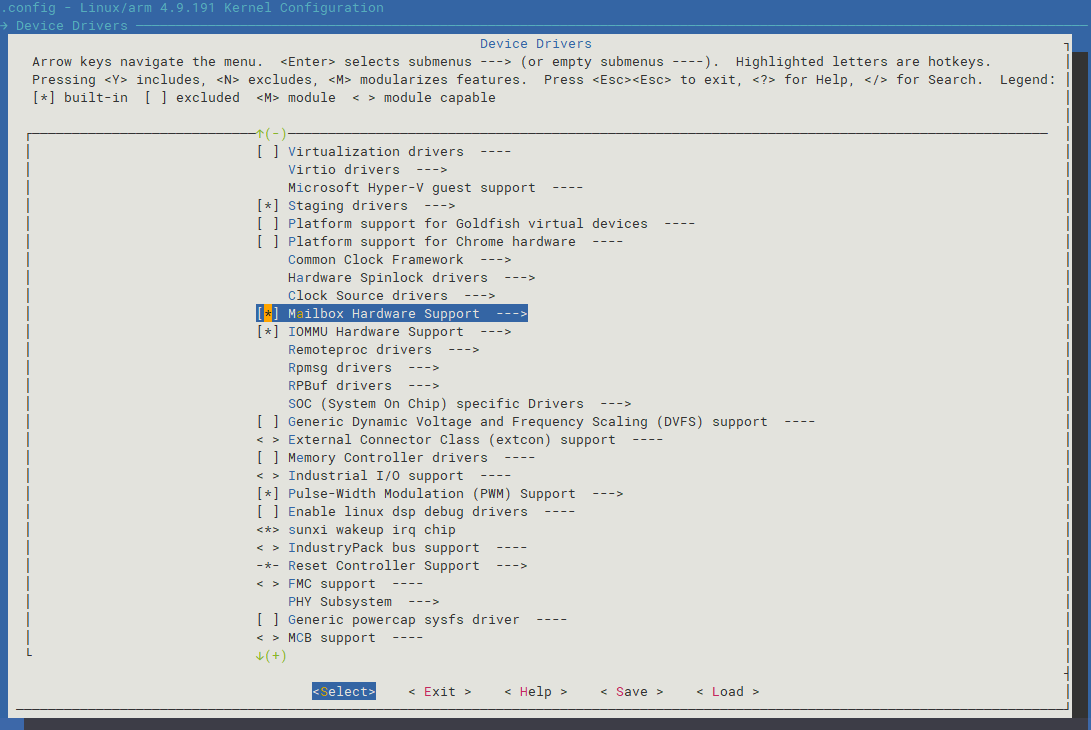
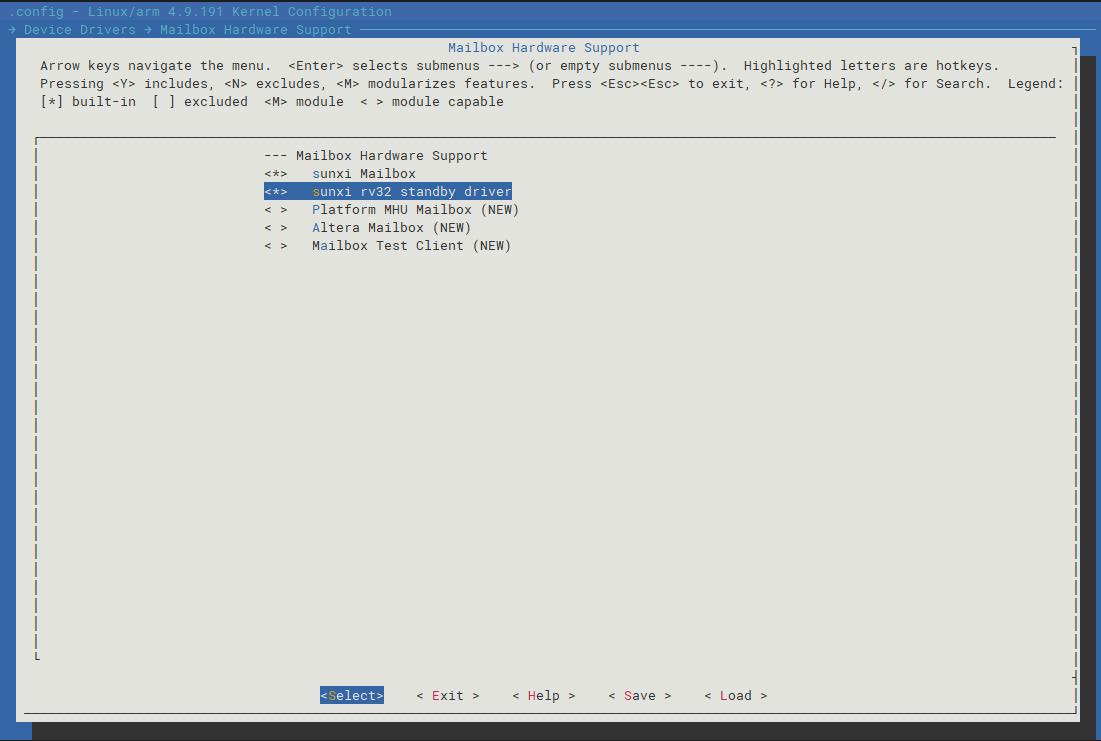
選中后進(jìn)入Mailbox Hardware Support目錄中,選中sunxi Mailbox和sunxi rv32 standby driver,選中完成后如下圖所示:
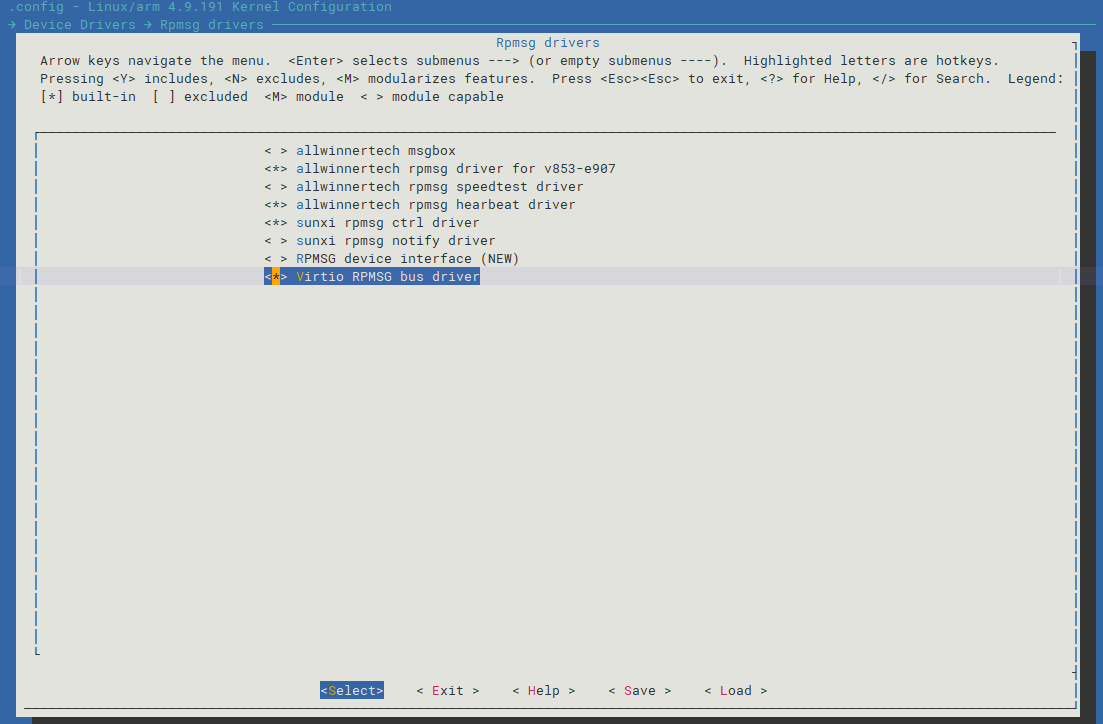
2.使能RPMsg驅(qū)動
進(jìn)入如下目錄中
→ Device Drivers
	→ Rpmsg drivers
選中如下配置
<*> allwinnertech rpmsg driver for v853-e907
<*> allwinnertech rpmsg hearbeat driver
<*> sunxi rpmsg ctrl driver
<*> Virtio RPMSG bus driver
選中完成后如下圖所示:
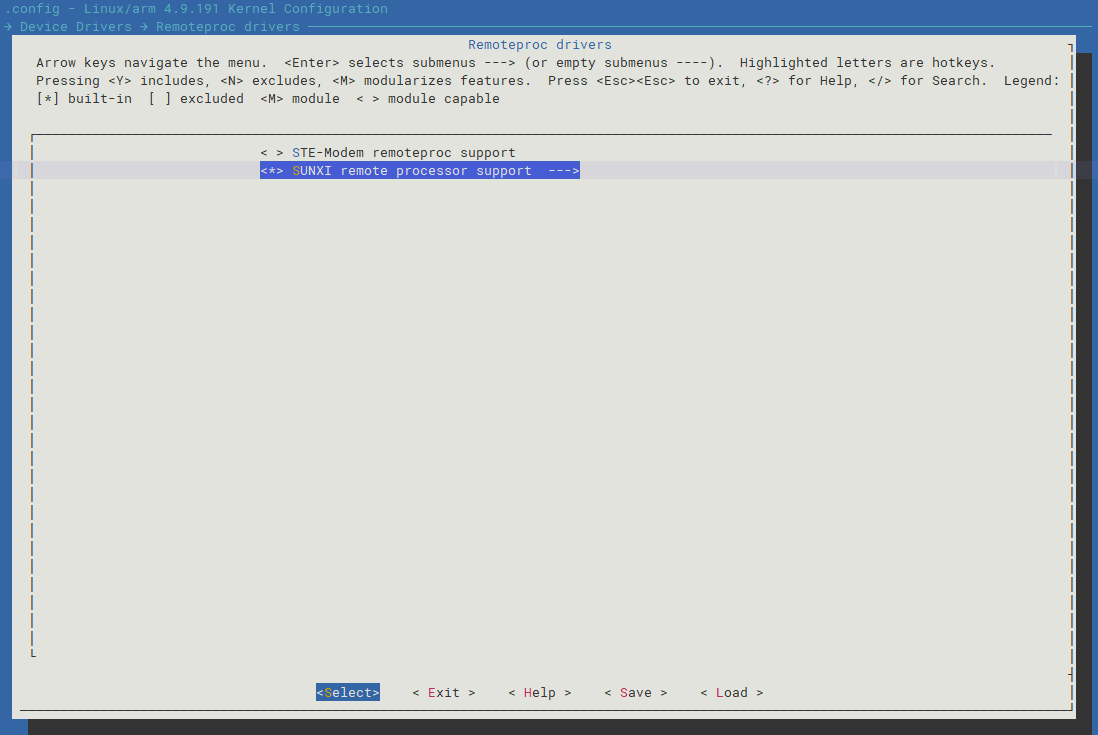
3.使能共享內(nèi)存驅(qū)動
? 進(jìn)入如下目錄中
→ Device Drivers
	→ Remoteproc drivers
選中如下配置
<*> SUNXI remote processor support --->
如下圖所示:
修改完成后,保存內(nèi)核配置并退出。
2.1.3 編譯新鏡像
在Tina根目錄下,輸入make編譯剛剛選中的內(nèi)核驅(qū)動,編譯完成后,輸入pack,打包生成新鏡像。例如:
book@100ask:~/workspaces/tina-v853-open$ make
...
book@100ask:~/workspaces/tina-v853-open$ pack
...
生成新鏡像后,將生成的v853_linux_100ask_uart0.img文件拷貝到Windows主機(jī)端。
2.2 E907配置
2.2.1 修改E907鏈接腳本
? 進(jìn)入目錄e907_rtos/rtos/source/projects/v853-e907-100ask中,找到kernel.lds文件,該文件保存有E907小核的鏈接信息。
book@100ask:~/workspaces/e907_rtos/rtos/source/projects/v853-e907-100ask$ ls
configs  data  epos.img  kernel.lds  src  version
修改kernel.lds,找到MEMORY節(jié)點(diǎn),修改起始地址為0x48000000,長度為0x00400000。此參數(shù)需要和Tina設(shè)備樹中的E907內(nèi)存參數(shù)一致,所以可修改MEMORY節(jié)點(diǎn)參數(shù)為:
MEMORY
{
   /*DRAM_KERNEL: 4M */
   DRAM_SEG_KRN (rwx) : ORIGIN = 0x48000000, LENGTH = 0x00400000
}
兩者對比圖如下:

這里使用的0x48000000是假設(shè)V853擁有128M的內(nèi)存,可設(shè)置十六進(jìn)制為為0x48000000;長度為4M,十六進(jìn)制為0x00400000
2.2.2 修改E907配置
進(jìn)入e907_rtos/rtos/source/projects/v853-e907-100ask/configs目錄下,修改defconfig文件,例如:
book@100ask:~/workspaces/e907_rtos/rtos/source/projects/v853-e907-100ask$ cd configs/
book@100ask:~/workspaces/e907_rtos/rtos/source/projects/v853-e907-100ask/configs$ ls
defconfig  sys_config.fex
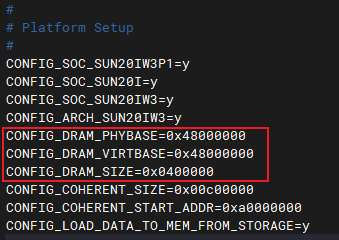
修改下面三個(gè)參數(shù)為:
CONFIG_DRAM_PHYBASE=0x48000000
CONFIG_DRAM_VIRTBASE=0x48000000
CONFIG_DRAM_SIZE=0x0400000
如下圖所示:
2.2.3 使用uart3輸出信息
1.修改引腳復(fù)用
配置引腳復(fù)用文件,進(jìn)入e907_rtos/rtos/source/projects/v853-e907-100ask/configs目錄下
修改sys_config.fex文件,通過查詢數(shù)據(jù)手冊,查看引腳復(fù)用功能,我們使用PH0和PH1作為uart3功能
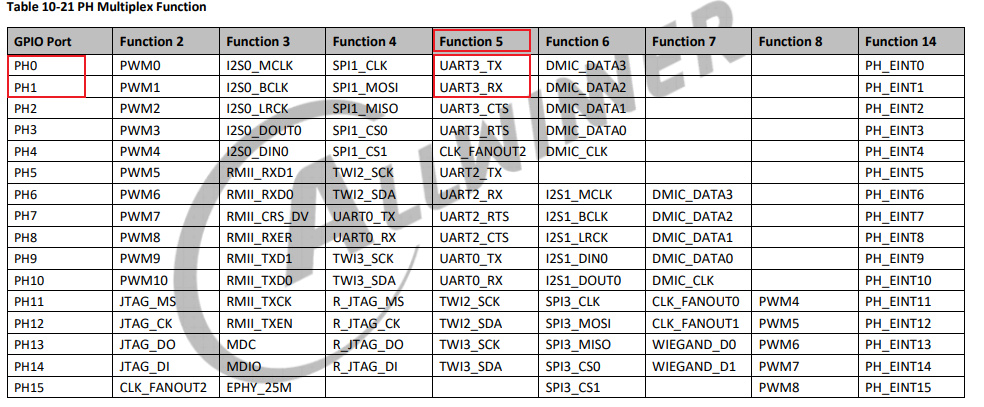
修改uart3節(jié)點(diǎn)為:
[uart3]
uart_tx         = port:PH00<5><1>
uart_rx         = port:PH01<5><1>
2.修改配置
在e907_rtos/rtos/source目錄下輸入make menuconfig,進(jìn)入E907配置界面
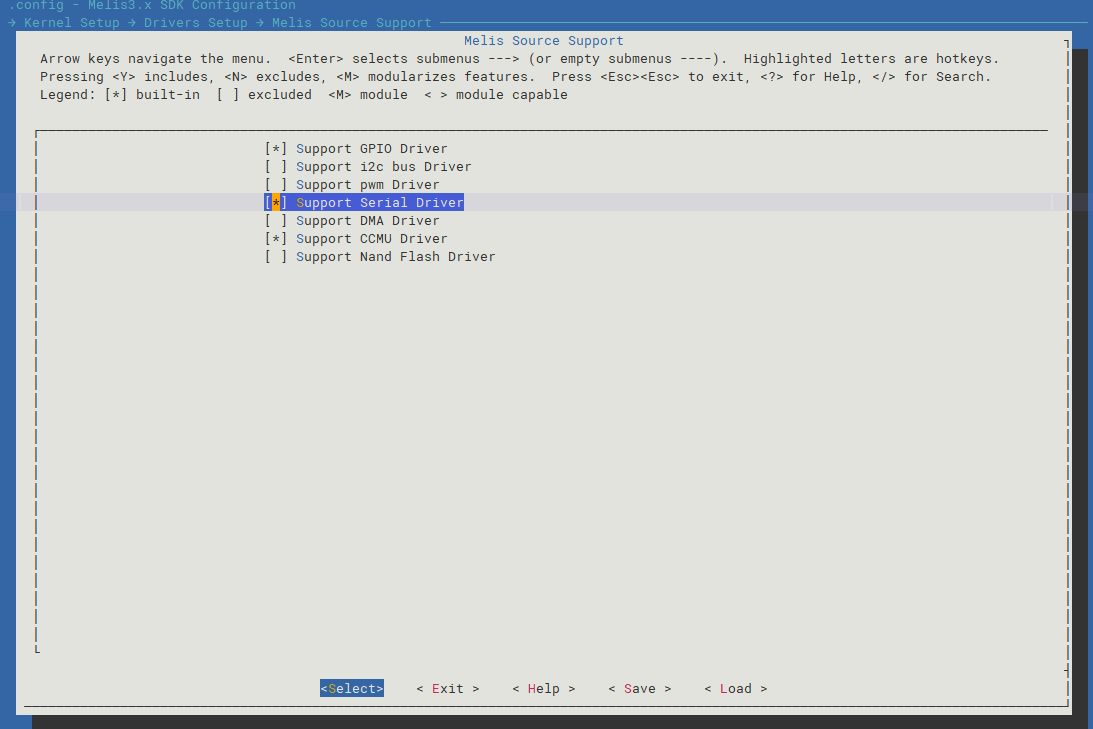
進(jìn)入如下目錄,選中[*] Support Serial Driver
 → Kernel Setup
 	→ Drivers Setup
 		→ Melis Source Support
 			[*] Support Serial Driver
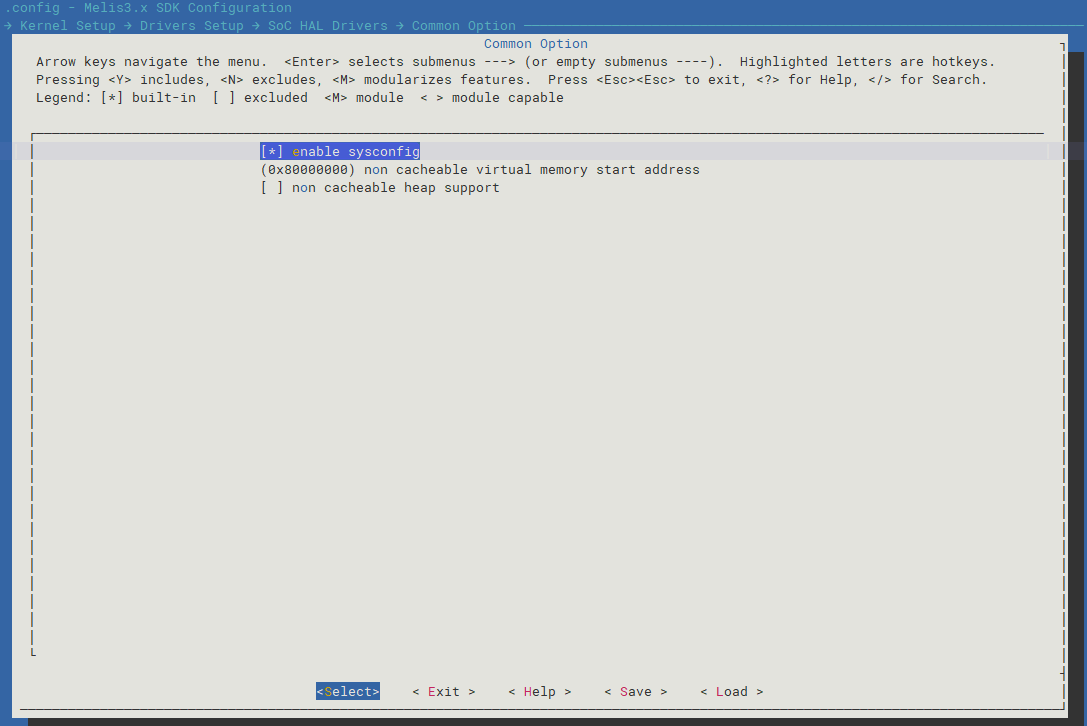
進(jìn)入如下目錄,選中[*] enable sysconfig,啟用讀取解析 sys_config.fex 功能
 → Kernel Setup
 	→ Drivers Setup
 		→ SoC HAL Drivers
 			→ Common Option
 				[*] enable sysconfig
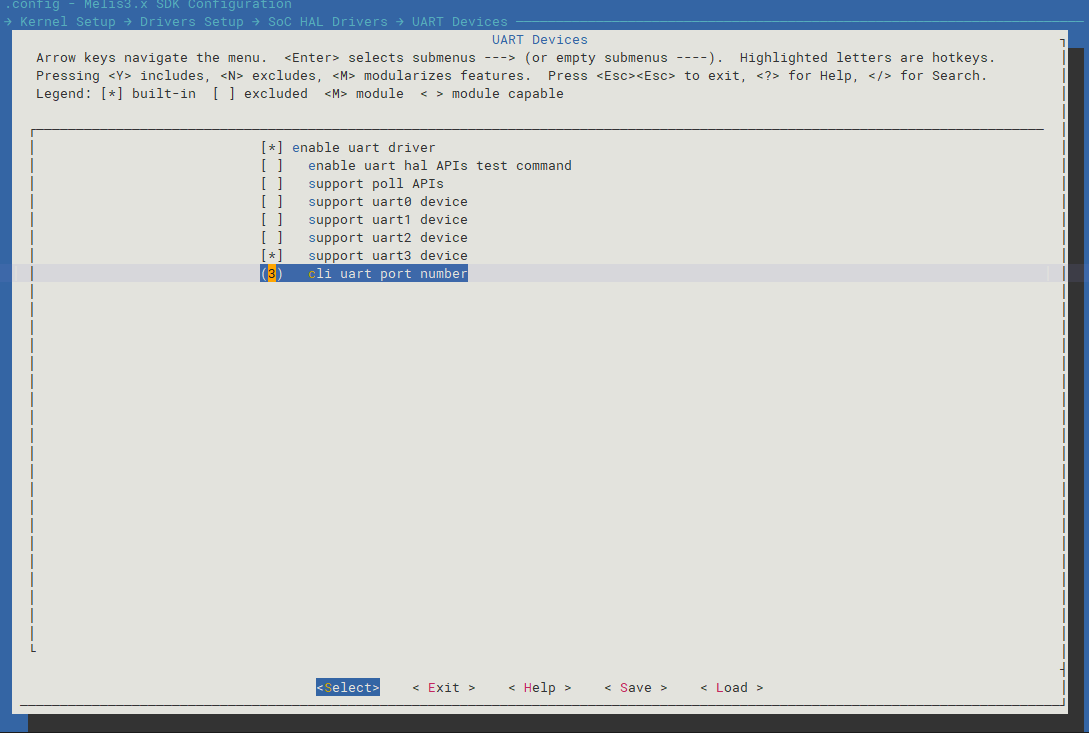
進(jìn)入如下目錄中,啟用uart驅(qū)動,并使用uart3。
 → Kernel Setup
 	→ Drivers Setup
 		→ SoC HAL Drivers
 			→ UART Devices
 				[*] enable uart driver
 				[*]   support uart3 device
 				(3)   cli uart port number
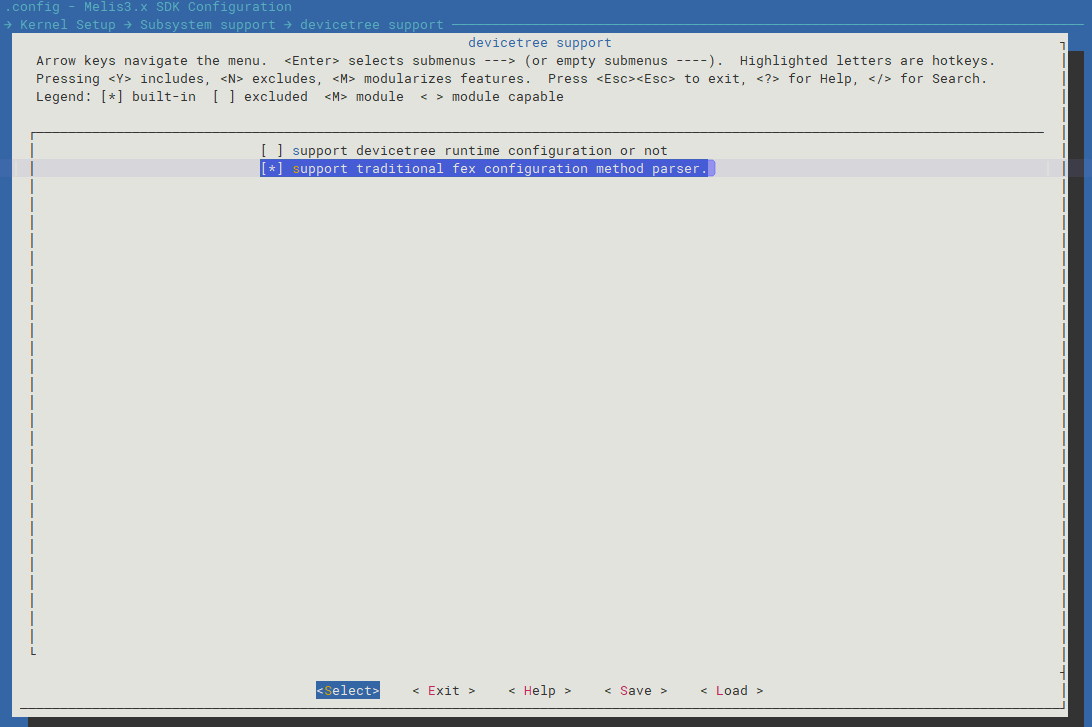
進(jìn)入如下目錄,啟用sys_config.fex 解析器
 → Kernel Setup
 	→ Subsystem support
 		→ devicetree support
 			[*] support traditional fex configuration method parser.
保存并退出E907配置。
2.2.4 編譯生成新鏡像
在workspaces/e907_rtos/rtos/source目錄下,輸入make
book@100ask:~/workspaces/e907_rtos/rtos/source$ make
  CHK     include/config/kernel.release
  CHK     include/generated/uapi/melis/version.h
fatal: not a git repository (or any parent up to mount point /)
Stopping at filesystem boundary (GIT_DISCOVERY_ACROSS_FILESYSTEM not set).
fatal: not a git repository (or any parent up to mount point /)
Stopping at filesystem boundary (GIT_DISCOVERY_ACROSS_FILESYSTEM not set).
fatal: not a git repository (or any parent up to mount point /)
Stopping at filesystem boundary (GIT_DISCOVERY_ACROSS_FILESYSTEM not set).
fatal: not a git repository (or any parent up to mount point /)
Stopping at filesystem boundary (GIT_DISCOVERY_ACROSS_FILESYSTEM not set).
  UPD     include/generated/uapi/melis/version.h
  CHK     include/generated/utsrelease.h
  CC      sysconfig.fex
  CC      ekernel/arch/common/common.o
  LD      ekernel/arch/common/built-in.o
  AS      ekernel/arch/riscv/sunxi/blobdata.o
  LD      ekernel/arch/riscv/sunxi/built-in.o
  LD      ekernel/arch/riscv/built-in.o
  LD      ekernel/arch/built-in.o
  LD      ekernel/built-in.o
  LD [M]  ekernel/melis30.o
/home/book/workspaces/e907_rtos/rtos/source/../toolchain/riscv64-elf-x86_64-20201104//bin/riscv64-unknown-elf-ld: ekernel/melis30.o: section .dram_seg.stack lma 0x4803a2b8 adjusted to 0x4803a34c
  OBJCOPY ekernel/melis30.bin
  RENAME  ekernel/melis30.o ----> ekernel/melis30.elf
/home/book/workspaces/e907_rtos/rtos/source/../toolchain/riscv64-elf-x86_64-20201104//bin/riscv64-unknown-elf-strip: ekernel/stWPSq13: section .dram_seg.stack lma 0x4803a2b8 adjusted to 0x4803a34c

   text    data     bss     dec     hex filename
 221280   17132   25488  263900   406dc ekernel/melis30.elf

  pack    melis

#### make completed successfully (7 seconds) ####
編譯完成后會在ekernel目錄下生成的melis30.elf。
2.3 檢查開發(fā)板硬件
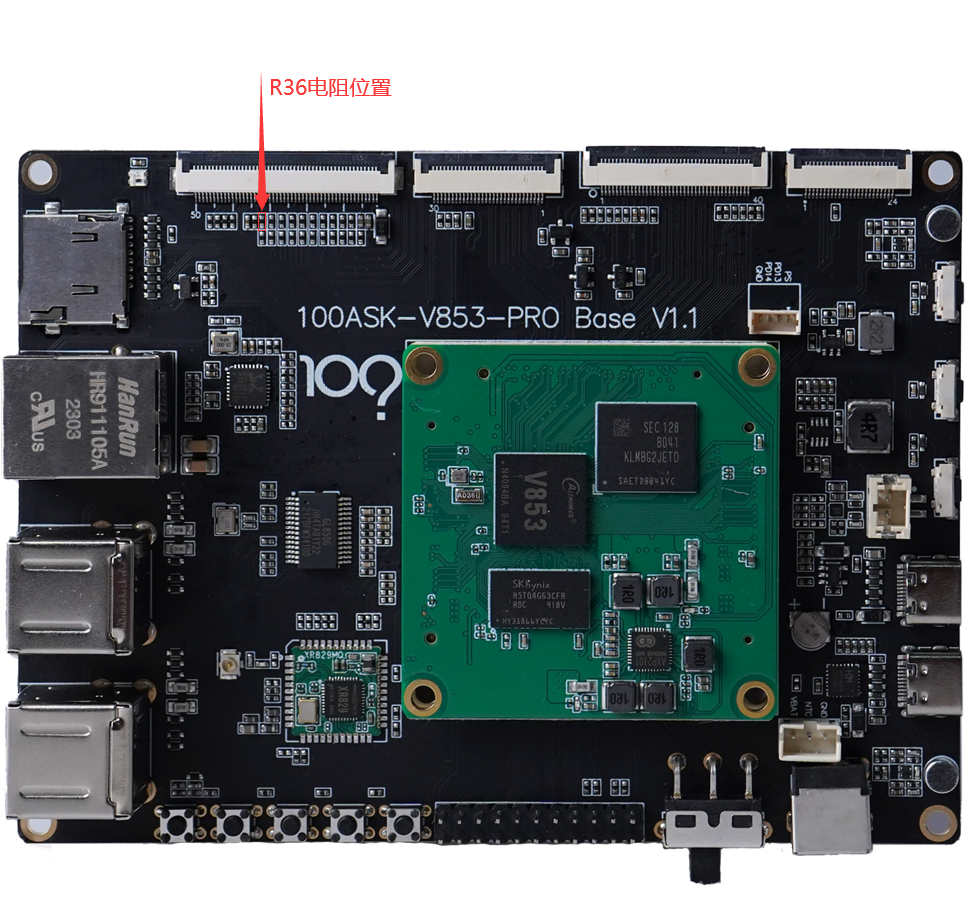
? 經(jīng)過測試發(fā)現(xiàn)在100ASK_V853-PRO開發(fā)板上的R36電阻會導(dǎo)致uart3波特率過高,所以需要檢查開發(fā)板上的R36電阻是否存在,如果存在需要手動去掉該電阻。下圖為存在R36電阻的位置情況,紅框內(nèi)即為R36電阻
如果電阻存在需要手動去除,下圖為去除R36電阻的示意圖
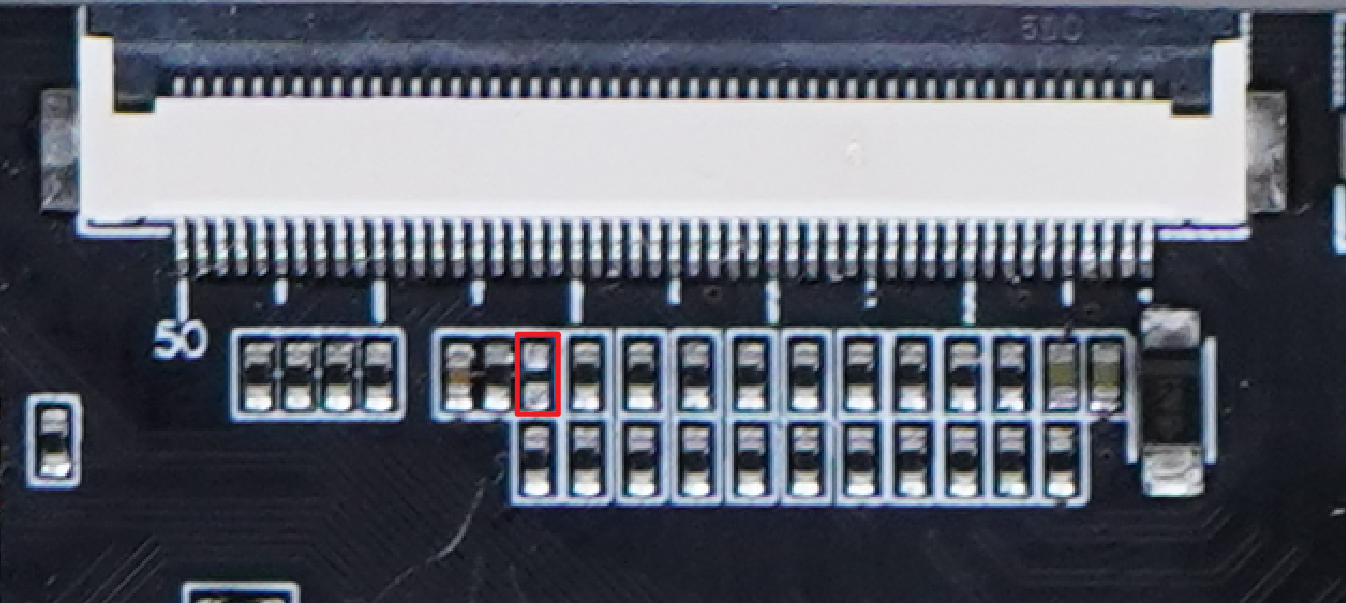
去除R36電阻后,即可正常訪問uart3串口。
2.4 開發(fā)板內(nèi)使能E907
使用全志燒寫工具AllwinnertechPhoeniSuit更新Tina新鏡像,詳情請參考https://forums.100ask.net/t/topic/2882
更新完成后,打開串口終端進(jìn)入開發(fā)板控制臺,將melis30.elf拷貝到/lib/firmware目錄下。
假設(shè)我使用ADB功能將文件拷貝到開發(fā)板的root/目錄下
root@TinaLinux:~# cd /root/
root@TinaLinux:~# ls
melis30.elf
將root目錄下的melis30.elf拷貝到/lib/firmware目錄下
root@TinaLinux:~# cp melis30.elf /lib/firmware/
root@TinaLinux:~# ls /lib/firmware/
boot_xr829.bin   fw_xr829.bin     melis30.elf      sdd_xr829.bin
etf_xr829.bin    fw_xr829_bt.bin  regulatory.db
拷貝完成后,可以在/lib/firmware目錄下,看到小核固件。
2.4.1 連接開發(fā)板的uart3
? 此時(shí)需要使用USB轉(zhuǎn)串口模塊,連接我們上面設(shè)置的uart3。我們需要找到開發(fā)板上的PH0、PH1、GND,分別連接到USB轉(zhuǎn)串口模塊的RXD、TXD、GND。100ASK_V853-PRO開發(fā)板已經(jīng)將PH0、PH1、GND引出來,位置圖圖下所示
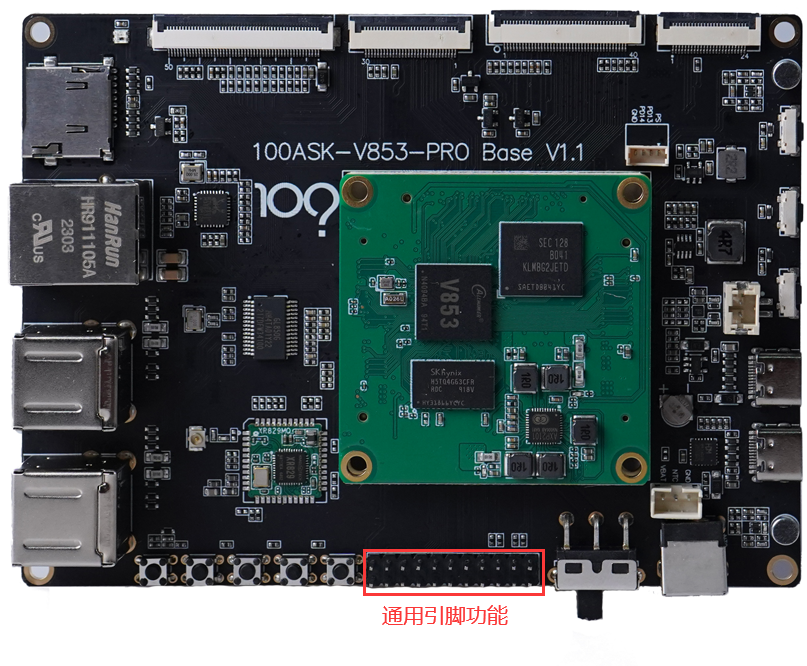
具體的引腳可查看開發(fā)板背面的絲印,確認(rèn)引腳位置。
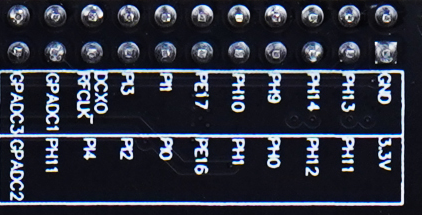
通過背面的絲印可以知道PH0、PH1、GND的位置,如下圖所示,PH0、PH1、GND,分別連接到USB轉(zhuǎn)串口模塊的RX、TX、GND。
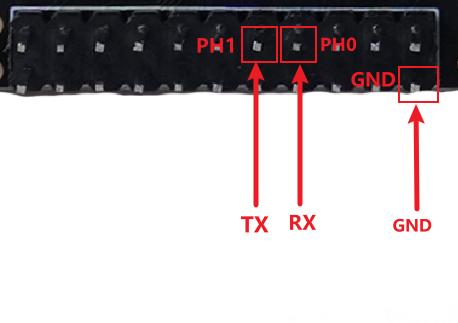
連接完成后將USB轉(zhuǎn)串口模塊插入windows主機(jī)端后,使用串口軟件打開uart3串口界面,波特率為115200。
在Tina Linux開發(fā)板串口終端輸入
root@TinaLinux:~# echo melis30.elf > /sys/kernel/debug/remoteproc/remoteproc0/firmware
將melis30.elf固件放在硬件節(jié)點(diǎn)firmware 下,啟動E907固件
root@TinaLinux:~# echo start > /sys/kernel/debug/remoteproc/remoteproc0/state
[ 3926.510018]  remoteproc0: powering up e907_rproc
[ 3926.515440]  remoteproc0: failed to parser head (melis30.elf) ret=-2
[ 3926.522674]  remoteproc0: failed to read boot_package item
[ 3926.528930]  remoteproc0: request_firmware failed from boot_package: -14
[ 3926.537528] virtio_rpmsg_bus virtio0: rpmsg host is online
[ 3926.543964]  remoteproc0: registered virtio0 (type 7)
[ 3926.550538]  remoteproc0: remote processor e907_rproc is now up
root@TinaLinux:~# [ 3926.560537] virtio_rpmsg_bus virtio0: creating channel rpbuf-service addr 0x400
[ 3926.569199] virtio_rpmsg_bus virtio0: creating channel sunxi,rpmsg_heartbeat addr 0x401
[ 3926.578725] virtio_rpmsg_bus virtio0: creating channel sunxi,notify addr 0x402
[ 3926.587194] virtio_rpmsg_bus virtio0: creating channel sunxi,rpmsg_ctrl addr 0x403
使能后可以在另一個(gè)串口界面看到如下打印信息
|commitid:
|halgitid:
|timever : Thu, 04 May 2023 04:22:23 -0400

scheduler startup
msh >Start Rpmsg Hearbeat Timer
rpmsg ctrldev: Start Running...
按下回車即可進(jìn)入終端界面。
輸入ps即可看見小核進(jìn)程信息
msh >ps
thread                           pri  status      sp     stack size max used left tick  error
-------------------------------- ---  ------- ---------- ----------  ------  ---------- ---
tshell                            21  ready   0x000003e8 0x00004000    19%   0x00000008 000
ctrldev                            6  suspend 0x00000148 0x00001000    08%   0x0000000a 000
rpmsg_srm                          8  suspend 0x000000f8 0x00000800    22%   0x0000000a 000
vring-ipi                         15  suspend 0x00000118 0x00002000    03%   0x0000000a 000
rpbuf_init                         8  suspend 0x000000e8 0x00001000    12%   0x0000000a 000
standby                            1  suspend 0x00000128 0x00001000    07%   0x0000000a 000
tidle                             31  ready   0x00000178 0x00002000    04%   0x0000001e 000
timer                              8  suspend 0x000000d8 0x00000200    73%   0x0000000a 000
3.雙核通信
3.1 E907小核創(chuàng)建通訊節(jié)點(diǎn)
在E907小核串口終端建立兩個(gè)通訊節(jié)點(diǎn)用于監(jiān)聽數(shù)據(jù),輸入eptdev_bind test 2
msh >eptdev_bind test 2
查看監(jiān)聽節(jié)點(diǎn),輸入rpmsg_list_listen
msh >rpmsg_list_listen
name             listen  alive
test             2  0
console                  100  0
3.2 大核創(chuàng)建通訊節(jié)點(diǎn)
在Tina LInux下也創(chuàng)建兩個(gè)通訊監(jiān)聽節(jié)點(diǎn),輸入以下兩個(gè)命令
echo test > /sys/class/rpmsg/rpmsg_ctrl0/open
echo test > /sys/class/rpmsg/rpmsg_ctrl0/open
輸入后,如下所示:
root@TinaLinux:~# echo test > /sys/class/rpmsg/rpmsg_ctrl0/open
[ 5060.227158] virtio_rpmsg_bus virtio0: creating channel sunxi,rpmsg_client addr 0x404
s/rpmsg/rpmsg_ctrl0/openroot@TinaLinux:~# echo test > /sys/class/rpmsg/rpmsg_ctrl0/open
[ 5061.464758] virtio_rpmsg_bus virtio0: creating channel sunxi,rpmsg_client addr 0x405
在大核TIna Linux中也創(chuàng)建了兩個(gè)監(jiān)聽節(jié)點(diǎn),輸入ls /dev/rpmsg*查看節(jié)點(diǎn)信息
root@TinaLinux:~# ls /dev/rpmsg*
/dev/rpmsg0       /dev/rpmsg1       /dev/rpmsg_ctrl0
創(chuàng)建完成后,可以在E907小核終端中查看自動輸出的信息。
msh >ctrldev: Rx 44 Bytes
client: Rx 8 Bytes
rpmsg0: binding
send 0x13131411 to rpmsg0
create rpmsg0 client success
ctrldev: Rx 44 Bytes
client: Rx 8 Bytes
rpmsg1: binding
send 0x13131411 to rpmsg1
create rpmsg1 client success
3.3 大核傳輸至E907小核
在Tina LInux下輸入
echo "hello 100ASK_V853-PRO" > /dev/rpmsg0
echo "hello Tina Linux" > /dev/rpmsg1
將Linux Message 0信息通過創(chuàng)建的監(jiān)聽節(jié)點(diǎn)傳輸?shù)紼907小核,例如:
root@TinaLinux:~# echo "hello 100ASK_V853-PRO" > /dev/rpmsg0
root@TinaLinux:~# echo "hello Tina Linux" > /dev/rpmsg1
輸入后,打開E907串口終端可以發(fā)現(xiàn),大核傳輸過來的信息。
rpmsg0: Rx 22 Bytes
Data:hello 100ASK_V853-PRO

rpmsg1: Rx 17 Bytes
Data:hello Tina Linux
3.4 E907小核傳輸至大核
? 在小核端需要使用命令 eptdev_send 用法 eptdev_send ,這里的id號從0開始,我們設(shè)置有兩個(gè)通信節(jié)點(diǎn),所以id號分別為0和1。
? 在小核的串口終端輸入以下命令:
eptdev_send 0 "hello E907"
eptdev_send 1 "hello E907"
例如:
msh >eptdev_send 0 "hello E907"
will send hello E907 to rpmsg0
msh >eptdev_send 1 "hello E907"
will send hello E907 to rpmsg1
輸入完成后,小核會將信息分別傳入rpmsg0和rpmsg1兩個(gè)通訊節(jié)點(diǎn)。可以在大核Tina Linux端輸入
cat /dev/rpmsg0
cat /dev/rpmsg1
可查看從E907小核傳輸過來的信息。例如:
root@TinaLinux:~# cat /dev/rpmsg0
hello E907
^C
root@TinaLinux:~# cat /dev/rpmsg1
hello E907
^C
按下Crtl+C結(jié)束監(jiān)聽前持續(xù)監(jiān)聽該節(jié)點(diǎn)。
? 您可以在小核端多次傳輸信息到該節(jié)點(diǎn),該節(jié)點(diǎn)支持持續(xù)接受小核傳輸?shù)男畔ⅲ纾?/p>
在E907小核,多次傳輸信息到監(jiān)聽節(jié)點(diǎn)rpmsg0
msh >eptdev_send 0 "hello E907 "
will send hello E907  to rpmsg0
msh >eptdev_send 0 "hello E907 "
will send hello E907  to rpmsg0
msh >eptdev_send 0 "hello E907 "
will send hello E907  to rpmsg0
msh >eptdev_send 0 "hello E907 "
will send hello E907  to rpmsg0
msh >eptdev_send 0 "hello E907 "
will send hello E907  to rpmsg0
msh >eptdev_send 0 "hello E907 "
will send hello E907  to rpmsg0
msh >eptdev_send 0 "hello E907 "
will send hello E907  to rpmsg0
在大核端則會一直接收到小核傳輸過來的信息
root@TinaLinux:~# cat /dev/rpmsg0
hello E907 hello E907 hello E907 hello E907 hello E907 hello E907 hello E907
3.5 關(guān)閉通訊
? 在大核Tina Linux端,操作節(jié)點(diǎn)即可,輸入以下命令,echo 給到rpmsg的控制關(guān)閉節(jié)點(diǎn)即可
echo 0 > /sys/class/rpmsg/rpmsg_ctrl0/close
echo 1 > /sys/class/rpmsg/rpmsg_ctrl0/close
例如:
root@TinaLinux:~# echo 0 > /sys/class/rpmsg/rpmsg_ctrl0/close
[ 6783.156899] virtio_rpmsg_bus virtio0: destroying channel sunxi,rpmsg_client addr 0x404
root@TinaLinux:~# echo 1 > /sys/class/rpmsg/rpmsg_ctrl0/close
root@TinaLinux:~# [ 6784.224740] virtio_rpmsg_bus virtio0: destroying channel sunxi,rpmsg_client addr 0x405
? 此時(shí)E907小核端也會自動關(guān)閉通信節(jié)點(diǎn),自動輸出以下信息
send 0x13131411 to rpmsg0
rpmsg0: unbinding
ctrldev: Rx 44 Bytes
send 0x13131411 to rpmsg1
rpmsg1: unbinding
-
處理器
+關(guān)注
關(guān)注
68文章
18927瀏覽量
227245 -
mcu
+關(guān)注
關(guān)注
146文章
16667瀏覽量
347818 -
Linux
+關(guān)注
關(guān)注
87文章
11123瀏覽量
207920 -
AI
+關(guān)注
關(guān)注
87文章
28877瀏覽量
266240 -
開發(fā)板
+關(guān)注
關(guān)注
25文章
4771瀏覽量
96185
發(fā)布評論請先 登錄
相關(guān)推薦
全志V853的ARM A7和RISC-V E907之間的通信

1.100ASK_V853-PRO 環(huán)境配置及編譯燒寫

6.100ASK_V853-PRO開發(fā)板支持MIPI攝像頭

全志V853開發(fā)板發(fā)布!開發(fā)板試用同步開放申請!
詳解全志V853上的ARM A7和RISC-V E907之間的通信方式
V853開發(fā)板硬件資料——RISC-V核E907用戶手冊
V853開發(fā)板開發(fā)進(jìn)階——在Linux下加載E907核心固件
每日推薦 | V853開發(fā)板開發(fā)進(jìn)階,單PCB輪式機(jī)器人的教程
全志V853芯片 在Tina下RISC-V核E907啟動方式的選擇
【全志V853開發(fā)板試用】全志V853開發(fā)板試用測評報(bào)告
【開源硬件大賽】基于全志V853設(shè)計(jì)的全功能BTB學(xué)習(xí)開發(fā)板
全志 V85x E907 RISC-V小核開發(fā)與使用
全志V853開發(fā)板參數(shù)規(guī)格概述
100ASK_V853-PRO開發(fā)板支持人形檢測與人臉檢測


 9.100ASK_V853-PRO開發(fā)板支持E907小核開發(fā)


評論