安裝SDK
下載sdk并上傳到虛擬機,解壓后執行:
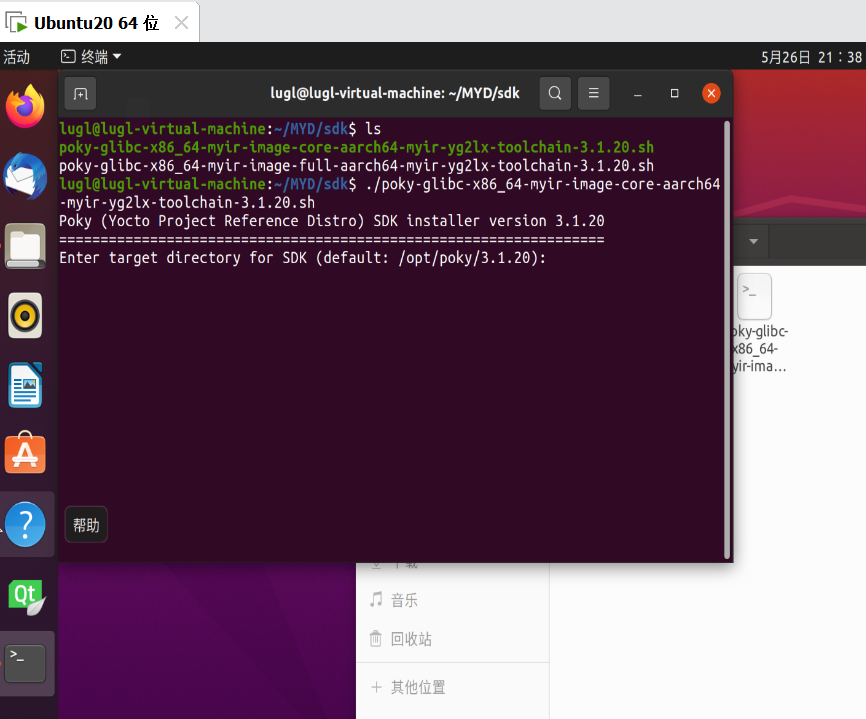
在這對話框中輸入想要保存的目錄:

在下面的對話框中輸入Y:

然后稍等安裝完畢:
Extracting SDK.......................................................................................................................................................................................................done
Setting it up...done
SDK has been successfully set up and is ready to be used.
Each time you wish to use the SDK in a new shell session, you need to source the environment setup script e.g.
 $ . /opt/yg2lx/environment-setup-aarch64-poky-linux
 $ . /opt/yg2lx/environment-setup-armv7vet2hf-neon-vfpv4-pokymllib32-linux-gnueabi
測試SDK
安裝完成后,使用以下命令設置環境變量,測試 SDK 是否完成:
lugl@lugl-virtual-machine:~/MYD/sdk$ source /opt/yg2lx/environment-setup-aarch64-poky-linux

lugl@lugl-virtual-machine:~/MYD/sdk$ $CC -v
Using built-in specs.
COLLECT_GCC=aarch64-poky-linux-gcc
COLLECT_LTO_WRAPPER=/opt/yg2lx/sysroots/x86_64-pokysdk-linux/usr/libexec/aarch64-poky-linux/gcc/aarch64-poky-linux/8.3.0/lto-wrapper
Target: aarch64-poky-linux
Configured with: ../../../../../../work-shared/gcc-8.3.0-r0/gcc-8-8.3.0/src/configure --build=x86_64-linux --host=x86_64-pokysdk-linux --target=aarch64-poky-linux --prefix=/usr/local/oe-sdk-hardcoded-buildpath/sysroots/x86_64-pokysdk-linux/usr --exec_prefix=/usr/local/oe-sdk-hardcoded-buildpath/sysroots/x86_64-pokysdk-linux/usr --bindir=/usr/local/oe-sdk-hardcoded-buildpath/sysroots/x86_64-pokysdk-linux/usr/bin/aarch64-poky-linux --sbindir=/usr/local/oe-sdk-hardcoded-buildpath/sysroots/x86_64-pokysdk-linux/usr/bin/aarch64-poky-linux --libexecdir=/usr/local/oe-sdk-hardcoded-buildpath/sysroots/x86_64-pokysdk-linux/usr/libexec/aarch64-poky-linux --datadir=/usr/local/oe-sdk-hardcoded-buildpath/sysroots/x86_64-pokysdk-linux/usr/share --sysconfdir=/usr/local/oe-sdk-hardcoded-buildpath/sysroots/x86_64-pokysdk-linux/etc --sharedstatedir=/usr/local/oe-sdk-hardcoded-buildpath/sysroots/x86_64-pokysdk-linux/com --localstatedir=/usr/local/oe-sdk-hardcoded-buildpath/sysroots/x86_64-pokysdk-linux/var --libdir=/usr/local/oe-sdk-hardcoded-buildpath/sysroots/x86_64-pokysdk-linux/usr/lib/aarch64-poky-linux --includedir=/usr/local/oe-sdk-hardcoded-buildpath/sysroots/x86_64-pokysdk-linux/usr/include --oldincludedir=/usr/local/oe-sdk-hardcoded-buildpath/sysroots/x86_64-pokysdk-linux/usr/include --infodir=/usr/local/oe-sdk-hardcoded-buildpath/sysroots/x86_64-pokysdk-linux/usr/share/info --mandir=/usr/local/oe-sdk-hardcoded-buildpath/sysroots/x86_64-pokysdk-linux/usr/share/man --disable-silent-rules --disable-dependency-tracking --with-libtool-sysroot=/home/hjx/renesas/new2-yocto/build-myir/tmp/work/x86_64-nativesdk-pokysdk-linux/gcc-cross-canadian-aarch64/8.3.0-r0/recipe-sysroot --with-gnu-ld --enable-shared --enable-languages=c,c++ --enable-threads=posix --enable-multilib --enable-default-pie --enable-c99 --enable-long-long --enable-symvers=gnu --enable-libstdcxx-pch --program-prefix=aarch64-poky-linux- --without-local-prefix --disable-install-libiberty --enable-lto --disable-libssp --enable-libitm --disable-bootstrap --disable-libmudflap --with-system-zlib --with-linker-hash-style=gnu --enable-linker-build-id --with-ppl=no --with-cloog=no --enable-checking=release --enable-cheaders=c_global --without-isl --with-gxx-include-dir=/not/exist/usr/include/c++/8.3.0 --with-build-time-tools=/home/hjx/renesas/new2-yocto/build-myir/tmp/work/x86_64-nativesdk-pokysdk-linux/gcc-cross-canadian-aarch64/8.3.0-r0/recipe-sysroot-native/usr/aarch64-poky-linux/bin --with-sysroot=/not/exist --with-build-sysroot=/home/hjx/renesas/new2-yocto/build-myir/tmp/work/x86_64-nativesdk-pokysdk-linux/gcc-cross-canadian-aarch64/8.3.0-r0/recipe-sysroot --enable-poison-system-directories --disable-static --enable-nls --with-glibc-version=2.28 --enable-initfini-array --enable-__cxa_atexit
Thread model: posix
gcc version 8.3.0 (GCC)
到此,SDK就安裝成功了。
測試
用vim編寫一個hello.c:
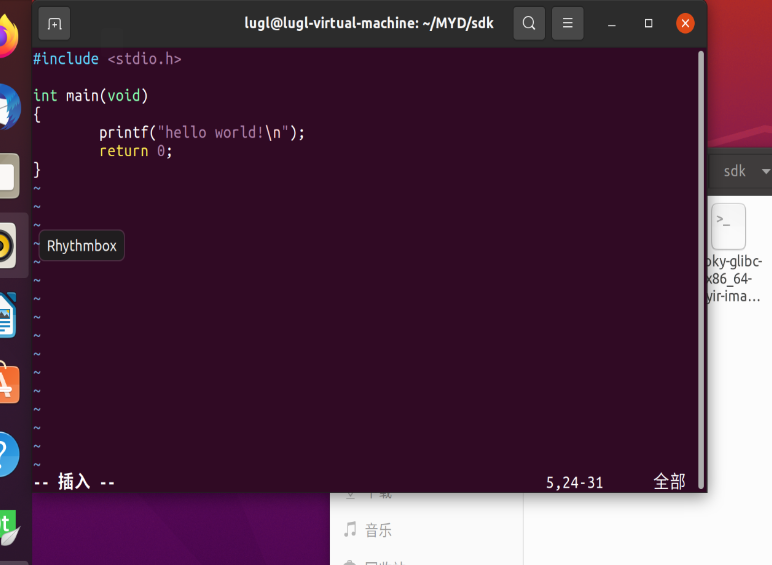
保存后編譯:$CC hello.c -o hello
編譯后查看hello文件類型:
lugl@lugl-virtual-machine:~/MYD/sdk$ file hello
hello: ELF 64-bit LSB shared object, ARM aarch64, version 1 (SYSV), dynamically linked, interpreter /lib64/ld-linux-aarch64.so.1, for GNU/Linux 3.14.0, BuildID[sha1]=5aa9a4ba2a1ff9ca3ef36c5d5508eb448b8f85f1, with debug_info, not stripped
上傳到開發板,修改權限后執行:

成功的輸出了hello world,說明SDK安裝成功!
聲明:本文內容及配圖由入駐作者撰寫或者入駐合作網站授權轉載。文章觀點僅代表作者本人,不代表電子發燒友網立場。文章及其配圖僅供工程師學習之用,如有內容侵權或者其他違規問題,請聯系本站處理。
舉報投訴
發布評論請先 登錄
相關推薦
【米爾瑞薩RZ/G2L開發板-試用體驗】米爾-瑞薩RZG2L - 64位雙核MPU開發板開箱測評
剛收到米爾瑞薩RZ/G2L開發板打開包裝后看到的很大的一塊黑色PCB,做工精美的
發表于 05-22 21:53
【米爾瑞薩RZ/G2L開發板-試用體驗】米爾瑞薩RZ/G2L開發板開箱視頻
今天剛剛收到米爾瑞薩RZ/G2L開發板,拆開包裹后給人的感覺是驚艷,板卡設計真的很棒,來看看視頻
發表于 05-22 21:58
【米爾瑞薩RZ/G2L開發板-試用體驗】米爾瑞薩RZ/G2L開發板使用SSH登錄
收到的米爾瑞薩RZ/G2L開發板上電測試一下SSH登錄方式和其它測試!
SSH登錄
在使用
發表于 06-11 21:47
150套開發板免費送!還有5G手機拿?米爾RZ/G2L開發板創意秀
人間最美五月天不負韶華不負卿米爾又來送板子了不是3套,也不是4套150套米爾RZ/G2L開發板送!免費!板卡不回收!01這是什么樣的有獎活動


 米爾瑞薩RZ/G2L開發板 安裝交叉編譯器


評論