當今的計算機是高度并行的系統,由多個 CPU 內核(通常每個內核多個線程)、每個 GPU 多個處理元素以及每個設備通常多個 GPU 組成。簡而言之,我們可以同時處理許多不同的事情,通常是在不同的設備上。不幸的是,Python 并不是編寫并行和異步代碼的好方法,至少在沒有一些額外幫助的情況下是這樣。畢竟 Python 是單線程的,這在未來不太可能改變。MXNet 和 TensorFlow 等深度學習框架采用 異步編程模型來提高性能,而 PyTorch 使用 Python 自己的調度程序導致不同的性能權衡。對于 PyTorch,默認情況下,GPU 操作是異步的。當您調用使用 GPU 的函數時,操作會排入特定設備的隊列,但不一定會在稍后執行。這使我們能夠并行執行更多計算,包括在 CPU 或其他 GPU 上的操作。
因此,了解異步編程的工作原理有助于我們通過主動減少計算要求和相互依賴性來開發更高效的程序。這使我們能夠減少內存開銷并提高處理器利用率。
import os
import subprocess
import numpy
import torch
from torch import nn
from d2l import torch as d2l
import os
import subprocess
import numpy
from mxnet import autograd, gluon, np, npx
from mxnet.gluon import nn
from d2l import mxnet as d2l

npx.set_np()
13.2.1。通過后端異步
作為熱身,請考慮以下玩具問題:我們想要生成一個隨機矩陣并將其相乘。讓我們在 NumPy 和 PyTorch 張量中都這樣做以查看差異。請注意,PyTorchtensor是在 GPU 上定義的。
# Warmup for GPU computation
device = d2l.try_gpu()
a = torch.randn(size=(1000, 1000), device=device)
b = torch.mm(a, a)

with d2l.Benchmark('numpy'):
  for _ in range(10):
    a = numpy.random.normal(size=(1000, 1000))
    b = numpy.dot(a, a)

with d2l.Benchmark('torch'):
  for _ in range(10):
    a = torch.randn(size=(1000, 1000), device=device)
    b = torch.mm(a, a)
numpy: 2.2001 sec
torch: 0.0057 sec
通過 PyTorch 的基準輸出要快幾個數量級。NumPy 點積在 CPU 處理器上執行,而 PyTorch 矩陣乘法在 GPU 上執行,因此后者預計會更快。但巨大的時差表明一定有其他事情在發生。默認情況下,GPU 操作在 PyTorch 中是異步的。強制 PyTorch 在返回之前完成所有計算顯示了之前發生的情況:計算由后端執行,而前端將控制權返回給 Python。
with d2l.Benchmark():
  for _ in range(10):
    a = torch.randn(size=(1000, 1000), device=device)
    b = torch.mm(a, a)
  torch.cuda.synchronize(device)
Done: 0.0039 sec
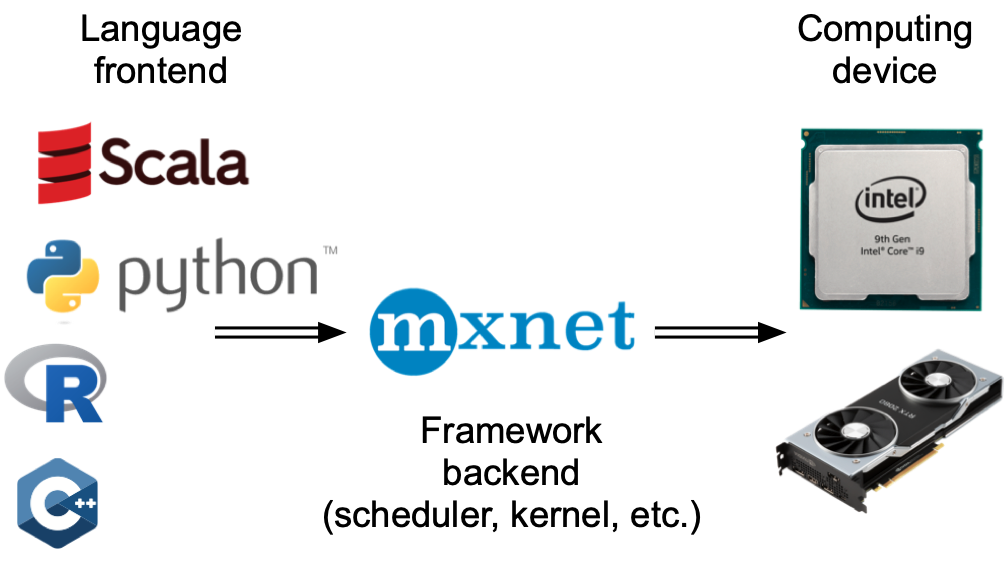
從廣義上講,PyTorch 有一個用于與用戶直接交互的前端(例如,通過 Python),以及一個供系統用來執行計算的后端。如圖13.2.1所示,用戶可以使用Python、C++等多種前端語言編寫PyTorch程序。無論使用何種前端編程語言,PyTorch 程序的執行主要發生在 C++ 實現的后端。前端語言發出的操作被傳遞到后端執行。后端管理自己的線程,這些線程不斷收集和執行排隊的任務。請注意,要使其正常工作,后端必須能夠跟蹤計算圖中各個步驟之間的依賴關系。因此,不可能并行化相互依賴的操作。
For a warmup consider the following toy problem: we want to generate a random matrix and multiply it. Let’s do that both in NumPy and in mxnet.np to see the difference.
with d2l.Benchmark('numpy'):
  for _ in range(10):
    a = numpy.random.normal(size=(1000, 1000))
    b = numpy.dot(a, a)

with d2l.Benchmark('mxnet.np'):
  for _ in range(10):
    a = np.random.normal(size=(1000, 1000))
    b = np.dot(a, a)
numpy: 2.1419 sec
mxnet.np: 0.0728 sec
The benchmark output via MXNet is orders of magnitude faster. Since both are executed on the same processor something else must be going on. Forcing MXNet to finish all the backend computation prior to returning shows what happened previously: computation is executed by the backend while the frontend returns control to Python.
with d2l.Benchmark():
  for _ in range(10):
    a = np.random.normal(size=(1000, 1000))
    b = np.dot(a, a)
  npx.waitall()
Done: 2.1325 sec
Broadly speaking, MXNet has a frontend for direct interactions with users, e.g., via Python, as well as a backend used by the system to perform the computation. As shown in Fig. 13.2.1, users can write MXNet programs in various frontend languages, such as Python, R, Scala, and C++. Regardless of the frontend programming language used, the execution of MXNet programs occurs primarily in the backend of C++ implementations. Operations issued by the frontend language are passed on to the backend for execution. The backend manages its own threads that continuously collect and execute queued tasks. Note that for this to work the backend must be able to keep track of the dependencies between various steps in the computational graph. Hence, it is not possible to parallelize operations that depend on each other.

圖 13.2.1編程語言前端和深度學習框架后端。
讓我們看另一個玩具示例以更好地理解依賴關系圖。
x = torch.ones((1, 2), device=device)
y = torch.ones((1, 2), device=device)
z = x * y + 2
z
tensor([[3., 3.]], device='cuda:0')
x = np.ones((1, 2))
y = np.ones((1, 2))
z = x * y + 2
z
array([[3., 3.]])
圖 13.2.2后端跟蹤計算圖中各個步驟之間的依賴關系。
上面的代碼片段也如圖 13.2.2所示 。每當 Python 前端線程執行前三個語句之一時,它只是將任務返回到后端隊列。當需要打印最后一條語句的結果時, Python 前端線程將等待 C++ 后端線程完成對變量結果的計算z。這種設計的一個好處是 Python 前端線程不需要執行實際計算。因此,無論 Python 的性能如何,對程序的整體性能影響都很小。 圖 13.2.3說明了前端和后端如何交互。
圖 13.2.3前后端交互。
13.2.2。障礙和阻滯劑
有許多操作會強制 Python 等待完成:
最明顯的npx.waitall()是等待所有計算完成,而不管計算指令何時發出。在實踐中,除非絕對必要,否則使用此運算符不是一個好主意,因為它會導致性能不佳。
如果我們只想等到特定變量可用,我們可以調用z.wait_to_read(). z在這種情況下,MXNet 會阻止返回 Python,直到計算出變量為止。之后可能會繼續進行其他計算。
讓我們看看這在實踐中是如何工作的。
with d2l.Benchmark('waitall'):
  b = np.dot(a, a)
  npx.waitall()

with d2l.Benchmark('wait_to_read'):
  b = np.dot(a, a)
  b.wait_to_read()
waitall: 0.0155 sec
wait_to_read: 0.0500 sec
完成這兩個操作大約需要相同的時間。除了明顯的阻塞操作之外,我們建議您了解 隱式阻塞程序。打印變量顯然需要變量可用,因此是一個障礙。最后,轉換為 NumPy via z.asnumpy()和轉換為標量 viaz.item()是阻塞的,因為 NumPy 沒有異步的概念。它需要像函數一樣訪問值print。
頻繁地將少量數據從 MXNet 的范圍復制到 NumPy 并返回可能會破壞原本高效代碼的性能,因為每個此類操作都需要計算圖來評估獲得相關術語所需的所有中間結果,然后才能完成任何其他操作。
with d2l.Benchmark('numpy conversion'):
  b = np.dot(a, a)
  b.asnumpy()

with d2l.Benchmark('scalar conversion'):
  b = np.dot(a, a)
  b.sum().item()
numpy conversion: 0.0780 sec
scalar conversion: 0.0727 sec
13.2.3。改進計算
在高度多線程的系統上(即使是普通筆記本電腦也有 4 個或更多線程,而在多插槽服務器上,這個數字可能超過 256),調度操作的開銷會變得很大。這就是為什么非常需要異步和并行進行計算和調度的原因。為了說明這樣做的好處,讓我們看看如果我們將變量遞增 1 多次(順序或異步)會發生什么。我們通過wait_to_read在每次添加之間插入一個屏障來模擬同步執行。
with d2l.Benchmark('synchronous'):
  for _ in range(10000):
    y = x + 1
    y.wait_to_read()

with d2l.Benchmark('asynchronous'):
  for _ in range(10000):
    y = x + 1
  npx.waitall()
synchronous: 1.4076 sec
asynchronous: 1.1700 sec
Python前端線程和C++后端線程之間的一個稍微簡化的交互可以概括如下: 1. 前端命令后端將計算任務插入到隊列中。1. 后端從隊列中接收計算任務并進行實際計算。1. 后端將計算結果返回給前端。假設這三個階段的持續時間是y = x + 1t1,t2和t3, 分別。如果我們不使用異步編程,執行 10000 次計算所花費的總時間大約是10000(t1+t2+t3). 如果使用異步編程,執行10000次計算的總時間可以減少到t1+10000t2+t3(假設 10000t2>9999t1), 因為前端不必等待后端返回每個循環的計算結果。
13.2.4。概括
深度學習框架可以將 Python 前端與執行后端分離。這允許將命令快速異步插入后端??和相關的并行性。
異步會導致響應相當靈敏的前端。但是,請注意不要使任務隊列過滿,因為這可能會導致過多的內存消耗。建議對每個 minibatch 進行同步,以保持前端和后端大致同步。
芯片供應商提供復雜的性能分析工具,以更細致地了解深度學習的效率。
請注意,從 MXNet 的內存管理轉換為 Python 將強制后端等待特定變量準備就緒。print,asnumpy和等函數item都有這個效果。這可能是可取的,但不小心使用同步可能會破壞性能。
13.2.5。練習
-
異步
+關注
關注
0文章
62瀏覽量
18034 -
pytorch
+關注
關注
2文章
803瀏覽量
13149
發布評論請先 登錄
相關推薦


 PyTorch教程-13.2. 異步計算


評論