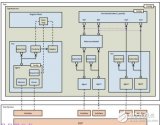
本文使用Easier UVM Code Generator生成包含多個agent和interface的uvm驗證環境。通過在uvm代碼生成器template 文件中設置參數,你可以將agent設置為在active 或passive 模式,并選擇是在其自己的環境中、在頂層環境中實例化。
本文使用的示例有四個interface/agent,其中兩個使用 register layer(bus1 和 bus2),兩個不使用(clkndata 和 serial)。這四個interface中每個interface template file都包含以下行,最初全部注釋掉:
Filename *.tpl
#uvm_seqr_class = yes
#agent_is_active = UVM_PASSIVE
#agent_has_env = yes
#additional_agent = serial
uvm_seqr_class
參數uvm_seqr_class可以設置為yes或no。默認值為 no,這意味著此agent的sequencer類將使用簡單的typedef 定義:
Filename clkndata_sequencer.sv
typedef uvm_sequencer #(data_tx) clkndata_sequencer_t;
如果參數設置為 yes,uvm代碼生成器將創建一個新的sequencer類:
Filename clkndata.tpl
...
uvm_seqr_class = yes
...
Filename clkndata_sequencer.sv
class clkndata_sequencer extends uvm_sequencer #(data_tx);


`uvm_component_utils(clkndata_sequencer)
  ...
endclass
agent_is_active
參數agent_is_active可以設置為UVM_ACTIVE或UVM_PASSIVE。默認值為 UVM_ACTIVE。將 agent_is_active 標志設置為 UVM_PASSIVE 就是通過配置頂層驗證環境來實現的。
Filename clkndata.tpl
...
agent_is_active = UVM_PASSIVE
...
Filename top_tb.sv
module top_tb;
  ...
  top_config env_config;


  initial
  begin
    env_config = new("env_config");
    ...
    env_config.is_active_clkndata = UVM_PASSIVE;
    ...
    uvm_config_db #(top_config)::set(null, "uvm_test_top.m_env", "config", env_config);
如上所示,一個配置對象用于配置整個頂層驗證環境。相應字段的值將從頂層配置對象復制到各個agent的配置對象,在本例中為 clkndata,在 env 的build_phase方法中:
Filename top_env.sv


class top_env extends uvm_env;
  ...
  clkndata_config   m_clkndata_config;
  top_config        m_config;
  ...
endclass


function void top_env::build_phase(uvm_phase phase);
if (!uvm_config_db #(clkndata_config)::get(this, "", "config", m_config))
    ...
m_clkndata_config           = new("m_clkndata_config");
  ...
m_clkndata_config.is_active = m_config.is_active_clkndata;
  ...
uvm_config_db #(clkndata_config)::set(this, "m_clkndata_agent", "config", m_clkndata_config);
上面的build_phase方法從其自己的配置(m_config) 中獲取值,并在其子配置(例如 m_clkndata_config)中設置這些相同的值。
換句話說,配置參數的值通過與組件關聯的配置對象層次化地結構向下傳遞。
最后,agent從配置數據庫中獲取此字段的值:
Filename clkndata_agent.sv


function void clkndata_agent::build_phase(uvm_phase phase);
if (!uvm_config_db #(clkndata_config)::get(this, "", "config", m_config))
    ...
  ...
if (get_is_active() == UVM_ACTIVE)
  begin
    m_driver    = clkndata_driver::create("m_driver", this);
    m_sequencer = clkndata_sequencer::create("m_sequencer", this);
  end
endfunction


function uvm_active_passive_enum clkndata_agent::get_is_active();
  ...
  m_is_active = m_config.is_active;
  ...
return uvm_active_passive_enum'(m_is_active);
endfunction
agent_has_env
參數 agent_has_env 可以設置為yes或 no。默認值為 no,這意味著此agent將從頂層環境實例化。如果agent_has_env設置為 yes,則agent將在其自己的env中實例化,該env將在頂層env實例化。
默認情況下,通過注冊模型訪問的代理將在自己的環境中實例化,所有其他代理將從頂級 env 實例化:
Filename top_env.sv
class top_env extends uvm_env:
...
// Child environments and associated objects
bus1_env         m_bus1_env;
bus2_env         m_bus2_env;


bus1_env_config  m_bus1_env_config;
bus2_env_config  m_bus2_env_config;


// Child agents and associated objects
clkndata_config    m_clkndata_config;
clkndata_agent     m_clkndata_agent;
clkndata_coverage  m_clkndata_coverage;


serial_config      m_serial_config;
serial_agent       m_serial_agent;
serial_coverage    m_serial_coverage;
...
endclass
在相應的template 文件中將agent_has_env設置為 yes 會將 clkndata agent移動到其自己的env中:
Filename clkndata.tpl
...
agent_has_env = yes
...
Filename top_env.sv
class top_env extends uvm_env:
...
// Child environments and associated objects
clkndata_env     m_clkndata_env;
bus1_env         m_bus1_env;
bus2_env         m_bus2_env;


clkndata_config  m_clkndata_config;
bus1_env_config  m_bus1_env_config;
bus2_env_config  m_bus2_env_config;


// Child agents and associated objects
serial_config    m_serial_config;
serial_agent     m_serial_agent;
serial_coverage  m_serial_coverage;
...
endclass
如果我們現在對剩下的一個agent代理(serial)執行相同的操作,那么每個agent都將放入自己的 env 中:
Filename serial.tpl
...
agent_has_env = yes
...
Filename top_env.sv
class top_env extends uvm_env:
...
// Child environments and associated objects
clkndata_env     m_clkndata_env;
bus1_env         m_bus1_env;
bus2_env         m_bus2_env;
serial_env       m_serial_env;


clkndata_config  m_clkndata_config;
bus1_env_config  m_bus1_env_config;
bus2_env_config  m_bus2_env_config;
serial_config    m_serial_config;
...
endclass
additional_agent
如果agent具有自己的env,則參數 additional_agent 可用于指定要在該env中實例化的其他agent,而不是在其自己的env環境中或在頂層實例化。假設serial沒有自己的 env,則可以在 clkndataagent的 env 中實例化:
文件名 clkndata.tpl
...
agent_has_env = yes
additional_agent = serial
...
文件名 clkndata_env.sv
class clkndata_env extends uvm_env:
  ...
  clkndata_config    m_clkndata_config;
  clkndata_agent     m_clkndata_agent;
  clkndata_coverage  m_clkndata_coverage;

  serial_config      m_serial_config;
  serial_agent       m_serial_agent;
  serial_coverage    m_serial_coverage;
  ...
endclass
現在,可以在四個模板文件 bus1.tpl、bus2.tpl、clkndata.tpl 和 serial.tpl 中試驗上述參數的值,并在每次更改后重新運行uvm代碼生成器以查看其效果。
審核編輯:劉清
-
UVM
+關注
關注
0文章
181瀏覽量
19137 -
生成器
+關注
關注
7文章
313瀏覽量
20976 -
CLK
+關注
關注
0文章
127瀏覽量
17125
原文標題:Easier UVM Code Generator Part 4:生成層次化的驗證環境
文章出處:【微信號:芯片驗證工程師,微信公眾號:芯片驗證工程師】歡迎添加關注!文章轉載請注明出處。
發布評論請先 登錄
相關推薦
IC驗證"UVM驗證平臺加入factory機制"(六)
數字IC驗證之“什么是UVM”“UVM的特點”“UVM提供哪些資源”(2)連載中...
參數化UVM IP驗證環境(上)

基于UVM的代碼生成器的開發設計

ASIC芯片設計之UVM驗證
e2 studio Code Generator 集成開發環境 用戶手冊:RL78 API Reference

CS+ Code Generator Tool 集成開發環境 用戶手冊: Pin View Rev.1.10

Easier UVM Code Generator Part 1: 運行仿真
Easier UVM Code Generator Part 2:添加用戶定義的代碼
e2 studio Code Generator 集成開發環境 用戶手冊:RL78 API Reference

CS+ Code Generator Tool 集成開發環境 用戶手冊: Pin View Rev.1.10


 Easier UVM Code Generator Part 4:生成層次化的驗證環境


評論