
1.概述
本篇文章主要介紹如何使用e2studio對瑞薩單片機進行USRT通過定時器中斷方式接收不定長數據。
2.硬件準備
首先需要準備一個開發板,這里我準備的是芯片型號 R7FA2L1AB2DFL 的開發板。
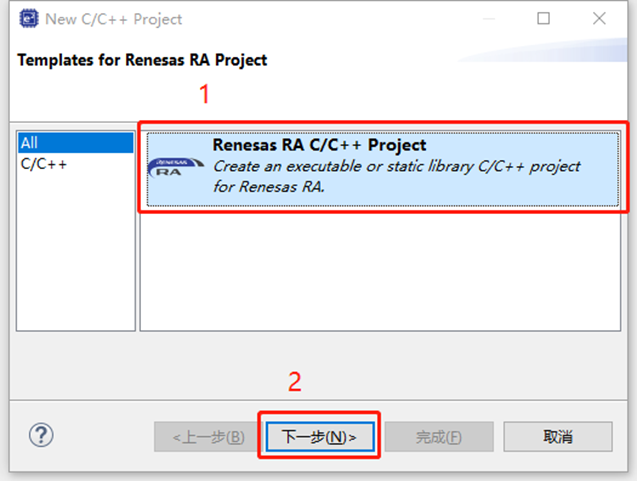
3.新建工程

4.工程模板
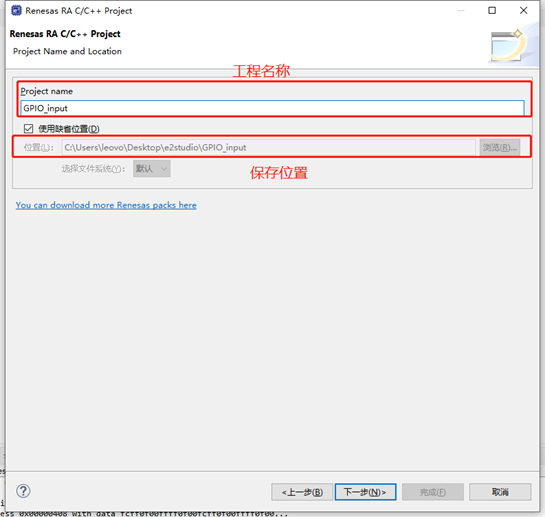
5.保存工程路徑
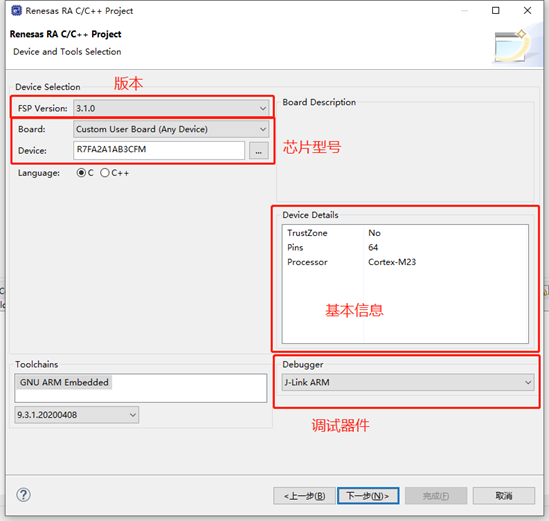
6.芯片配置
本文中使用R7FA2L1AB2DFL來進行演示。
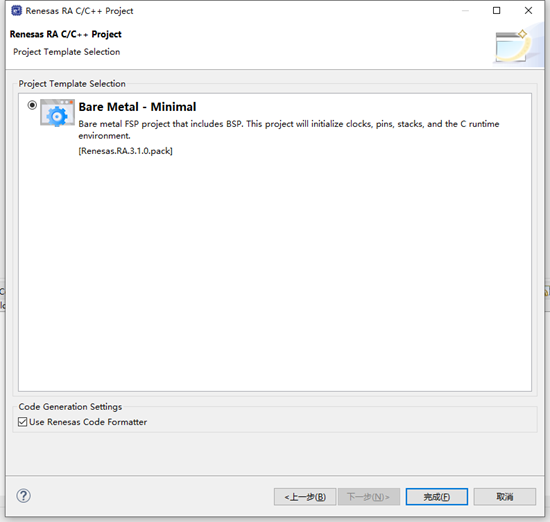
7.工程模板選擇
8.UART配置
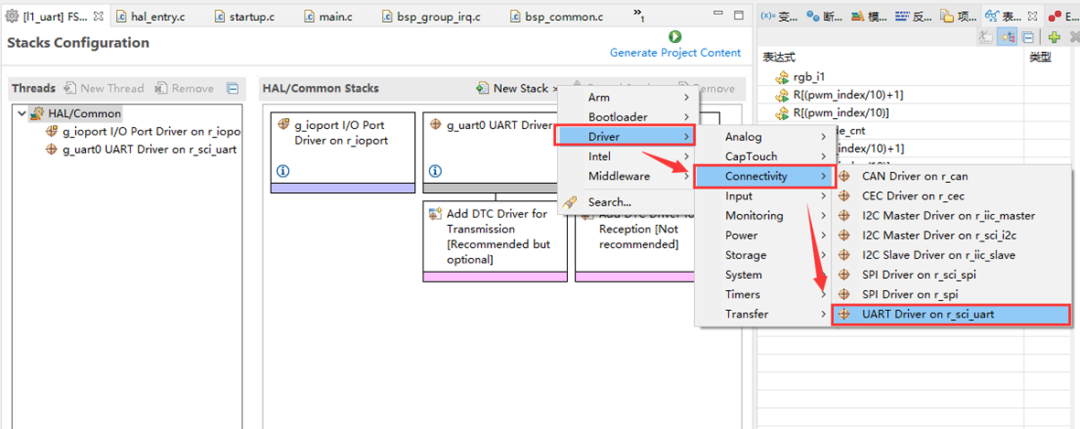
點擊Stacks->New Stack->Driver->Connectivity -> UART Driver on r_sci_uart。
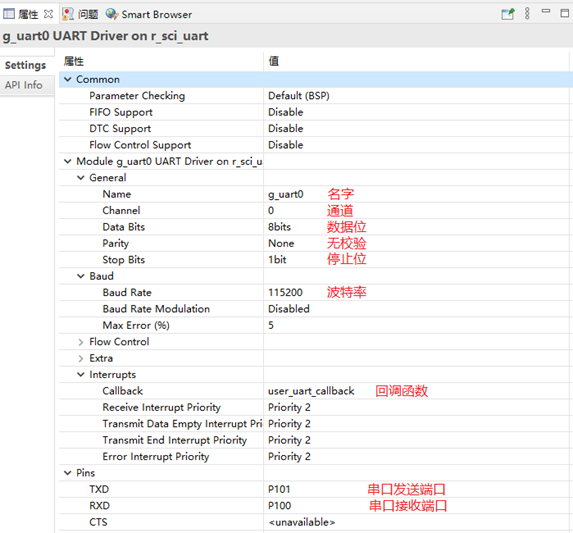
9.UART屬性配置
10.PRINTF重定向
PRINTF重定向已經在上述文章中講述,故可以查看往期文章進行學習。
打印最常用的方法是printf,所以要解決的問題是將printf的輸出重定向到串口,然后通過串口將數據發送出去。
注意一定要加上頭文件#include
#ifdef __GNUC__                                 //串口重定向
    #define PUTCHAR_PROTOTYPE int __io_putchar(int ch)
#else
    #define PUTCHAR_PROTOTYPE int fputc(int ch, FILE *f)
#endif

PUTCHAR_PROTOTYPE
{
        err = R_SCI_UART_Write(&g_uart0_ctrl, (uint8_t *)&ch, 1);
        if(FSP_SUCCESS != err) __BKPT();
        while(uart_send_complete_flag == false){}
        uart_send_complete_flag = false;
        return ch;
}
int _write(int fd,char *pBuffer,int size)
{
    for(int i=0;i
11.回調函數user_uart_callback ()
設置接受到0xff則輸出已經輸入的數據。
若接收到新的數據,使用R_GPT_Reset進行充值定時器計數。
volatile bool uart_send_complete_flag = false;

uint8_t RxBuff[1];      //進入中斷接收數據的數組
uint8_t DataBuff[5000]; //保存接收到的數據的數組
int RxLine=0;           //接收到的數據長度
int Rx_flag=0;                  //接受到數據標志
int Rx_flag_finish=0; //接受完成或者時間溢出

void user_uart_callback (uart_callback_args_t * p_args)
{
    if(p_args->event == UART_EVENT_TX_COMPLETE)
    {
        uart_send_complete_flag = true;
    }
 if(p_args->event ==     UART_EVENT_RX_CHAR)
    {
        RxBuff[0] = p_args->data;
        RxLine++;                      //每接收到一個數據,進入回調數據長度加1
        DataBuff[RxLine-1]=RxBuff[0];  //把每次接收到的數據保存到緩存數組
        Rx_flag=1;
        if(RxBuff[0]==0xff)            //接收結束標志位,這個數據可以自定義,根據實際需求,這里只做示例使用,不一定是0xff
        {
            Rx_flag_finish=1;
        }
        RxBuff[0]=0;
        err = R_GPT_Reset(&g_timer0_ctrl);
        assert(FSP_SUCCESS == err);
    }
}
12.printf_usart打印函數
打印已經接受的數據以及其長度。
void printf_usart(void)
{

    printf("length=%d\r\n",RxLine);
    for(int i=0;i
13.定時器設置
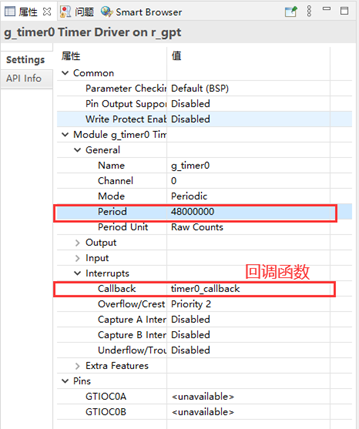
點擊Stacks->New Stack->Driver->Timers -> Timers Driver on r_gpt。

設置500ms無輸入則輸出已經輸入的數據。
頻率=時鐘源/period,若設置計數時間為500ms一次,頻率為1Hz,則period=48M/1=48000000
14.定時器回調函數timer0_callback()
 /* Callback function */
    void timer0_callback(timer_callback_args_t *p_args)
    {
        /* TODO: add your own code here */
        if (TIMER_EVENT_CYCLE_END == p_args->event)
        {
            if(Rx_flag==1)
            {
                printf_usart();
                Rx_flag=0;
            }
        }
}
15.完整代碼
#include "hal_data.h"
#include
FSP_CPP_HEADER
void R_BSP_WarmStart(bsp_warm_start_event_t event);
FSP_CPP_FOOTER

void printf_usart(void);

fsp_err_t err = FSP_SUCCESS;
volatile bool uart_send_complete_flag = false;

uint8_t RxBuff[1];      //進入中斷接收數據的數組
uint8_t DataBuff[5000]; //保存接收到的數據的數組
int RxLine=0;           //接收到的數據長度
int Rx_flag=0;                  //接受到數據標志
int Rx_flag_finish=0;                  //接受完成或者時間溢出
void user_uart_callback (uart_callback_args_t * p_args)
{
    if(p_args->event == UART_EVENT_TX_COMPLETE)
    {
        uart_send_complete_flag = true;
    }
    if(p_args->event ==     UART_EVENT_RX_CHAR)
    {
        RxBuff[0] = p_args->data;
        RxLine++;                      //每接收到一個數據,進入回調數據長度加1
        DataBuff[RxLine-1]=RxBuff[0];  //把每次接收到的數據保存到緩存數組
        Rx_flag=1;
        if(RxBuff[0]==0xff)            //接收結束標志位,這個數據可以自定義,根據實際需求,這里只做示例使用,不一定是0xff
        {
            Rx_flag_finish=1;
        }
        RxBuff[0]=0;
        err = R_GPT_Reset(&g_timer0_ctrl);
        assert(FSP_SUCCESS == err);
    }
}
#ifdef __GNUC__                                 //串口重定向
    #define PUTCHAR_PROTOTYPE int __io_putchar(int ch)
#else
    #define PUTCHAR_PROTOTYPE int fputc(int ch, FILE *f)
#endif
PUTCHAR_PROTOTYPE
{
        err = R_SCI_UART_Write(&g_uart0_ctrl, (uint8_t *)&ch, 1);
        if(FSP_SUCCESS != err) __BKPT();
        while(uart_send_complete_flag == false){}
        uart_send_complete_flag = false;
        return ch;
}
int _write(int fd,char *pBuffer,int size)
{
    for(int i=0;ievent)
        {
            if(Rx_flag==1)
            {
                printf_usart();
                Rx_flag=0;
            }
        }
}
void hal_entry(void)
{
    /* TODO: add your own code here */
    /* Open the transfer instance with initial configuration. */
    err = R_SCI_UART_Open(&g_uart0_ctrl, &g_uart0_cfg);
    assert(FSP_SUCCESS == err);
    /* Initializes the module. */
    err = R_GPT_Open(&g_timer0_ctrl, &g_timer0_cfg);
    /* Handle any errors. This function should be defined by the user. */
    assert(FSP_SUCCESS == err);
    /* Start the timer. */
    (void) R_GPT_Start(&g_timer0_ctrl);
          while(1)
          {
              R_BSP_SoftwareDelay(1, BSP_DELAY_UNITS_MILLISECONDS); // NOLINT100->160
              if(Rx_flag_finish==1)
              {
                      printf_usart();
              }
          }
 #if BSP_TZ_SECURE_BUILD
       /* Enter non-secure code */
       R_BSP_NonSecureEnter();
   #endif
   }

void printf_usart(void)
{

    printf("length=%d\r\n",RxLine);
    for(int i=0;i
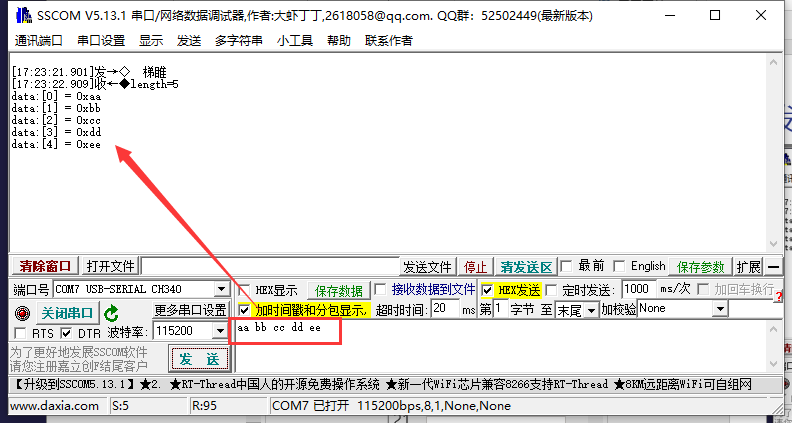
16.發送數據,并且以0xff結尾
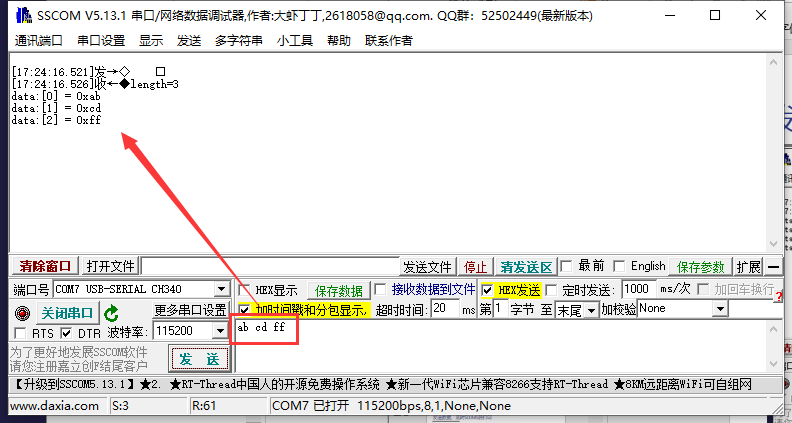
17.發送數據,延時500ms后打印
18.教學視頻
視頻教學稍后會在B站官方賬號更新,請留意B站視頻更新~

原文標題:瑞薩e2studio----USRT通過定時器中斷方式接收不定長數據
文章出處:【微信公眾號:RA生態工作室】歡迎添加關注!文章轉載請注明出處。
-
mcu
+關注
關注
146文章
17019瀏覽量
350373 -
ARM
+關注
關注
134文章
9057瀏覽量
366873 -
嵌入式
+關注
關注
5071文章
19026瀏覽量
303501
發布評論請先 登錄
相關推薦
瑞薩e2studio(1)----瑞薩芯片之搭建FSP環境
STM32CUBEMX(8)--USART通過定時器中斷方式接收不定長數據
STM32CUBEMX(2)--USART通過DMA方式接收不定長數據
stm32f103通過UART_RX空閑中斷服務函數接收不定長數據,運行一段時間后會進入HardFault_Handler的原因?
STM32F030串口用IDLE中斷接收不定長度數據包,中斷異常的原因?
用STM32F030F4串口空閑中斷接收不定長數據,發生中斷后不知道如何計算接收到的字節數?
瑞薩e2studio(28)----SPI 驅動WS2812燈珠

基于RASC的keil電子時鐘制作(瑞薩RA)(7)----配置RTC時鐘及顯示時間


 瑞薩e2studio----USRT通過定時器中斷方式接收不定長數據



評論