在UDS診斷過程中,會涉及到安全訪問的問題,也就是常說的Seed&Key。TSMaster中提供了兩種 Seed&Key 的處理方法:第一種是直接加載DLL文件;第二種是直接在TSMaster的編譯器中直接添加安全算法。
一
加載外部 Seed&Key DLL
TSMaster 診斷模塊支持通過 dll 載入 Seed&Key 算法,該算法 dll 跟主流工具的計算接口兼容,接口定義如下圖所示:

DLL 加載界面如下圖所示:
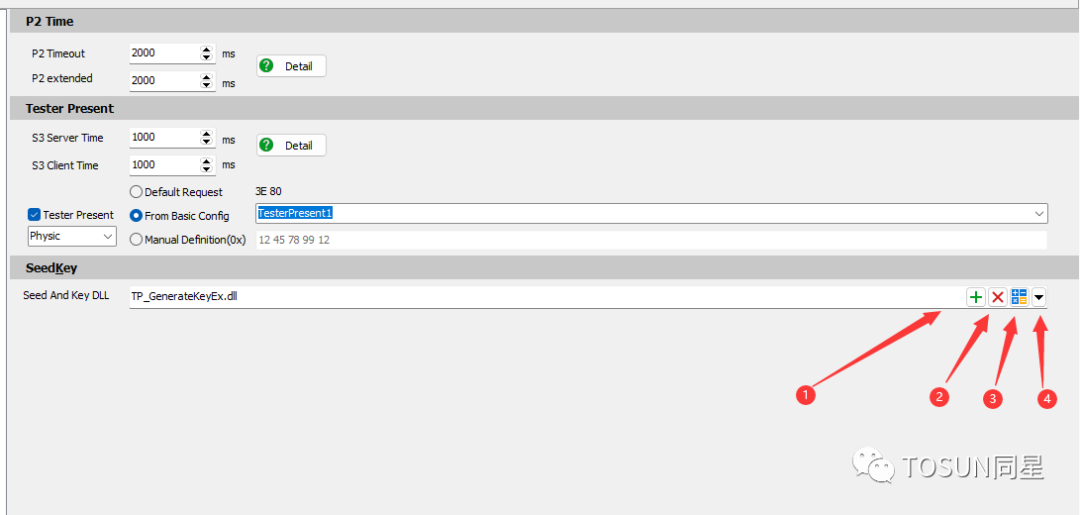
【1】 加載 DLL
【2】 刪除 DLL
【3】 DLL 校驗器,通過此按鈕,用戶可以判斷自己加載的 dll 接口是否正確,算法是否符合設計要求。如下圖所示:
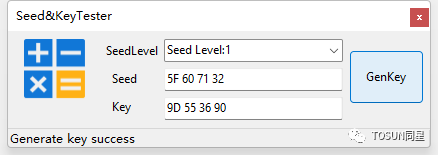
如上圖所示界面,用戶選擇 Seed 的 Level 過后,輸入 Demo Seed 值,點擊 GenKey 進行判斷。如果該 DLL 接口跟模板定義接口統一,則會輸出提示信息:Generate Key Success,然后用戶根據 Key 值跟目標值對比,進一步確認DLL 中的算法是否符合設計要求。
【4】 打開 TSMaster 安裝目錄下 Seed&Key 接口工程所在的路徑。用戶可以拷貝該工程添加自己的 Seed&Key 算法。
“
默認SeedKey函數接口
目前,要想被 TSMaster 的診斷模塊直接加載,該 DLL 必須實現如下三種函數接口中的一種:
【1】 接口 1:
unsigned int GenerateKeyEx(
const unsigned char* ipSeedArray, /* Array for the seed [in] */
unsigned int iSeedArraySize, /* Length of the array for the seed [in] */
const unsigned int iSecurityLevel, /* Security level [in] */
const char* ipVariant, /* Name of the active variant [in] */
unsigned char* iopKeyArray, /* Array for the key [in, out] */
unsigned int iMaxKeyArraySize, /* Maximum length of the array for the key [in] */
unsigned int& oActualKeyArraySize); /* Length of the key [out] */
【2】 接口 2:
unsigned int GenerateKeyExOpt(
const unsigned char* ipSeedArray, /* Array for the seed [in] */
unsigned int iSeedArraySize, /* Length of the array for the seed [in] */
const unsigned int iSecurityLevel, /* Security level [in] */
const char* ipVariant, /* Name of the active variant [in] */
const char* iPara, /* */
unsigned char* iopKeyArray, /* Array for the key [in, out] */
unsigned int iMaxKeyArraySize, /* Maximum length of the array for the key [in] */
unsigned int& oActualKeyArraySize) /* Length of the key [out] */
【3】 接口 3:
bool ASAP1A_CCP_ComputeKeyFromSeed(
const unsigned char* ipSeedArray, /* Array for the seed [in] */
unsigned short iSeedArraySize, /* Length of the array for the seed [in] */
unsigned char* iopKeyArray, /* Array for the key [in, out] */
unsigned short iMaxKeyArraySize, /* Maximum length of the array for the key [in] */
unsigned short* opSizeKey) /* Length of the key [out] */
用戶的 DLL 只要實現了上述任意一種函數接口,即可直接加載到 TP 層模塊中。如果出現加載失敗,主要檢查如下情況:
1. 是否用 Release 模式發布,如果是 Debug 模式,常常會有以上失敗的情況出現。
2. 是否采用 x86 平臺發布,目前 TSMaster 為支持 X86 的版本,用來調試的 DLL 也必須為X86 模式。
“
如何兼容其他函數接口
日常使用中,經常出現用戶已經開發好了 dll,如果該 dll的接口不是上述三種中的任何一種,就無法直接加載到 TSMaster 的診斷模塊中。對于這種情況,推薦采用如下方案來解決此問題:
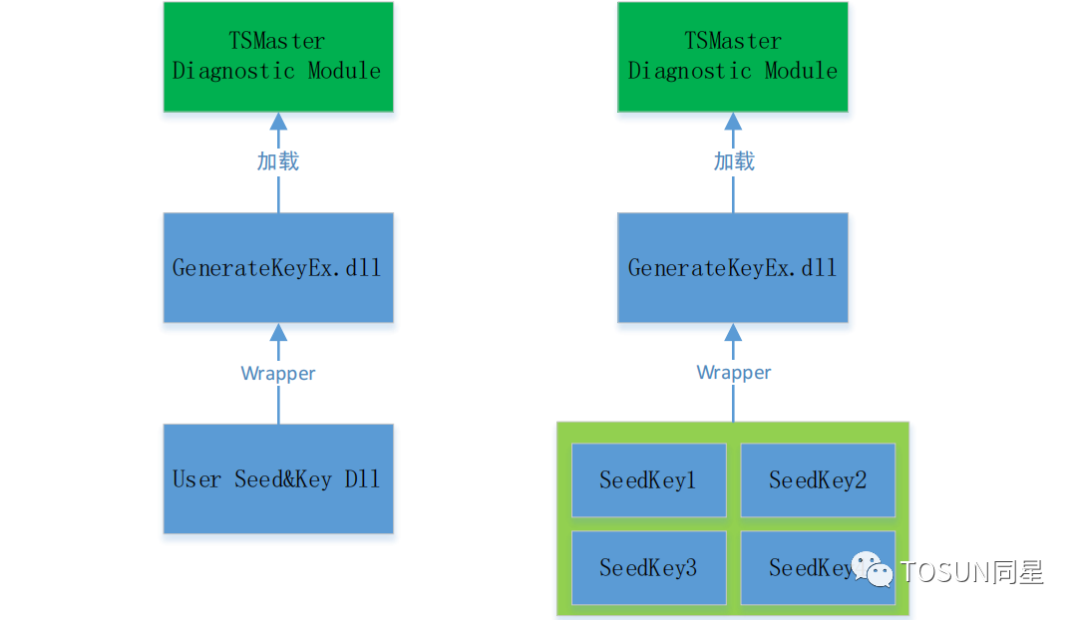
下面以一個實際的實例來講解如何兼容用戶現有的 DLL 文件。
1. 用戶現有的 DLL,名稱為 UserSeedKey.dll。該函數內部的 API 函數有:
? Seed 等級為 1 的時候,調用函數 void GetKeyFromSeed01(byte* ASeed, byte* AKey);
? Seed 等級為 3 的時候,調用函數 void GetKeyFromSeed03(byte* ASeed, byte* AKey);
? Seed 等級為 11 的時候,調用函數 void GetKeyFromSeed11(byte* ASeed, byte* AKey);
該 dll 不支持上述默認加載接口,無法直接加載到 TSMaster 中使用。因此,需要把這些 DLL 再包裝一層,才能載入到 TSMaster 的診斷模塊中。
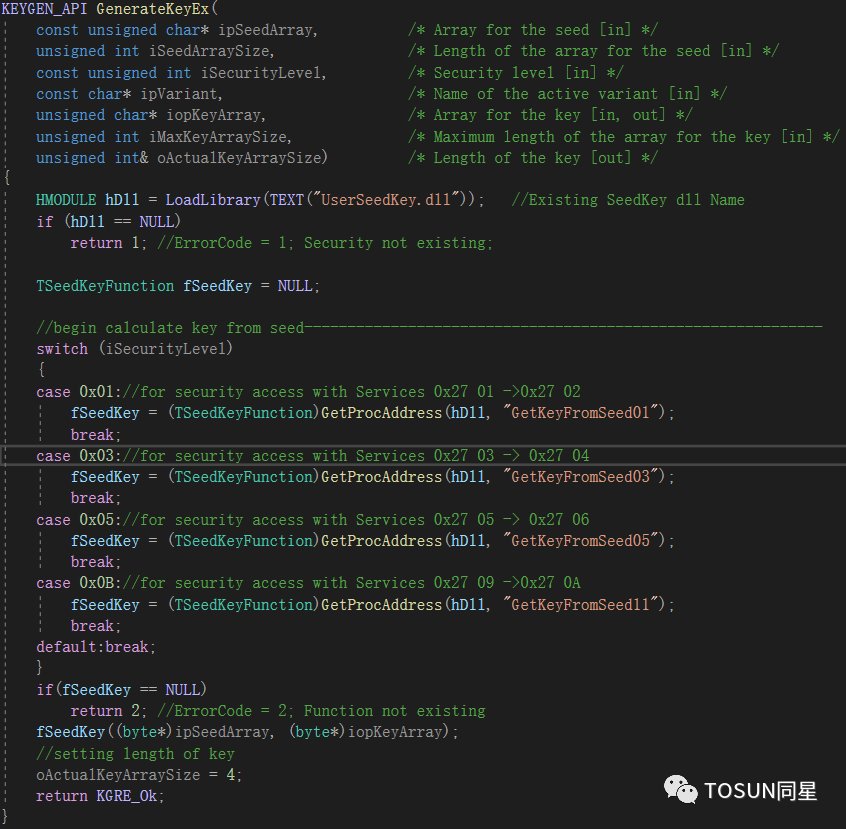
2. 選擇 TSMaster 安裝目錄中提供的 GenerateKeyEx 的模板工程,在該工程中調用上述 DLL的函數接口。基本思路是:
? 采用 Loadlibrary 動態用戶現有的 dll。
? 根據傳入的 Level 參數,采用 GetProcAddress 函數動態獲取實際的用于計算 Key 的函數指針。
? 如果獲取函數指針成功,則使用該函數指針傳輸 Seed 值,并計算對應的 Key 值。
詳細調用示例函數如下圖所示:
3. 該 GenerateKeyEx 工程開發結束后,TSMaster 直接加載 GenerateKeyEx 所在的 dll。需要注意的是,用戶需要把現有的UserSeedKey.dll 拷貝到TSMaster 根目錄或者GenerateKeyEx.dll 所在的目錄。如果不拷貝過去,GenerateKeyEx.dll 執行的時候會出現找不到對應依賴 dll 的情況,解鎖失敗。
總結:
在 TSMaster 安裝目錄中,提供了封裝 Seed&Key 算法的模板工程。如 GenerateKeyEx,GenerateKeyExOpt ASAP1A_CCP_ComputeKeyFromSeed,用戶基于此模板工程開發即可得到能夠直接加載的 dll 函數。
同時,也提供了二次封裝的 dll 的工程,比如 GenerateKeyEx_Wrapper_Demo,該工程演示了如何基于已經存在的 SeedKey 算法庫進行包裝,生成可以直接加載到 TSMaster 診斷模塊中的 dll 的過程。
二
采用內置的算法編輯器
基本步驟如下所示:
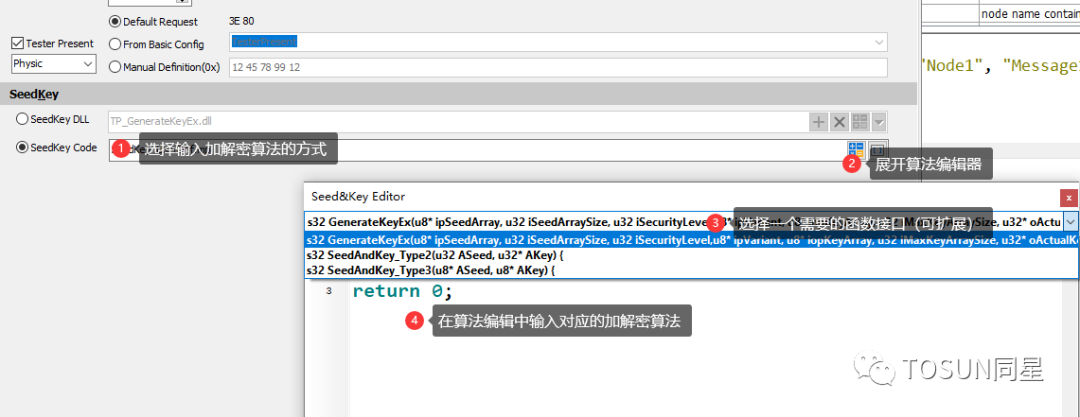
注意事項:
【1】 算法函數的接口,TSMaster 目前提供了最常用的接口形式,如果用戶有自己特殊的接口形式,無法覆蓋住,請聯系上海同星把此接口增加到選項中。

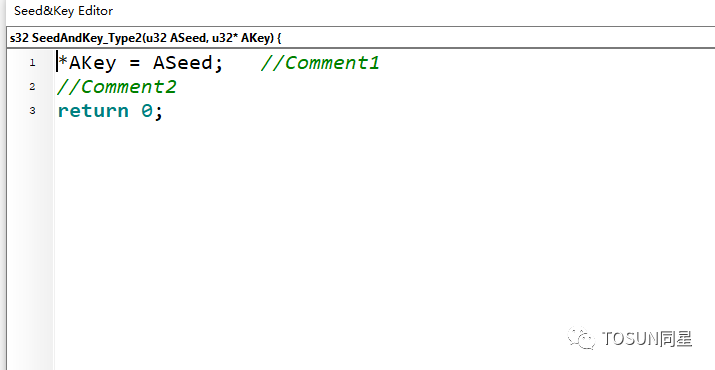
【2】 所有的接口函數都定義了返回值 s32。增加此約束,主要是增加函數的嚴謹性。返回值為 0 表示成功,為其他值則有對應的錯誤碼。用戶在編輯代碼的時候,最后一行一定不要忘了輸入返回值,否則系統執行函數過后,會認為算法執行失敗,不予往后面執行。如下所示:
【3】 添加算法過后,點擊 OK 退出。TSMaster 內置編譯器會自動解釋該算法,并準備好在執行診斷的過程中使用。
以上就是Seed&Key 的兩種處理方法,如有任何問題可與同星聯系。
-
dll
+關注
關注
0文章
115瀏覽量
45380 -
編譯器
+關注
關注
1文章
1618瀏覽量
49057 -
MASTER
+關注
關注
0文章
103瀏覽量
11266
發布評論請先 登錄
相關推薦
放大電路的基本分析方法有哪兩種
TSMaster 中 Hex 文件編輯器使用詳細教程

詳解TSMaster CAN 與 CANFD 的 CRC E2E 校驗方法

TSMaster VLAN配置方法

在TSMaster中加載基于DotNet平臺的Seed&amp;Key

TSMaster如何同時記錄標定變量和DBC信號至BLF文件

高頻電流探頭的兩種測量方法的過程與特點分析
Maxwell中兩種用戶自定義材料庫的實現方法


 一文了解TSMaster中Seed和key的兩種處理方法




評論