0. 引言
在實際應用中,并不是單一的使用本地緩存或者redis,更多是組合使用來滿足不同的業務場景,于是如何優雅的組合本地緩存和遠程緩存就成了我們要研究的問題,而這一點,阿里開源的jetcache組件幫我們實現了
1. jetcache簡介
jetcache是阿里開源的基于java開發的緩存框架,支持多種緩存類型:本地緩存、分布式緩存、多級緩存。能夠滿足不同業務場景的緩存需求。
jetcache具有上手簡單、性能高效、拓展性強的特點。支持緩存預熱 、緩存key前綴等功能。結合spring-cache使用,可以實現十分優雅的緩存類型切換
2. jetcache使用
1、引入依賴,這里我們使用sringboot項目框架,同時使用redis作為遠程緩存。于是我們引入jetcache-starter-redis依賴,這里我的springboot版本為2.6.13
如果是非springboot項目可以參考官網說明配置

com.alicp.jetcache
jetcache-starter-redis
2.7.0


redis.clients
jedis
4.3.1
對應的版本說明如下:springboot與jetcache版本關系

2、修改配置文件,配置redis地址和線程數
jetcache:
#統計間隔,0表示不統計,開啟后定期在控制臺輸出緩存信息
statIntervalMinutes:15
#是否把cacheName作為遠程緩存key前綴
areaInCacheName:false
#本地緩存配置
local:
default:#default表示全部生效,也可以指定某個cacheName
#本地緩存類型,其他可選:caffeine/linkedhashmap
type:linkedhashmap
keyConvertor:fastjson
#遠程緩存配置
remote:
default:#default表示全部生效,也可以指定某個cacheName
type:redis
#key轉換器方式n
keyConvertor:fastjson
broadcastChannel:projectA
#redis序列化方式
valueEncoder:java
valueDecoder:java
#redis線程池
poolConfig:
minIdle:5
maxIdle:20
maxTotal:50
#redis地址與端口
host:127.0.0.1
port:6379
更詳細的參數配置
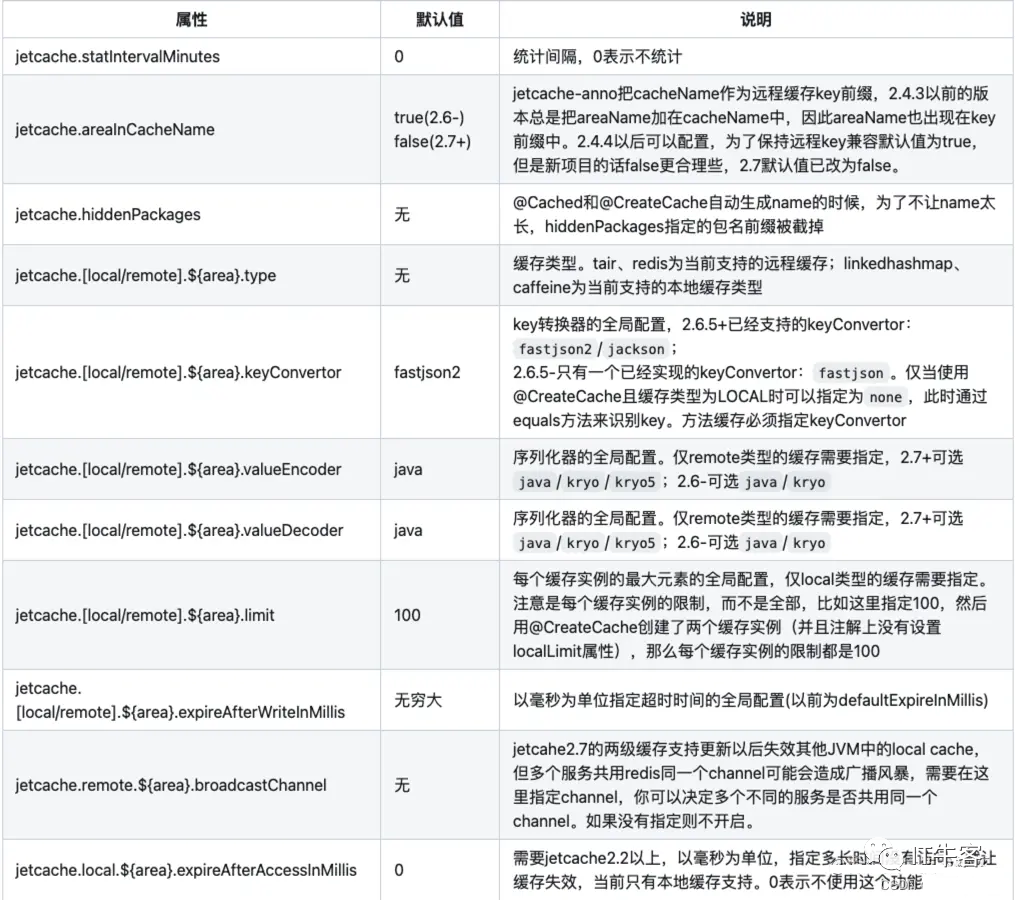
3、啟動類添加注解@EnableCreateCacheAnnotation,開啟緩存,添加@EnableMethodCache(basePackages = "com.example.jetcachedemo")注解,配置緩存方法掃描路徑
4、使用緩存可以通過三種方式:
方式一(推薦)AOP模式:通過@Cached,@CacheUpdate,@CacheInvalidate注解
@RestController
@RequestMapping("user")
publicclassUserController{

@GetMapping("getRemote")
@Cached(name="userCache:",key="#id",expire=3600,timeUnit=TimeUnit.SECONDS,cacheType=CacheType.REMOTE)
publicUsergetRemote(Longid){
//直接新建用戶,模擬從數據庫獲取數據
Useruser=newUser();
user.setId(id);
user.setName("用戶remote"+id);
user.setAge(23);
user.setSex(1);
System.out.println("第一次獲取數據,未走緩存:"+id);
returnuser;
}

@GetMapping("getLocal")
@Cached(name="userCache:",key="#id",expire=3600,timeUnit=TimeUnit.SECONDS,cacheType=CacheType.LOCAL)
publicUsergetLocal(Longid){
//直接新建用戶,模擬從數據庫獲取數據
Useruser=newUser();
user.setId(id);
user.setName("用戶local"+id);
user.setAge(23);
user.setSex(1);
System.out.println("第一次獲取數據,未走緩存:"+id);
returnuser;
}

@GetMapping("getBoth")
@Cached(name="userCache:",key="#id",expire=3600,timeUnit=TimeUnit.SECONDS,cacheType=CacheType.BOTH)
publicUsergetBoth(Longid){
//直接新建用戶,模擬從數據庫獲取數據
Useruser=newUser();
user.setId(id);
user.setName("用戶both"+id);
user.setAge(23);
user.setSex(1);
System.out.println("第一次獲取數據,未走緩存:"+id);
returnuser;
}

@PostMapping("updateUser")
@CacheUpdate(name="userCache:",key="#user.id",value="#user")
publicBooleanupdateUser(@RequestBodyUseruser){
//TODO更新數據庫
returntrue;
}

@PostMapping("deleteUser")
@CacheInvalidate(name="userCache:",key="#id")
publicBooleandeleteUser(Longid){
//TODO從數據庫刪除
returntrue;
}

}
這里要注意實體類User一定要實現序列化,即聲明Serializable
@Data
publicclassUserimplementsSerializable{

privateLongid;
privateStringname;
privateIntegerage;
privateIntegersex;
}
方式二 API模式:通過@CreateCache,注:在jetcache 2.7 版本CreateCache注解已廢棄,不推薦使用
@RestController
@RequestMapping("user2")
publicclassUser2Controller{

@CreateCache(name="userCache:",expire=3600,timeUnit=TimeUnit.SECONDS,cacheType=CacheType.BOTH)
privateCacheuserCache;

@GetMapping("get")
publicUserget(Longid){
if(userCache.get(id)!=null){
return(User)userCache.get(id);
}
Useruser=newUser();
user.setId(id);
user.setName("用戶both"+id);
user.setAge(23);
user.setSex(1);
userCache.put(id,user);
System.out.println("第一次獲取數據,未走緩存:"+id);
returnuser;
}

@PostMapping("updateUser")
publicBooleanupdateUser(@RequestBodyUseruser){
//TODO更新數據庫
userCache.put(user.getId(),user);
returntrue;
}

@PostMapping("deleteUser")
publicBooleandeleteUser(Longid){
//TODO從數據庫刪除
userCache.remove(id);
returntrue;
}

}
方式三 高級API模式:通過CacheManager,2.7 版本才可使用
(1)添加依賴
com.alibaba
fastjson
2.0.25
(2)書寫配置類
@Configuration
publicclassJetcacheConfig{

@Autowired
privateCacheManagercacheManager;
privateCacheuserCache;

@PostConstruct
publicvoidinit(){
QuickConfigqc=QuickConfig.newBuilder("userCache:")
.expire(Duration.ofSeconds(3600))
.cacheType(CacheType.BOTH)
//本地緩存更新后,將在所有的節點中刪除緩存,以保持強一致性
.syncLocal(false)
.build();
userCache=cacheManager.getOrCreateCache(qc);
}

@Bean
publicCachegetUserCache(){
returnuserCache;
}
}
(3)調用代碼
@RestController
@RequestMapping("user3")
publicclassUser3Controller{

@Autowired
JetcacheConfigjetcacheConfig;
@Autowired
privateCacheuserCache;

@GetMapping("get")
publicUserget(Longid){
if(userCache.get(id)!=null){
return(User)userCache.get(id);
}
Useruser=newUser();
user.setId(id);
user.setName("用戶both"+id);
user.setAge(23);
user.setSex(1);
userCache.put(id,user);
System.out.println("第一次獲取數據,未走緩存:"+id);
returnuser;
}

@PostMapping("updateUser")
publicBooleanupdateUser(@RequestBodyUseruser){
//TODO更新數據庫
userCache.put(user.getId(),user);
returntrue;
}

@PostMapping("deleteUser")
publicBooleandeleteUser(Longid){
//TODO從數據庫刪除
userCache.remove(id);
returntrue;
}

}
多級緩存的形式,會先從本地緩存獲取數據,本地獲取不到會從遠程緩存獲取
5、啟動redis,啟動演示項目
注意,如果啟動出現NoClassDefFoundError: redis/clients/util/Pool或NoClassDefFoundError: redis/clients/jedis/UnifiedJedis報錯,說明springboot與jetcache版本不一致,對應關系可參考上述第一步中的說明 同時如果使用的是jetcache2.7.x版本,因為該版本中有jedis包的依賴,需要額外添加如下依賴,或者將jetcache版本將至2.6.5以下
redis.clients
jedis
4.3.1
3. 測試
3.1 方式一測試
1、訪問localhost:8088/user/getRemote?id=1
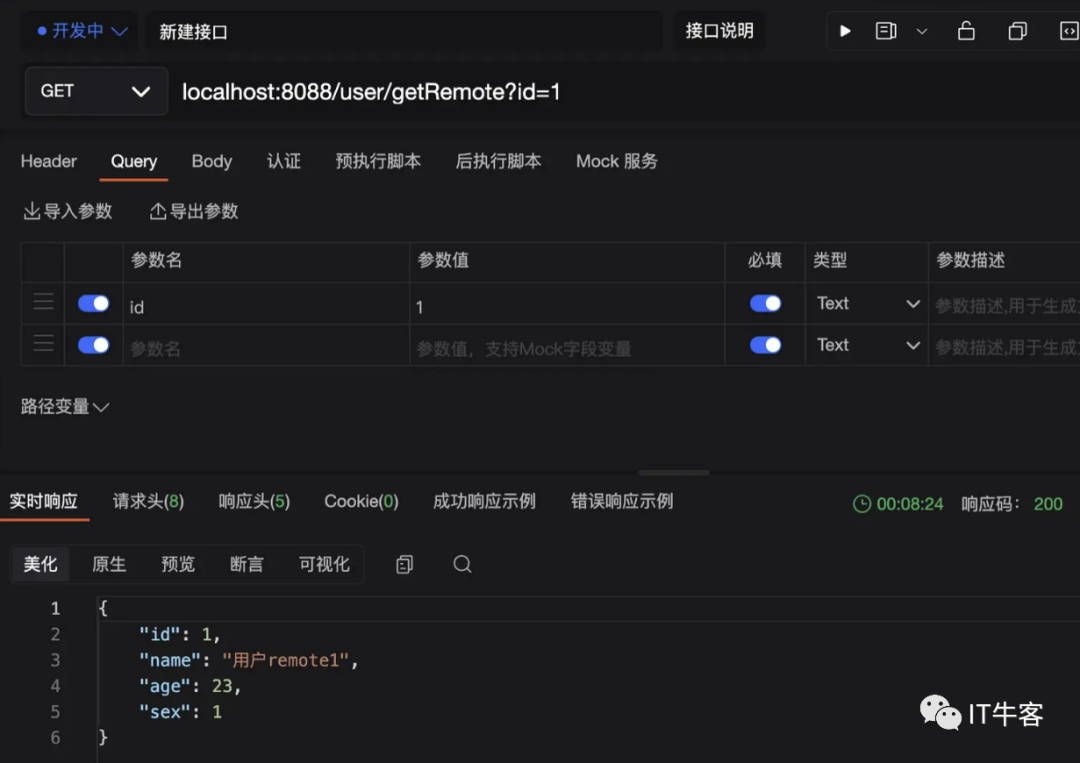
因為配置的是遠程緩存,在redis中也能看到對應的key

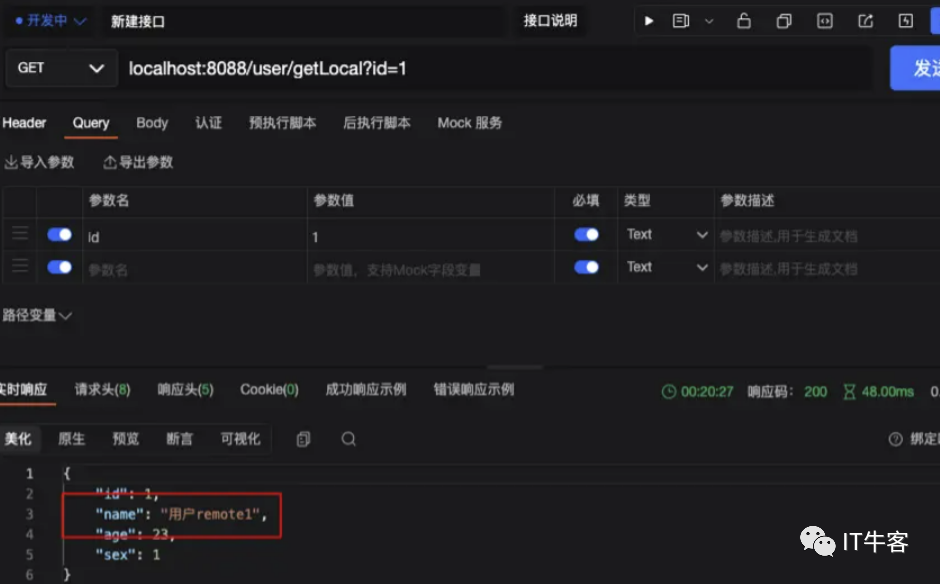
2、訪問localhost:8088/user/getLocal?id=1,這個方法是從本地緩存獲取的,現在只有遠程緩存上有數據,我們調用發現緩存數據還是拿到了,這說明當我們在配置文件中配置了本地緩存和遠程緩存后,方式一中本地緩存和遠程緩存會自動相互調用
比如本地緩存有這個key,redis中沒有,通過遠程緩存方式訪問時,會先從redis獲取,如果沒有會自動獲取本地緩存,但是數據還是存儲在本地緩存,并不會同步到redis上,這樣更加靈活的實現了多級緩存架構
3.2 方式二測試
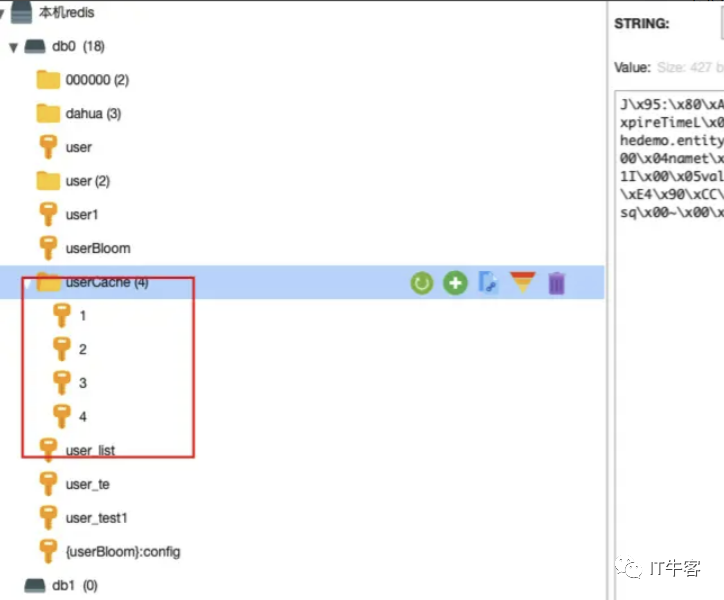
1、再測試下CreateCache的形式:localhost:8088/user2/get?id=4
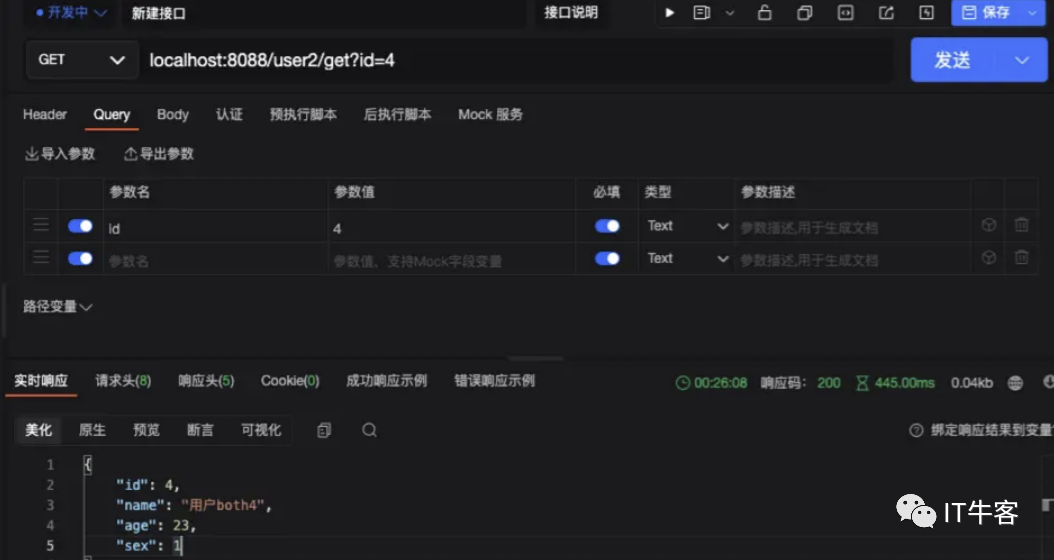
正常獲取了,并且redis中也有了對應的值

而當我們把緩存方式更改為LOCAL后,再訪問localhost:8088/user2/get?id=5
@CreateCache(name="userCache:",expire=3600,timeUnit=TimeUnit.SECONDS,cacheType=CacheType.LOCAL)
會發現redis中就沒有對應緩存了,只在本地緩存存在,說明我們指定本地緩存的形式成功了
3.3 方式三測試
1、調用localhost:8088/user3/get?id=11
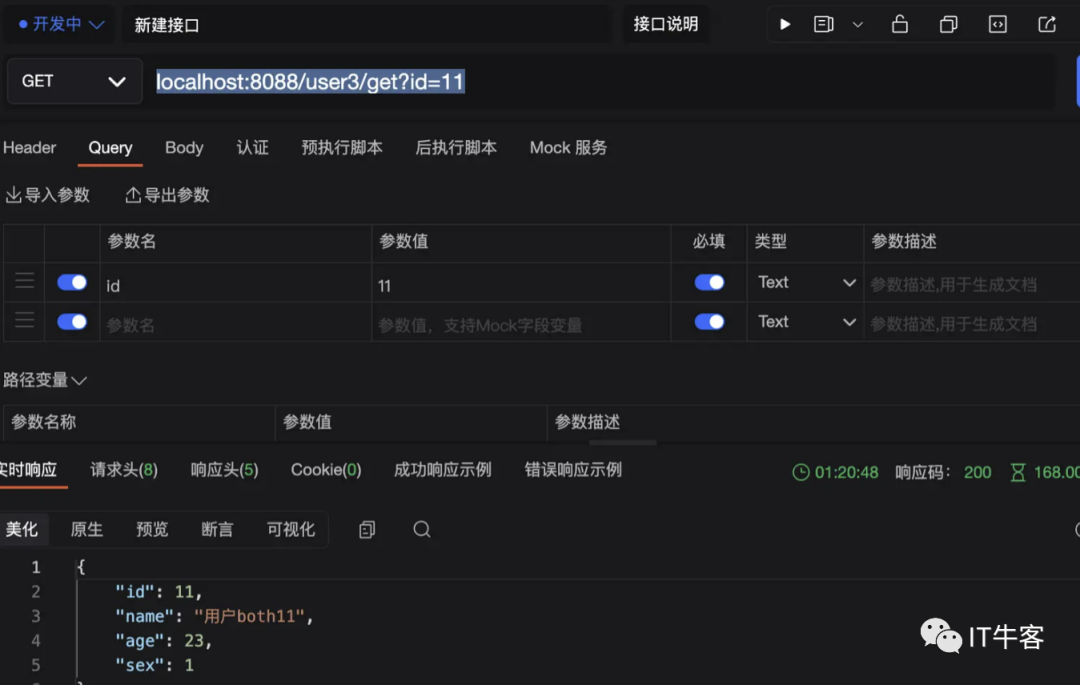
redis中緩存設置成功!

4. 常見報錯
1、 ClassNotFoundException: com.alibaba.fastjson.JSON 解決:添加依賴
com.alibaba
fastjson
2.0.25
2、NoClassDefFoundError: redis/clients/jedis/UnifiedJedis 解決: 添加依賴
redis.clients
jedis
4.3.1
或者將jetcache版本降低至2.6.5以下
演示源碼
https://gitee.com/wuhanxue/wu_study/tree/master/demo/jetcache-demo
審核編輯:湯梓紅
-
JAVA
+關注
關注
19文章
2958瀏覽量
104553 -
緩存
+關注
關注
1文章
233瀏覽量
26649 -
開源
+關注
關注
3文章
3252瀏覽量
42407 -
spring
+關注
關注
0文章
338瀏覽量
14311 -
Redis
+關注
關注
0文章
371瀏覽量
10846
原文標題:jetcache:阿里這款多級緩存框架一定要掌握
文章出處:【微信號:magedu-Linux,微信公眾號:馬哥Linux運維】歡迎添加關注!文章轉載請注明出處。
發布評論請先 登錄
相關推薦
java框架學習-Webwork2開發
【南京】誠聘JAVA開發工程師
java開源工具包-Jodd框架
阿里巴巴開源的通用緩存訪問框架JetCache介紹
基于AOP的智能Web緩存框架
Java Web的開發前奏詳細資料免費下載
基于Java的接口快速開發框架
基于Java的接口快速開發框架——magic-api


 基于java開發的緩存框架jetcache簡介


評論