1 使用synchronized,wait,notify,notifyAll
使用synchronized 等方法來控制共享變量,完成交替打印。
思路:
- 在同步方法中先判斷信號量,如果不是當前需要的信號使用wait()阻塞線程。
- 完成打印之后切換信號變量。再喚醒所有線程。
public class ThreadSignaling2 {

    public static void main(String[] args) {
        NorthPrint print = new NorthPrint(new NorthSignal());
        ThreadA threadA = new ThreadA(print);
        ThreadB threadB = new ThreadB(print);
        threadA.start();
        threadB.start();

    }
public static class ThreadA extends Thread {
    private NorthPrint print;
    public ThreadA(NorthPrint print) {
        this.print = print;
    }
    @Override
    public void run() {
        print.printNumber();

    }
}

public static class ThreadB extends Thread {
    private NorthPrint print;
    public ThreadB(NorthPrint print) {
        this.print = print;
    }
    @Override
    public void run() {
        print.printChar();
    }
}
}

public class NorthSignal {
    protected boolean hasDataToProcess = false;
    public synchronized boolean hasDataToProcess(){
        return this.hasDataToProcess;
    }
    public synchronized void setHasDataToProcess(boolean hasData){
        this.hasDataToProcess = hasData;
    }
}

public class NorthPrint {
    private NorthSignal signal;
    public NorthPrint(NorthSignal signal) {
        this.signal = signal;
    }

    public synchronized void printNumber() {
        try {
            for (int i = 1; i <= 26; ) {
                if (signal.hasDataToProcess()) {
                    wait();
                }else {
                    System.out.print(i * 2 - 1);
                    System.out.print(i * 2);
                    signal.setHasDataToProcess(true);
                    i++;
                    notifyAll();
                }
            }
        } catch (InterruptedException e) {
            e.printStackTrace();
        }
    }

    public synchronized void printChar() {
        try {
            for (int i = 'A'; i <= 'Z'; ) {
                if (!signal.hasDataToProcess()) {
                    wait();
                }else {
                    System.out.print((char)i);
                    signal.setHasDataToProcess(false);
                    i++;
                    notifyAll();
                }
            }
        } catch (InterruptedException e) {
            e.printStackTrace();
        }
    }
}
2 Lock,Condition
通過使用Lock,Condition的signal() 和 await()來進行換新阻塞交替打印。
public class ThreadSignalingReentrant {
    public static void main(String[] args) {
        Lock lock = new ReentrantLock();
        Condition condition1 = lock.newCondition();
        Condition condition2 = lock.newCondition();
        new Thread(() - > {
            try{
                lock.lock();
                int i = 1;
                while (i <= 26) {
                    System.out.print(i * 2 - 1);
                    System.out.print(i * 2);
                    i++;
                    condition2.signal();
                    condition1.await();
                }
                condition2.signal();
            } catch (InterruptedException e) {
                e.printStackTrace();
            } finally {
                lock.unlock();
            }
        }).start();

        new Thread(() - > {
            try{
                lock.lock();
                char i = 'A';
                while (i <= 'Z') {
                    System.out.print(i);
                    i++;
                    condition1.signal();
                    condition2.await();
                }
                condition1.signal();
            } catch (InterruptedException e) {
                e.printStackTrace();
            } finally {
                lock.unlock();
            }

        }).start();
    }
}
3 LockSupport
LockSupport 用來創建鎖和其他同步類的基本線程阻塞。當調用LockSupport.park時,表示當前線程將會等待,直至獲得許可,當調用LockSupport.unpark時,必須把等待獲得許可的線程作為參數進行傳遞,好讓此線程繼續運行。
其中:
- park函數,阻塞線程,并且該線程在下列情況發生之前都會被阻塞: ① 調用unpark函數,釋放該線程的許可。② 該線程被中斷。③ 設置的時間到了。并且,當time為絕對時間時,isAbsolute為true,否則,isAbsolute為false。當time為0時,表示無限等待,直到unpark發生。
- unpark函數,釋放線程的許可,即激活調用park后阻塞的線程。這個函數不是安全的,調用這個函數時要確保線程依舊存活。
public class ThreadSignalingLockSupport {
    private static Thread threadA = null;
    private static Thread threadB = null;

    public static void main(String[] args) {
        threadA = new Thread(() - > {
            int i = 1;
            while (i <= 26) {
                System.out.print(i * 2 - 1);
                System.out.print(i * 2);
                i++;
                LockSupport.unpark(threadB);
                LockSupport.park();
            }
        });
        threadB = new Thread(() - > {
            char i = 'A';
            while (i <= 'Z') {
                LockSupport.park();
                System.out.print(i);
                i++;
                LockSupport.unpark(threadA);
            }
        });
        threadA.start();
        threadB.start();
    }
}
4 volatile
根據volatile修飾的對象在JVM內存中的可見性,完成交替打印
public class ThreadSignalingVolatile {

    enum ThreadRunFlag{PRINT_NUM, PRINT_CHAR}
    private volatile static ThreadRunFlag threadRunFlag = ThreadRunFlag.PRINT_NUM;

    public static void main(String[] args) {

        new Thread(() - > {
            int i = 1;
            while (i <= 26) {
                while(threadRunFlag == ThreadRunFlag.PRINT_CHAR){}
                System.out.print(i * 2 - 1);
                System.out.print(i * 2);
                i++;
                threadRunFlag = ThreadRunFlag.PRINT_CHAR;
            }
        }).start();

        new Thread(()- >{
            char i = 'A';
            while (i <= 'Z'){
                while (threadRunFlag == ThreadRunFlag.PRINT_NUM){}
                System.out.print(i);
                i++;
                threadRunFlag = ThreadRunFlag.PRINT_NUM;
            }
        }).start();

    }
}
5 AtomicInteger
同樣利用了AtomicInteger的并發特性,來完成交替打印。
public class AtomicIntegerSignal {

    private static AtomicInteger threadSignal = new AtomicInteger(1);
    public static void main(String[] args) {

        new Thread(() - > {
            int i = 1;
            while (i <= 26) {
                while(threadSignal.get() == 2){}
                System.out.print(i * 2 - 1);
                System.out.print(i * 2);
                i++;
                threadSignal.set(2);
            }
        }).start();

        new Thread(()- >{
            char i = 'A';
            while (i <= 'Z'){
                while (threadSignal.get() == 1){}
                System.out.print(i);
                i++;
                threadSignal.set(1);
            }
        }).start();

    }
}
6 利用 Piped Stream
使用Stream中的Piped Stream分別控制輸出,但是其運行速度極慢。
public class ThreadSignalPipedStream {

    private final PipedInputStream inputStream1;
    private final PipedOutputStream outputStream1;
    private final PipedInputStream inputStream2;
    private final PipedOutputStream outputStream2;
    private final byte[] MSG;

    public ThreadSignalPipedStream() {
        inputStream1 = new PipedInputStream();
        outputStream1 = new PipedOutputStream();
        inputStream2 = new PipedInputStream();
        outputStream2 = new PipedOutputStream();
        MSG = "Go".getBytes();
        try {
            inputStream1.connect(outputStream2);
            inputStream2.connect(outputStream1);
        } catch (IOException e) {
            e.printStackTrace();
        }
    }

    public static void main(String[] args) {
        ThreadSignalPipedStream signal = new ThreadSignalPipedStream();
        signal.threadA().start();
        signal.threadB().start();

    }

    public Thread threadA (){
        final String[] inputArr = new String[2];

        return new Thread() {
            String[] arr = inputArr;
            PipedInputStream in1 = inputStream1;
            PipedOutputStream out1 = outputStream1;
            @Override
            public void run() {
                int i = 1;
                while (i <= 26) {
                    try {
                        System.out.print(i * 2 - 1);
                        System.out.print(i * 2);
                        out1.write(MSG);
                        byte[] inArr = new byte[2];
                        in1.read(inArr);
                        while(!"Go".equals(new String(inArr))){ }
                        i++;
                    } catch (IOException e) {
                        e.printStackTrace();
                    }
                }
            }
        };
    }

    public Thread threadB (){
        final String[] inputArr = new String[2];
        return new Thread() {
            private String[] arr = inputArr;
            private PipedInputStream in2 = inputStream2;
            private PipedOutputStream out2 = outputStream2;
            @Override
            public void run() {
                char i = 'A';
                while (i <= 'Z'){
                    try {
                        byte[] inArr = new byte[2];
                        in2.read(inArr);
                        while(!"Go".equals(new String(inArr))){  }
                        System.out.print(i);
                        i++;
                        out2.write(MSG);
                    } catch (IOException e) {
                        e.printStackTrace();
                    }
                }
            }
        };
    }
}
7 利用BlockingQueue
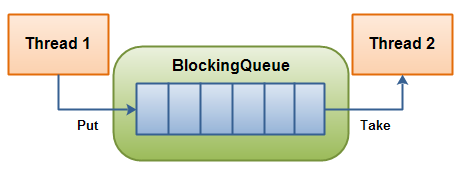
BlockingQueue 通常用于一個線程生產對象,另外一個線程消費這些對象的場景。

img
一個線程負責往里面放,另一個線程從里面取一個BlockingQueue。
線程可以持續將新對象插入到隊列之中,直到隊列達到可容納的臨界點。當隊列到達臨界點之后,線程生產者會在插入對象是進入阻塞狀態,直到有另外一個線程從隊列中拿走一個對象。消費線程會不停的從隊列中拿出對象。如果消費線程從一個空的隊列中獲取對象的話,那么消費線程會處阻塞狀態,直到一個生產線程把對象丟進隊列。
BlockingQueue常用方法如下:

image-20210906230302480
那么我們使用一個LinkedBlockingQueue來完成開始出現的題目
方法中我們使用offer,peek,poll這幾個方法來完成。
public class ThreadSignalBlockingQueue {
    private static LinkedBlockingQueue< String > queue = new LinkedBlockingQueue<  >();
    public static void main(String[] args) throws InterruptedException {
        new Thread(() - > {
            int i = 1;
            while (i <= 26) {
                System.out.print(i * 2 - 1);
                System.out.print(i * 2);
                i++;
                queue.offer("printChar");
                while(!"printNumber".equals(queue.peek())){}
                queue.poll();
            }
        }).start();

        new Thread(()- >{
            char i = 'A';
            while (i <= 'Z'){
                while(!"printChar".equals(queue.peek())){}
                queue.poll();
                System.out.print(i);
                i++;
                queue.offer("printNumber");
            }
        }).start();
    }
}
我們也可以使用兩個LinkedBlockinQueue來完成,分別使用帶阻塞的put,take來完成。代碼如下
public class ThreadSignalBlockingQueue2 {
    private static LinkedBlockingQueue< String > queue1 = new LinkedBlockingQueue<  >();
    private static LinkedBlockingQueue< String > queue2 = new LinkedBlockingQueue<  >();
    public static void main(String[] args) throws InterruptedException {
        new Thread(() - > {
            int i = 1;
            while (i <= 26) {
                System.out.print(i * 2 - 1);
                System.out.print(i * 2);
                i++;
                try {
                    queue2.put("printChar");
                    queue1.take();
                } catch (InterruptedException e) {
                    e.printStackTrace();
                }

            }
        }).start();

        new Thread(()- >{
            char i = 'A';
            while (i <= 'Z'){
                try {
                    queue2.take();
                    System.out.print(i);
                    i++;
                    queue1.put("printNumber");
                } catch (InterruptedException e) {
                    e.printStackTrace();
                }
            }
        }).start();
    }
}
8 使用CyclicBarrier
CyclicBarrier的字面意思就是可循環使用的屏障,它可以讓一組線程到達一個阻塞點(屏障)時被阻塞。直到最后一個線程到達阻塞點后,屏障才會開門,然后所有被攔截的線程就可以繼續運行。
CyclicBarrier中有一個barrierCommand,主要就是在所有線程到達阻塞點之后執行的一個線程。可以使用構造方法來 CyclicBarrier(int parties, Runnable barrierAction)進行構建。
關于使用CyclicBarrier進行交替打印,先來說一下思路。
- 利用await()方法使得每循環一次都阻塞線程。
- 將每次循環輸出的值放到一個共享的同步list里面。
- 然后再使用barrierAction到達阻塞點之后進行輸出。由于list里面的值先后順序有變化,所有先排序然后再打印。
下面我們看一下實操代碼:
public class ThreadSignalCyclicBarrier {
    private static List< String > list =  Collections.synchronizedList(new ArrayList<  >());
    public static void main(String[] args) throws Exception {
        CyclicBarrier barrier = new CyclicBarrier(2,barrierRun());

        new Thread(() - > {
            int i = 1;
            while (i <= 26) {
                list.add(String.valueOf(i * 2 - 1));
                list.add(String.valueOf(i * 2));
                i++;
                try {
                    barrier.await();
                } catch (Exception e) {
                    e.printStackTrace();
                }

            }
        }).start();

        new Thread(()- >{
            char i = 'A';
            while (i <= 'Z'){
                try {
                    list.add(String.valueOf(i));
                    i++;
                    barrier.await();
                } catch (Exception e) {
                    e.printStackTrace();
                }
            }
        }).start();


    }

    public static Runnable barrierRun(){
        return new Runnable() {
            @Override
            public void run() {
                Collections.sort(list);
                list.forEach(str- >System.out.print(str));
                list.clear();
            }
        };
    }
}
-
通信
+關注
關注
18文章
5971瀏覽量
135858 -
函數
+關注
關注
3文章
4306瀏覽量
62431 -
Lock
+關注
關注
0文章
10瀏覽量
7760 -
線程
+關注
關注
0文章
504瀏覽量
19651
發布評論請先 登錄
相關推薦
IOT-OS之RT-Thread--- 線程間同步與線程間通信
RTT多線程間通信機制有哪幾種及推薦?
QNX消息傳遞及其在線程間通信的應用
線程和進程的區別和聯系,線程和進程通信方式
了解Linux多線程及線程間同步


 線程間通信的幾種方式


評論