1. 問題背景
KW45是繼KW38的下一代BLE芯片,符合 BLE5.3標準,最多可同時支持24個安全連接。在KW系列中KW45首次采用三核架構:一個96MHz的CM33應用核、一個處理Radio相關任務的CM3內核和一個專門處理加密安全稱為EdgeLock(類似HSM)M0+核。其中CM3內核用于處理BLE controller相關的任務, CM33內核可以更專注于處理BLE Host層,GATT層和應用相關的任務,除此之外CM3內核還擁有獨立的Flash和SRAM資源,不占用芯片本身內置的1M Flash和128K RAM,從而可以將CM33主核上的內存資源和處理資源釋放給用戶應用空間。EdgeLock類似HSM的功能,提供常見AES/ECC/RSA等對稱非對稱加解密的硬件加速、密鑰存儲操作和安全生命周期管理,最大限度地減少了主核工作量。
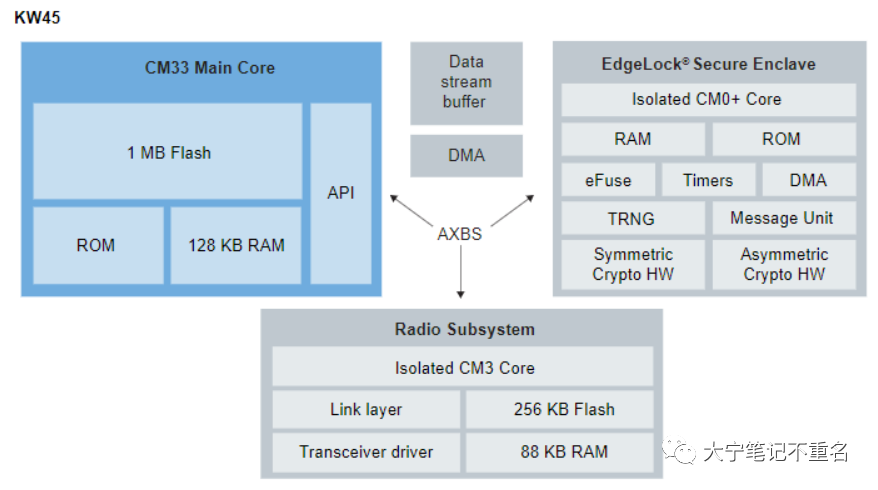
盡管架構更復雜,但因為后兩者的軟件是由芯片廠商提供,無需用戶開發,所以并沒有額外增加多少工作量,其和以前KW3X系列一個最大不同是,CM3的軟件也稱為NBU需要用戶自行燒錄(這也就是為何常有客戶反饋自己做的板子運行無線相關的例子運行時總是卡在一個地方的原因),之所以這塊沒有固化在芯片內內部有兩方面考慮,一方面方便用戶更新支持到更新的BLE feature,例如說channel sounding,而一方面方便用戶可以對官方提供的NBU Image 進行個性化的簽名,防止未認證的惡意代碼啟動,從而增加系統安全等級。所以這里就需要工具完成密鑰的生成,image的加密,加密image的燒錄過程,為方便用戶,原廠提供了一套開源的SPSDK腳本方便用戶使用,但牽涉到環境搭建,尤其有很多Key的生成,對新手來說有些挑戰,本文第4章節會給出一個step by step的教程,方便開發者更系統的去看每一個步驟在做什么,需要修改什么,先解決怎么做的問題,至于為什么這么做,每個Key的作用需要用戶結合RM手冊去查看。同時隨著信息安全越來越受到重視,很多產品量產后會考慮臨時禁止調試口,在需要時通過特定的方式再去使能,對應到KW45就是debug authentication,RM文檔更多從原理性介紹,給出的是JTAG操作偽指令,至于如何在SPSDK中實現未有提及,本文會在第5章節重點介紹相關實操。
2. SPSDK概覽
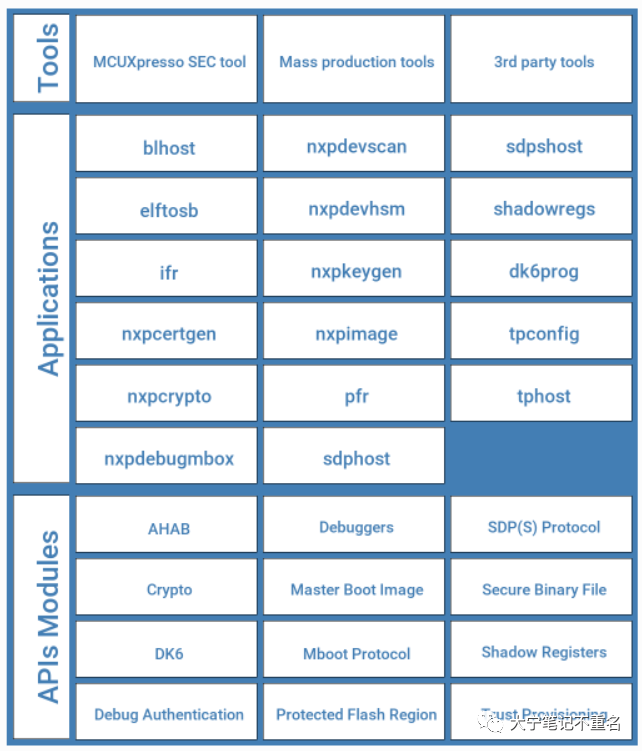
SPSDK的全稱是Secure Provisioning SDK,它是一個統一、可靠且易于使用的Python SDK 庫,適用于NXP MCU 產品組合,客戶幫助客戶快速完成從原型設計到生產部署的整個過程。該庫允許用戶與設備連接和通信、配置設備、準備、下載和上傳數據(包括安全操作)。
在SPSDK包中,提供了以下兩種方式供用戶使用:
應用程序:用戶可以使用 Python虛擬環境命令行或者Jupyter Notebook(推薦方式)調用各個應用程序;
API接口:以Python 庫的形式提供,方便用戶或者工具廠商增加自定義功能和自定義安全部署;
3. 準備工作:
安裝Python3.7,建議使用3.7-3.11版本,不支持Python2.x;
安裝SPSDK,可以直接在cmd中完成;
安裝jupyter
d:
cdD:YU_IOTKW45_3SPSDK
D:YU_IOTKW45_3SPSDK>python-mvenvspsdk_pyenv
D:YU_IOTKW45_3SPSDK>spsdk_pyenvScriptsactivate
D:YU_IOTKW45_3SPSDK>python-mpipinstall--upgradepip
D:YU_IOTKW45_3SPSDK>pipinstallspsdk
D:YU_IOTKW45_3SPSDK>spsdk--help
D:YU_IOTKW45_3SPSDK>pip3installjupyter
#以上spsdk和jupyter的安裝需在Python虛擬環境啟動后進行,否則安裝無效;
下載spsdk源文件或者AN13883的附件,兩者大同小異,此筆記以后者為示例。
spsdk源文件:https://spsdk.readthedocs.io/en/latest/spsdk.html
AN13883源文件:
4. 在ISP下載KW45 Radio firmware過程
OEM公私鑰和證書文件的生成
SB3文件的生成
image燒錄過程
D:YU_IOTKW45_3SPSDK>spsdk_pyenvScriptsactivate
(spsdk_pyenv)D:YU_IOTKW45_3SPSDK>cdD:YU_IOTKW45_3SPSDKAN13883SWAN_SPSDK
(spsdk_pyenv)D:YU_IOTKW45_3SPSDKAN13883SWAN_SPSDK>jupyter-lab
此后,會有一個Jupyter的網頁交互產生,如下圖,然后就是傻瓜式的step by step執行腳本。
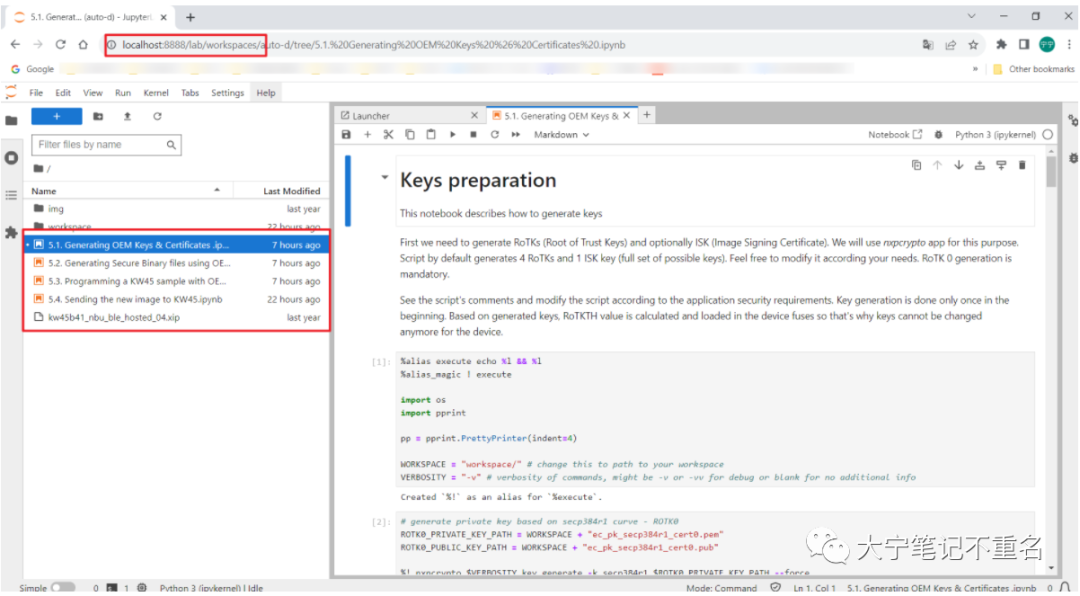
詳細步驟如下:
4.1. RoTKs 和ISK的生成
此過程會生成4對RoTKs (Root of Trust Keys) 和1對ISK (Image Signing Certificate), ISK是可選的,會在生成SB3文件時選擇是否使用。
#generateprivatekeybasedonsecp384r1curve-ROTK0
ROTK0_PRIVATE_KEY_PATH=WORKSPACE+"ec_pk_secp384r1_cert0.pem"
ROTK0_PUBLIC_KEY_PATH=WORKSPACE+"ec_pk_secp384r1_cert0.pub"

%!nxpcrypto$VERBOSITYkeygenerate-ksecp384r1$ROTK0_PRIVATE_KEY_PATH--force
assert_exit_code==0

#verifythatkeysweregenerated
assertos.path.exists(ROTK0_PRIVATE_KEY_PATH)
assertos.path.exists(ROTK0_PUBLIC_KEY_PATH)
.....
4.2. X509證書生成的yml模板生成
#obtainatemplateforrootcertROTK0
ROOT0_CERT_CONFIG_PATH=WORKSPACE+"cert0_template.yml"
%!nxpcrypto$VERBOSITYcertget-cfg-template$ROOT0_CERT_CONFIG_PATH--force

assert_exit_code==0
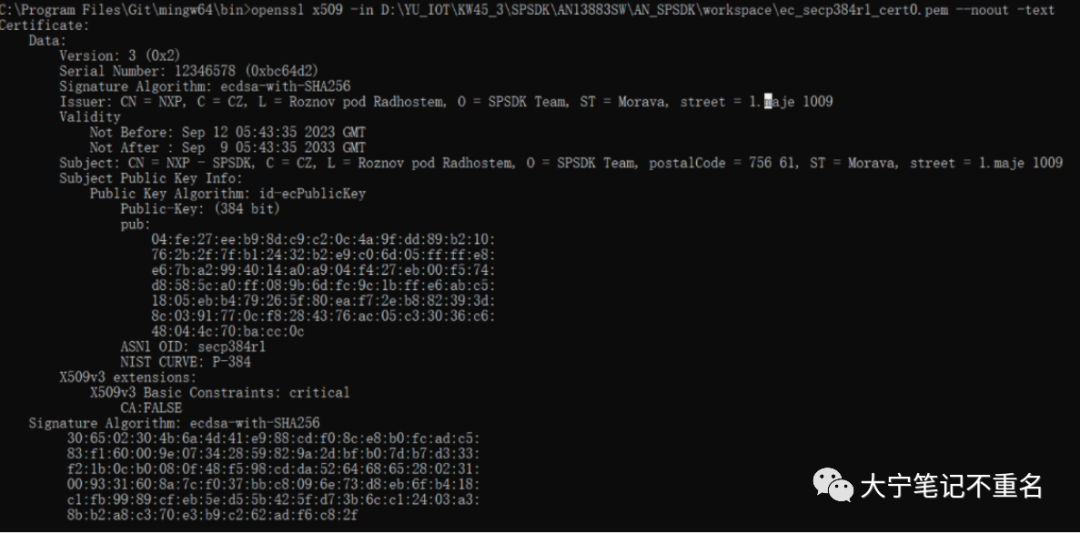
證書模板如下,包括issue,subject,證書序列號、有效期、簽發使用的私鑰,對應公鑰等信息,更多證書格式信息可以參考https://github.com/pyca/cryptography,cryptography/src/cryptography/x509/oid.py
issuer:
  COMMON_NAME: NXP
  COUNTRY_NAME: CZ
  LOCALITY_NAME: Roznov pod Radhostem
  STATE_OR_PROVINCE_NAME: Morava
  STREET_ADDRESS: 1.maje 1009
  ORGANIZATION_NAME: SPSDK Team

# ==============================================
# Subject identification fields
# ==============================================
# All available option can be found within class NameOID in
# cryptography/src/cryptography/x509/oid.py at https://github.com/pyca/cryptography
subject:
  COMMON_NAME: NXP - SPSDK
  COUNTRY_NAME: CZ
  LOCALITY_NAME: Roznov pod Radhostem
  STATE_OR_PROVINCE_NAME: Morava
  STREET_ADDRESS: 1.maje 1009
  ORGANIZATION_NAME: SPSDK Team
  POSTAL_CODE: 756 61

# ==============================================
# The certificate settings
# ==============================================

# Path, where issuer private key is stored
issuer_private_key: issuer_key.pem
# Path, where subject public key is stored
subject_public_key: subject_key.pub
# Serial number of certificate
serial_number: 12346578
# Validity duration in days
duration: 3650

# ==============================================
# Certificate basic extensions
# ==============================================
extensions:
  BASIC_CONSTRAINTS:
    # Delegate certificate as a signing authority to create an intermediate certificates.
    ca: false  # Valid values true|false
    # Integer length of the path of certificate signature from a given certificate, back to the root certificate
    path_length: 0
4.3. 正式證書生成
#Generaterootcertificates0
%!nxpcrypto$VERBOSITYcertgenerate-c$ROOT0_CERT_CONFIG_PATH-o$ROOT_0_CERT_PATH--force
assert_exit_code==0
#Generaterootcertificates1
%!nxpcrypto$VERBOSITYcertgenerate-c$ROOT1_CERT_CONFIG_PATH-o$ROOT_1_CERT_PATH--force
assert_exit_code==0
#Generaterootcertificates2
%!nxpcrypto$VERBOSITYcertgenerate-c$ROOT2_CERT_CONFIG_PATH-o$ROOT_2_CERT_PATH--force
assert_exit_code==0
#Generaterootcertificates3
%!nxpcrypto$VERBOSITYcertgenerate-c$ROOT3_CERT_CONFIG_PATH-o$ROOT_3_CERT_PATH--force
assert_exit_code==0


#GenerateISKcertificate
%!nxpcrypto$VERBOSITYcertgenerate-c$ISK_CERT_CONFIG_PATH-o$ISK_CERT_PATH--force
assert_exit_code==0
如下是cert0的內容,但是因為其是base64編碼,不方便查看,如果有興趣可以通過Openssl去讀取證書的信息和yml文件對照。
opensslx509-incacert.pem-noout-text
#openssl在Git安裝后可以直接使用
4.4 對稱密鑰SB3KDK生成
該Key用于加密SB3 key block,會被program到fuse,后續無法再次修改,該生成步驟也可以放在前面去執行。
importos,binascii

SB3KDK_KEY_PATH=WORKSPACE+"sb3kdk.txt"
withopen(SB3KDK_KEY_PATH,"wb")asf:
f.write(binascii.b2a_hex(os.urandom(32)))

assertos.path.exists(SB3KDK_KEY_PATH)
4.5. SB3配置文件生成
該步驟會使用到SPSDK的npximage.exe應用程序
WORKSPACE="workspace/"#changethistopathtoyourworkspace
VERBOSITY="-v"#verbosityofcommands,mightbe-vor-vvfordebugorblankfornoadditionalinfo

SB31_TEMPLATE_PATH=WORKSPACE+"sb31_config.yml"
%!nxpimage$VERBOSITYsb31get-template-fkw45xx-o$SB31_TEMPLATE_PATH
assert_exit_code==0
assertos.path.exists(SB31_TEMPLATE_PATH)
需要注意的是:
需要手動注釋掉binaryCertificateBlock: my_isk_cert.bin,否則會后面SB3正式生成時會報錯。
useIsk: false意味著沒有使用ISK,需要修改配置文件
#binaryCertificateBlock:my_isk_cert.bin
commands:
-erase:
address:'0x48800000'
size:'0x30000'
-load:
address:'0x48800000'
file:kw45b41_nbu_ble_hosted_04.xip
containerConfigurationWord:0
containerKeyBlobEncryptionKey:workspace/sb3kdk.txt
containerOutputFile:sb3.sb3
description:384_none_nbu_only
family:kw45xx
firmwareVersion:0
isNxpContainer:false
iskSignProvider:type=file;file_path=my_isk_prv_key.pem
kdkAccessRights:3
mainRootCertId:0
mainRootCertPrivateKeyFile:workspace/ec_pk_secp384r1_cert0.pem
rootCertificate0File:workspace/ec_secp384r1_cert0.pem
rootCertificate1File:workspace/ec_secp384r1_cert1.pem
rootCertificate2File:workspace/ec_secp384r1_cert2.pem
rootCertificate3File:workspace/ec_secp384r1_cert3.pem
rootCertificateEllipticCurve:secp384r1
signingCertificateConstraint:0
useIsk:false
4.6 SB3文件的生成
上面已經生成了證書和key,按照sb31_config.yml 的配置生成
%!nxpimage$VERBOSITYsb31export$SB31_TEMPLATE_PATH
assert_exit_code==0
assertos.path.exists(WORKSPACE+SB31_FILE_PATH)

INFOSB3KDK:9e1432fc4869435ee6f396dccba9595933c8d1d2ad40385927f3a8b9f58162d7
INFORoTKTH:5e03e6649294d19fa31b19e17895184dc16149e5c2748bc394db46249a6ef29ca1f14dcd67169d7744c5c1a9025b981a
4.7 SB3KDK和ROTKH的燒錄(研發階段可跳到此步驟)
在NXP demo板芯片內已經預燒錄了SB3KDK和ROTKTH,所以可以直接跳到這個步驟。
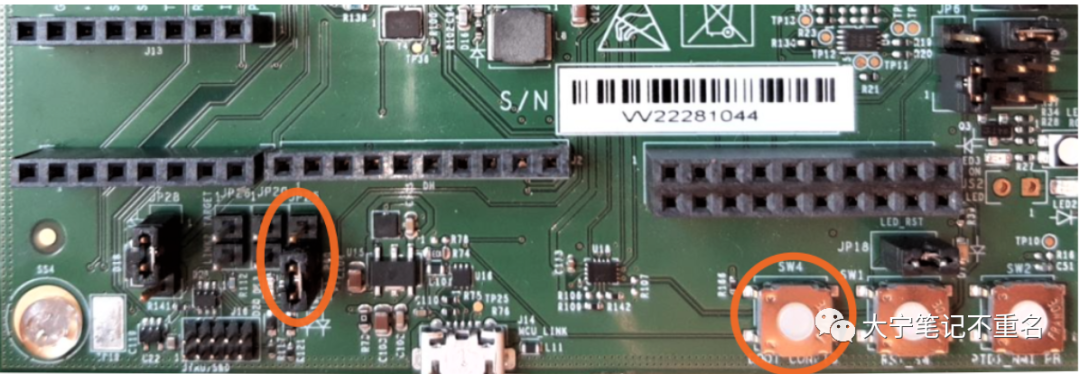
把J25連到2-3,按住SW4,重新上電
修改串口號,嘗試連接
#choosecomport
UART_CONNECTION="-pcom14"

%!blhost$UART_CONNECTIONget-propertycurrent-version
assert_exit_code==0
fuses with keys/RoTKTH
此過程是不可逆的,強烈建議在研發階段使用NXP提供的默認SB3KDK和ROTKTH;
#Increasevoltageforfuseburning
%!blhost$UART_CONNECTIONset-property0x161

#programSB3KDK(CUST_PROD_OEMFW_ENC_SK)
#putvalueSB3KDKgeneratedbynxpimage
#%!blhost$UART_CONNECTIONfuse-program0x20[["SubstitutethiscommentbytheSB3KDKgeneratedkeyoutputinsectionSB3.1generation.Examplebelow."]]
#exampleline:%!blhost$UART_CONNECTIONfuse-program0x20[[7aa7ef9813b3561257b8837dab26225301df3511217f2733c71dadcd447722d1]]
%!blhost$UART_CONNECTIONfuse-program0x20[[7aa7ef9813b3561257b8837dab26225301df3511217f2733c71dadcd447722d1]]

#programRoTKTH(CUST_PROD_OEMFW_AUTH_PUK)
#putvalueRoTKTHgeneratedbynxpimage
#%!blhost$UART_CONNECTIONfuse-program0x1F[["SubstitutethiscommentbytheRoTKTHgeneratedkeyoutputinsectionSB3.1generation.Examplebelow."]]
#exampleline:%!blhost$UART_CONNECTIONfuse-program0x1F[[650d8097079ff27a3e8a2da14781b922fd8295b6c00bfa067f00e87f1a16b8b304bf710d45cbd591e2e24be83183922c]]
%!blhost$UART_CONNECTIONfuse-program0x1F[[650d8097079ff27a3e8a2da14781b922fd8295b6c00bfa067f00e87f1a16b8b304bf710d45cbd591e2e24be83183922c]]
#ProgramTZM_ENfuse,thisfusewasmissedduringmanufacturingoffirstKW45samples.WithoutTZM_ENfuseset,theS3MUAsemaphoreisnotworkingproperlyandaftergettingofownership,thewriteaccesstoTRregistercausingBUSFault.IfS3MUAsemaphoreisnotusedduringcommunicationwithS3MUA(e.g.onlyonethreadiscommunicatingwithS3MUA(EdgeLock)),thenTZM_ENfusecanremain0.
%!blhost$UART_CONNECTIONfuse-program0xD[[01]]

#Setvoltagetonormalvalue
%!blhost$UART_CONNECTIONset-property0x160
4.8 SB3文件燒錄
此步驟需要在ISP模式下執行,即把J25連到2-3,按住SW4,重新上電
#uploadsSB3.1
SB31_FILE_FINAL=WORKSPACE+SB31_FILE_PATH
assertos.path.exists(SB31_FILE_FINAL)

%!blhost$UART_CONNECTIONreceive-sb-file$SB31_FILE_FINAL
assert_exit_code==0
至此,生成加密簽名文件的工作結束。
5. Debug authentication實現步驟
在做Debug authentication之前,需要大概了解下KW45啟動的過程,如下圖,在啟動后,會先去檢查用戶是否使能dual image啟動,如果是就去運行最新版本,如果不是就會先去Boot image base address處去查看是否有有效的PC和SP,對于KW45來說如果未使能dual image這個地址就是0x00。如果PC和SP有效就會先去對用戶應用程序驗簽,如果失敗,就會回到ISP模式,如果用戶應用程序驗簽通過,ROM就會繼續對NBU進行驗簽,如果驗簽通過才會真正進入到客戶正常應用程序。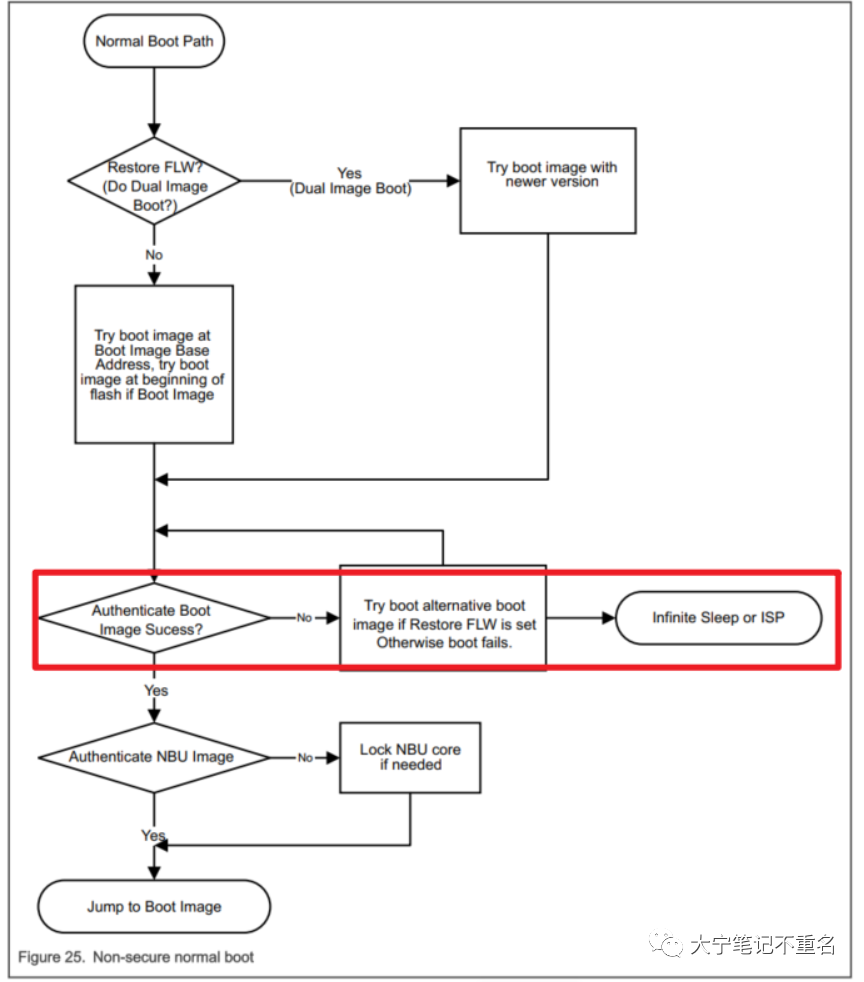 而Debug authentication是貫穿在上面整個過程中的,需要在每一個步驟都能進行debug。前文提到,Debug authentication的目的是在量產禁止JTAG仿真器接口后,通過證書認證方式再去打開Debug口的訪問權限,所以如果想去使能這個功能就需要做些額外的操作,譬如說將lifecycle推進到OEM secure world,生成debug authentication的證書,輸入命令等,如下分別講述。
5.1 關閉JTAG調試功能,
OEM Open->OEM Secure World Close模式
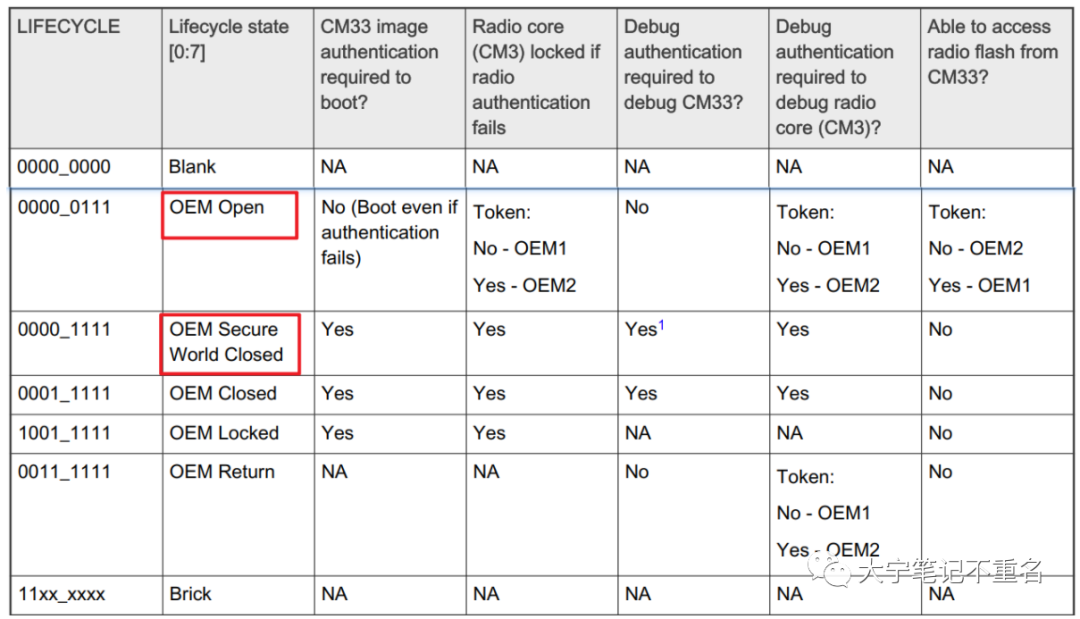
實現方式有兩種:第一種借助于單獨的blhost程序,第二種使用SPSDK中的app實現
::Increasevoltageforfuseburning
..inlhost.exe-pCOM14set-property0x161
::programSB3KDK(CUST_PROD_OEMFW_ENC_SK)
..inlhost.exe-pCOM14--fuse-program0x20"{{7aa7ef9813b3561257b8837dab26225301df3511217f2733c71dadcd447722d1}}"
::programRoTKTH(CUST_PROD_OEMFW_AUTH_PUK)
..inlhost.exe-pCOM14--fuse-program0x1F"{{650d8097079ff27a3e8a2da14781b922fd8295b6c00bfa067f00e87f1a16b8b304bf710d45cbd591e2e24be83183922c}}"
::ProgramTZM_ENfuse,thisfusewasmissedduringmanufacturingoffirstKW45samples.WithoutTZM_ENfuseset,theS3MUAsemaphoreisnotworkingproperlyandaftergettingofownership,thewriteaccesstoTRregistercausingBUSFault.IfS3MUAsemaphoreisnotusedduringcommunicationwithS3MUA(e.g.onlyonethreadiscommunicatingwithS3MUA(EdgeLock)),thenTZM_ENfusecanremain0.
..inlhost.exe-pCOM14--fuse-program0xD"{{1}}"
::Setvoltagetonormalvalue
..inlhost.exe-pCOM14set-property0x160
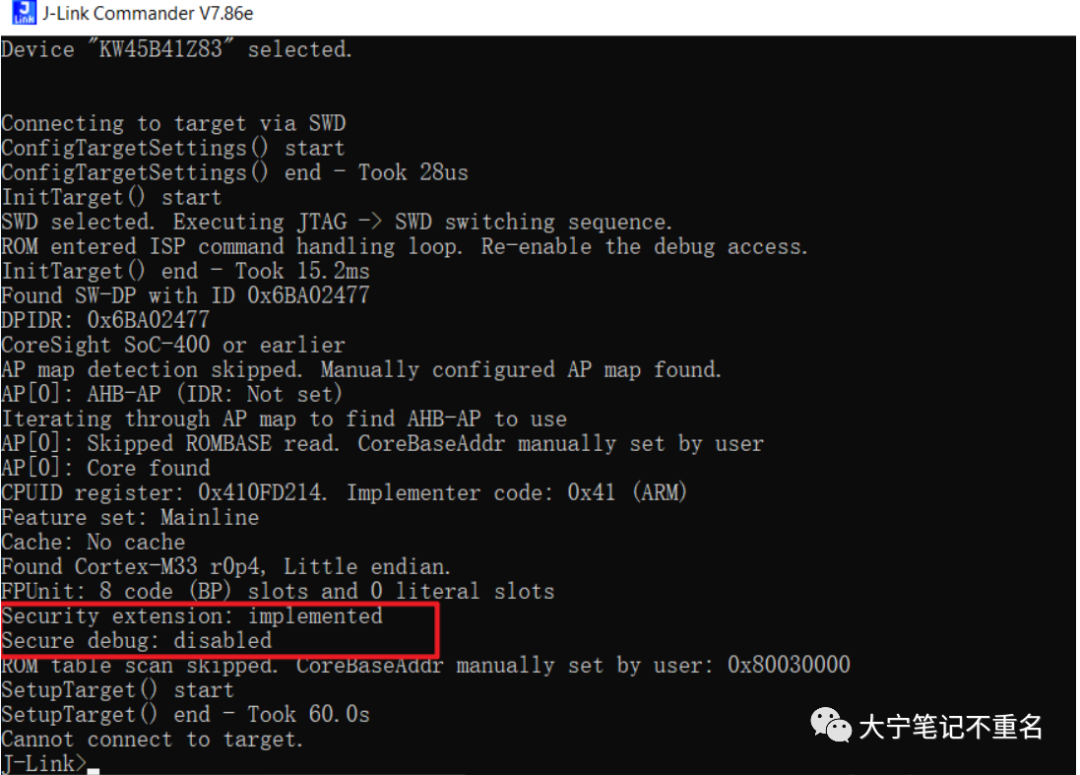
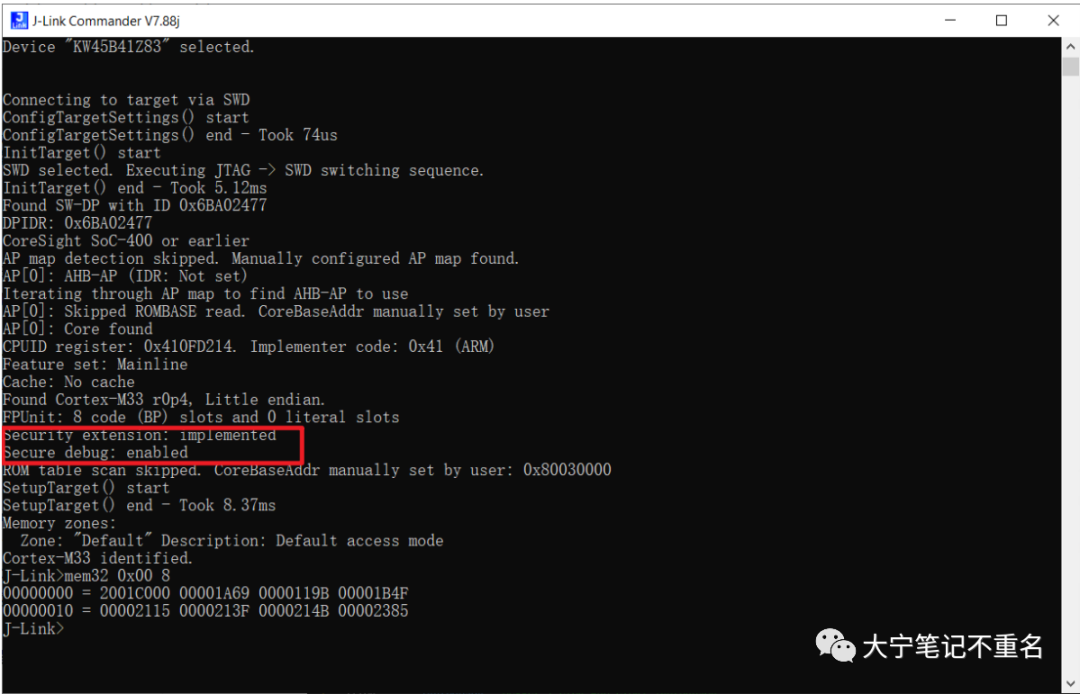
成功后可以回讀0x0A fuse地址,查看當前lifecycle狀態,成功后如果使用Jlink去連接顯示如下Secure debug disabled:
5.2 生成DC使用的公私鑰對
#generateprivatekeybasedonsecp384r1curve-Debug
ROTK0_Debug_PRIVATE_KEY_PATH=WORKSPACE+"ec_pk_secp384r1_cert0_debug.pem"
ROTK0_Debug_PUBLIC_KEY_PATH=WORKSPACE+"ec_pk_secp384r1_cert0_debug.pub"

%!nxpcrypto$VERBOSITYkeygenerate-ksecp384r1$ROTK0_Debug_PRIVATE_KEY_PATH--force
assert_exit_code==0

#verifythatkeysweregenerated
assertos.path.exists(ROTK0_Debug_PRIVATE_KEY_PATH)
assertos.path.exists(ROTK0_Debug_PUBLIC_KEY_PATH)
5.3 DC證書模板生成
#obtainatemplatefordebugcert
DC_CONFIG_PATH=WORKSPACE+"DC.yml"
%!nxpdebugmboxget-template-f$DC_CONFIG_PATH
assert_exit_code==0
#Copyright2023NXP
#
#SPDX-License-Identifier:BSD-3-Clause

#DCBlockstructure
#============================================
#============================================
#============================================
#===Version===
#============================================
#===SocClass===
#============================================
#===UUID===
#============================================
#===RoTMetaSHA256offollowing:===
#===RoTKey0SHA256===
#===RoTKey1SHA256===
#===RoTKey2SHA256===
#===RoTKey3SHA256===
#============================================
#===DebuggerKeyDCK(Pub):===
#===Mod:2048Exp:32===
#============================================
#===CCSOCU===
#============================================
#===CCVU===
#============================================
#===CB===
#============================================
#===RoTKey(pub)===
#===Mod:2048Exp:32===
#============================================
#============================================
#===Signatureofallblock===
#===SHA256ofwholeblock=>RSA(RoTK)===
#============================================
#============================================
#============================================

#============SoCClass============
#AuniqueidentifierforasetofSoCsthatrequirenoSoC-specificdifferentiationin
#theirdebugauthentication.Themainusageistoallowadifferentsetofdebug
#domainsandoptionstobenegotiatedbetweenthedeviceconfigurationand
#credentials.AclasscancontainjustasinglerevisionofasingleSoCmodel,ifthe
#granularityofdebugcontrolwarrantsit.
#Exampleslistofpossiblesettings:
#0x0000:i.MXRT595,i.MXRT685,
#0x0001:LPC550x,LPC55s0x,LPC551x,LPC55s1x,LPC552x,LPC55s2x,LPC55s6x
#0x0004:LPC55s3x,RW61x
#0x0005:KW45xx/K32W1xx
#0x0006:MCXN9xx(A0)
#0x0007:MCXN9xx(A1)
#0x000A:RW61x(A2)
#0x5254049C:i.MXRT118x

socc:0x0005

#============DeviceUUID============
#128-bitIETFRFC4122compliantnon-sequentialUniversallyUniqueIdentifier(UUID)
uuid:"00000000000000000000000000000000"

#============SoCUsage============
#ACC(constraint)valuethatisabitmask,andwhosebitsareusedinan
#SoCC-specificmanner.Thesebitsaretypicallyusedforcontrollingwhichdebug
#domainsareaccessedviatheauthenticationprotocol,butdevice-specificdebug
#optionscanbemanagedinthiswayalso.
cc_socu:0xFFFF


#============VendorUsage============
#ACC(constraint)valuethatisopaquetothedebugauthenticationprotocolitselfbut
#whichcanbeleveragedbyvendorsinproduct-specificways.
cc_vu:0

#============CredentialBeacon&Authenticationbeacon============
#Avaluethatispassedthroughtheauthenticationprotocol,whichisnotinterpreted
#bytheprotocolbutisinsteadmadevisibletotheapplicationbeingdebugged.A
#credentialbeaconisassociatedwithaDCandisthereforevendor/RoT-signed.An
#authenticationbeaconisprovidedandsignedbythedebuggerduringthe
#authenticationprocess.
cc_beacon:0

#============RoTmeta-data============
#TheRoTmeta-datarequiredbythedevicetocorroborate;theROTIDsentinthe
#DAC,thefieldinthisDC,andanyadditionalRoTstatethatisnotstoredwithinthe
#device.ThisallowsdifferentRoTidentification,managementandrevocation
#solutionstobehandled.
rot_meta:
-../kw45_debug_auth/secp384r1_private_key0.pub
-../kw45_debug_auth/secp384r1_private_key1.pub
-../kw45_debug_auth/secp384r1_private_key2.pub
-../kw45_debug_auth/secp384r1_private_key3.pub

#============RoTIdentifier============
#RoTIDallowsthedebuggertoinferwhichRoTpublickey(s)areacceptabletothe
#device.Ifthedebuggercannotordoesnotprovidesuchacredential,the
#authenticationprocesswillfail.
rot_id:0

#============DebugCredentialKey============
#Auser-ownedkeypair.ThepublicpartofthekeyisassociatedwithaDC,the
#privatepartisheldbytheuserandusedtoproducesignaturesduring
#authentication.
dck:../kw45_debug_auth/secp384r1_private_dck.pub

#==================================================================================================
#Signatureconfigurationarea
#==================================================================================================
#TherearetwowayshowsignthefinalDCdatablob.
#
#1.Incasethatyouisavailableprivatepairforrot_metawithindexrot_idjustusefirstsimplestyle
#touseitbyrotkkey.Asasecondwaytodosameisusesign_provider(orsignProvider-bothareaccepted)optionwith'type=file'.
#
#2.ForcasethatDebugCredentialfilesaregeneratedinuntrustedenvironment(withoutaccesstoRoTprivatekeys),
#thereisoptiontouseplugin(examplehowtocreateownpluginisin:./SPSDK/examples/dat/hsm/).Theplugin
#hassimpleinterfacethatallowshandleDCdatablobintopluginwithindexofRoTmetapublickeytogetbacksigned
#DCimage.
#
#Thoseoptionsareexclusive,soonlyoneoptioncouldbeusedtosigntheDC.

#============SignatureProvider============
#Tousesigningproviderexamples
#
#sign_provider:'type=file;file_path=./hsm/k0_cert0_2048.pem'
#sign_provider::'type=sasp;key_number=0'

#============RoTsignatureprivatekey============
#PrivatekeyforfortheRoTmetachosenbyrot_idtosigntheimage.
rotk:../kw45_debug_auth/secp384r1_private_key0.pem
此處的公鑰是NXP生成的默認值,這個是客戶拿不到的
5.4 DC證書生成
%!nxpdebugmbox-p2.1gendc-cD:YU_IOTKW45_3SPSDKdebug_authenworkspacecert0_template_debug.ymlD:YU_IOTKW45_3SPSDKdebug_authenworkspacedebug_authen.cert1

%!nxpdebugmbox-p2.1gendc-cD:YU_IOTKW45_3SPSDKdebug_authenkw45_debug_auth	est.ymlD:YU_IOTKW45_3SPSDKdebug_authenkw45_debug_auth	est.cert
5.5 Debug認證過程
nxpdebugmboxstart

nxpdebugmbox-v-p2.1-ijlinkauth-b0x0–cD:YU_IOTKW45_3SPSDKdebug_authenworkspacedebug_authen.cert–kD:YU_IOTKW45_3SPSDKdebug_authenkw45_debug_authsecp384r1_private_dck.pem

nxpdebugmbox-v-p2.1-ijlinkauth-b0x0–cD:YU_IOTKW45_3SPSDKdebug_authenkw45_debug_auth	est.cert–kD:YU_IOTKW45_3SPSDKdebug_authenkw45_debug_authsecp384r1_private_dck.pem
執行debug authen的命令和步驟如下,可以看到在debug authen成功后會顯示successful。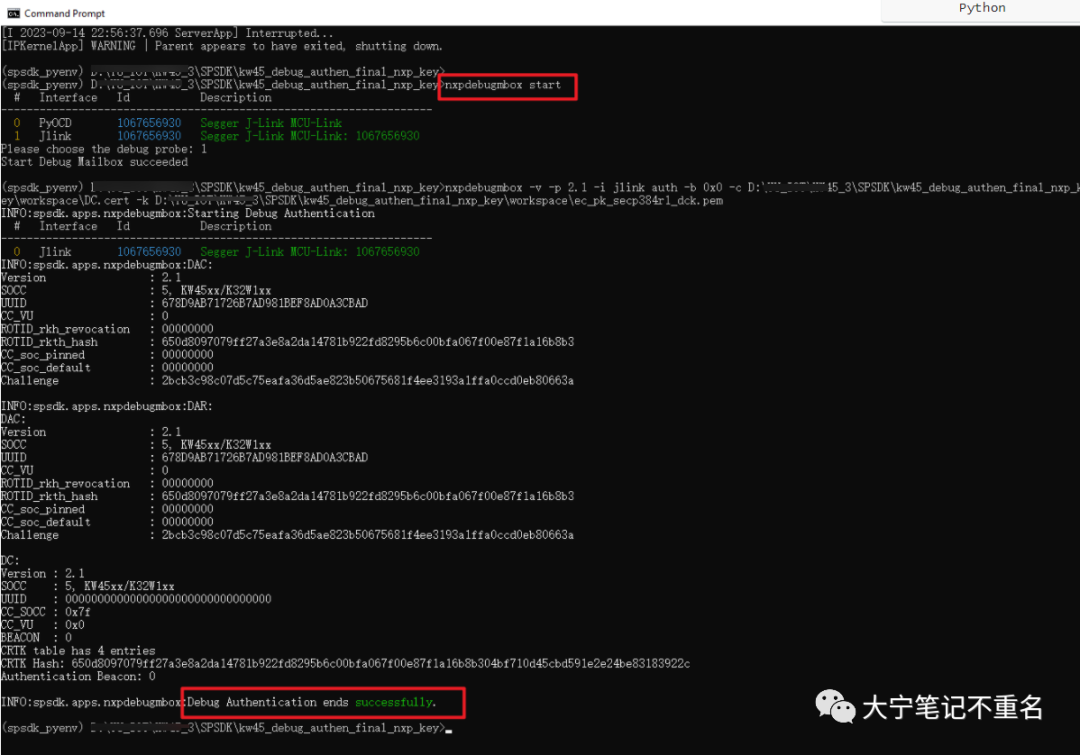
此時再去用Jlink嘗試連接KW45,會顯示secure debug enabled.
6. 總結
至此,完成了對在ISP下KW45 Radio firmware下載過程和Debug authentication實現步驟的講解。以上步驟確實比較多,筆者也摸索了好久,但熟悉其原理和每一步的執行目的后,可以簡化成幾個自定義的腳本,在開發階段建議使用NXP默認的Key和證書,在量產階段再根據自定義的key和證書做自定義。
審核編輯:湯梓紅
-
芯片
+關注
關注
453文章
50387瀏覽量
421783 -
mcu
+關注
關注
146文章
16984瀏覽量
350293 -
內核
+關注
關注
3文章
1362瀏覽量
40226 -
代碼
+關注
關注
30文章
4744瀏覽量
68344 -
DEBUG
+關注
關注
3文章
89瀏覽量
19883
原文標題:KW45使用SPSDK進行代碼更新和debug authentication指南
文章出處:【微信號:pzh_mcu,微信公眾號:痞子衡嵌入式】歡迎添加關注!文章轉載請注明出處。
發布評論請先 登錄
相關推薦
KW45通過32MHz晶振電容調節時鐘頻率
請問nxpdebugmbox是否支持長度為4096的調試身份驗證密鑰?
首次使用KW45(汽車門禁)或K32W1(物聯網/工業)構建PCB的最佳方式是什么?
如何將Kw45 is值轉換為dBm結果?
用于VDD_RF的KW45內部VPA源,以確保我們可以偏置10dBm目標,如何實現?
KW45板CAN收發器靜默模式下未接收到CAN Rx中斷是怎么回事?
如何使用SPSDK對i.MX RT685EVK進行編程?
求助,關于KW45芯片半雙倍模式的SPI配置問題
使用DRaaS測試操作系統更新和新代碼版本
創建KW45B41Z/K32W148固件更新圖像使用的編程工具

基于 NXP KW45 BLE Digital Key EVK 方案


 KW45使用SPSDK進行代碼更新和debug authentication指南


評論