概述
本篇文章主要介紹如何使用e2studio對瑞薩進(jìn)行Flash配置,并且分別對Code Flash & Data Flash進(jìn)行讀寫操作。
Flash有Code Flash(儲存程序代碼)以及Data Flash(儲存一般數(shù)據(jù)),其中Code Flash主要以NOR型為主,儲存系統(tǒng)程序代碼及小量數(shù)據(jù);而Data Flash則是以NAND型為主,用于儲存大量數(shù)據(jù)。
硬件準(zhǔn)備
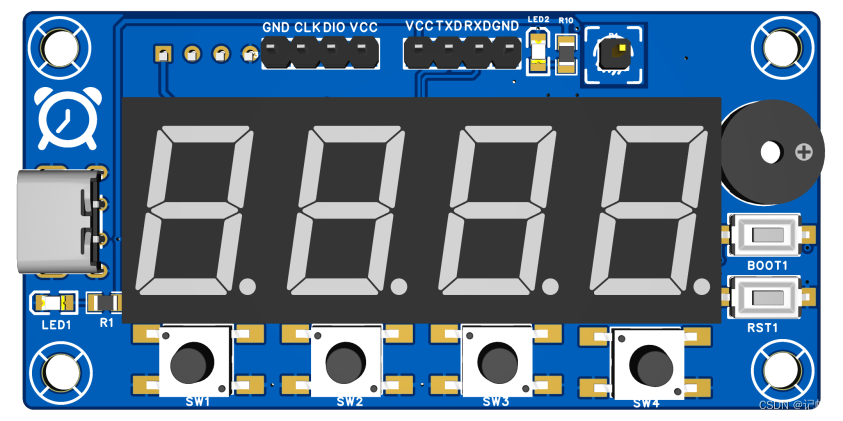
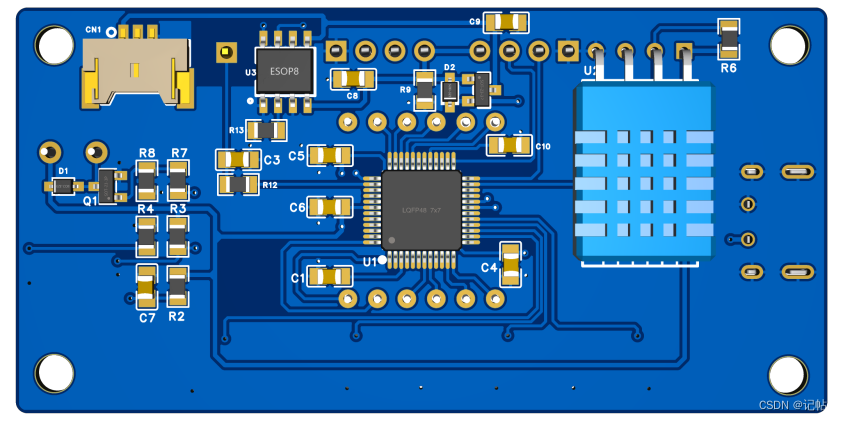
首先需要準(zhǔn)備一個開發(fā)板,這里我準(zhǔn)備的是芯片型號R7FA2E1A72DFL的開發(fā)板:
視頻教程
https://www.bilibili.com/video/BV1ck4y1K72M/
Flash
對Code Flash進(jìn)行讀寫操作時候,特別要注意寫的地址,因為如果寫的不對,會覆蓋到代碼區(qū),造成運(yùn)行錯誤,同時對于擦除,是一塊的數(shù)據(jù)都會直接擦除掉。
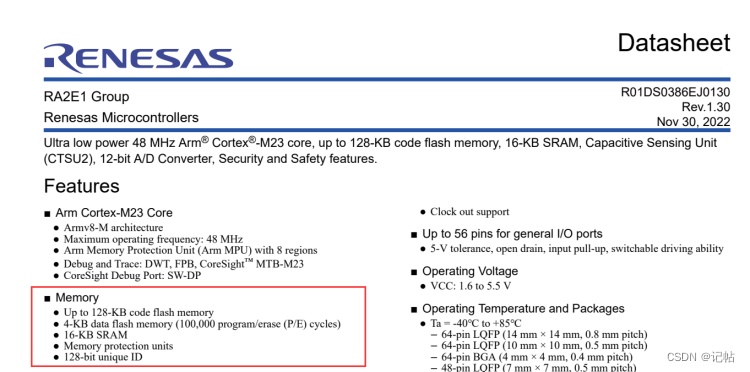
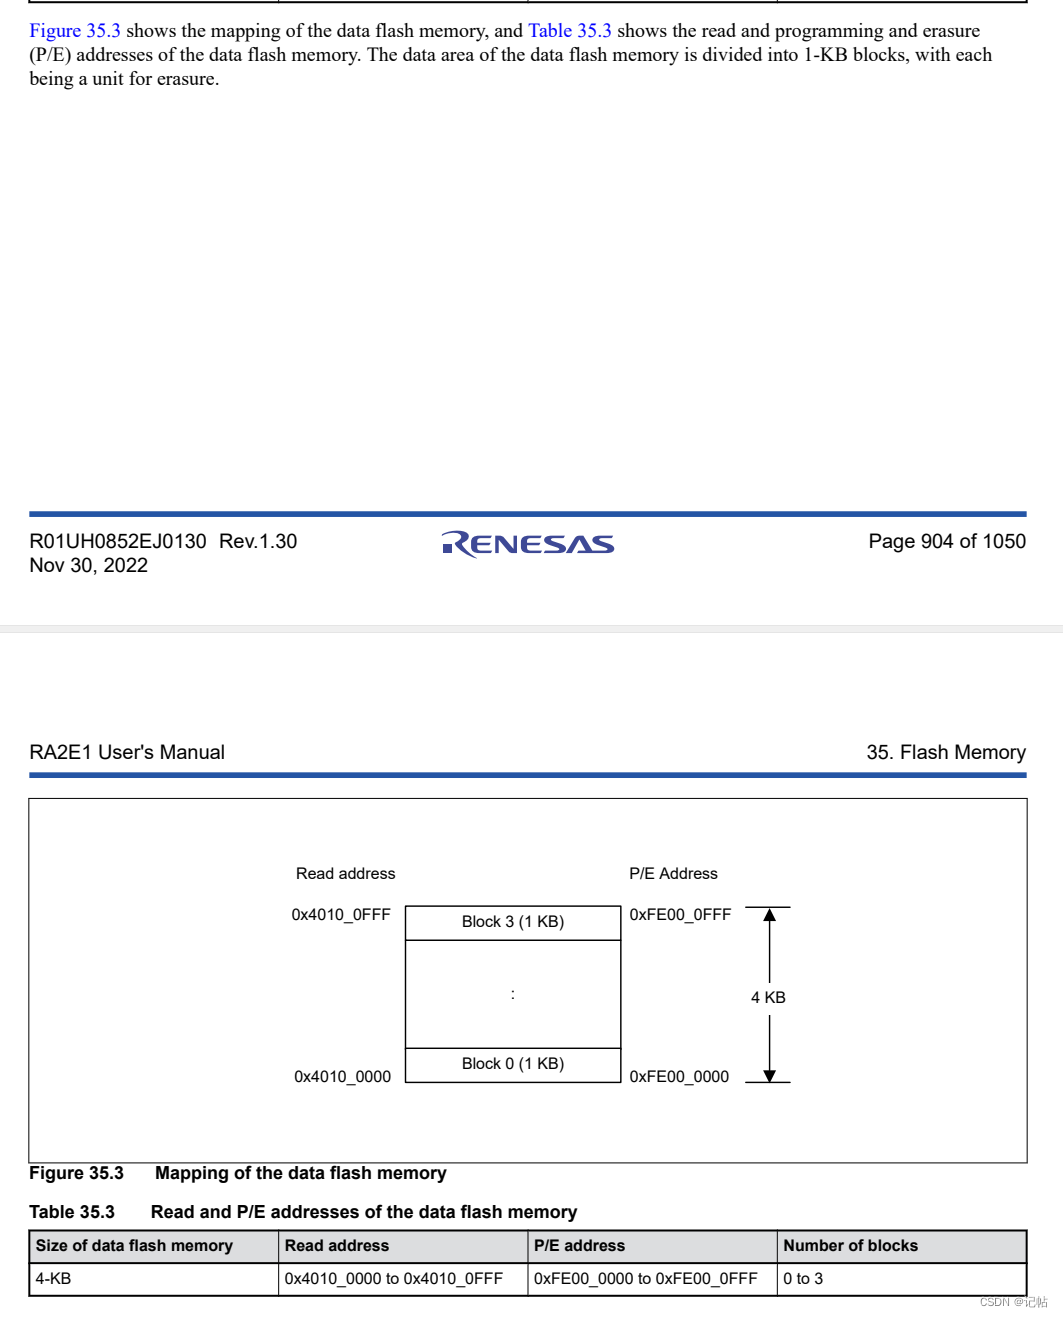
在RA2E1中,Code flash最高為128KB,Data flash為4KB。
FLASH配置
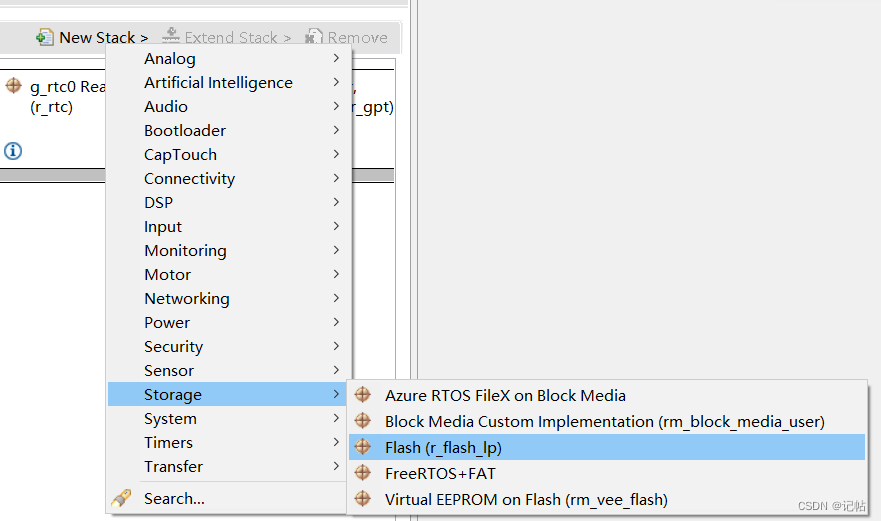
點(diǎn)擊Stacks->New Stack->Storage -> Flash (r_flash_lp)。
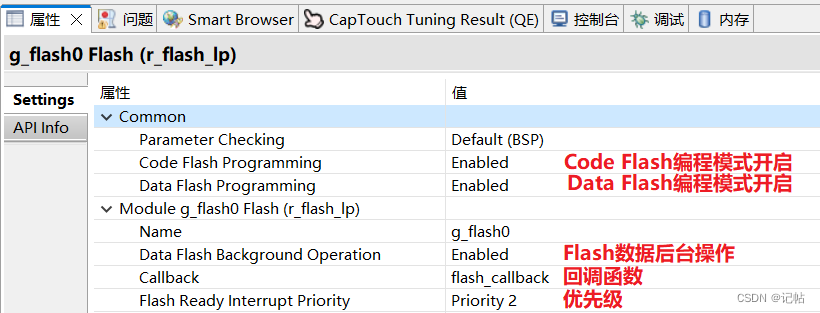
FLASH屬性配置
Data Flash
對Data Flash進(jìn)行讀寫操作時候,特別要注意要等待Data Flash寫完才能進(jìn)行后續(xù)讀寫操作。 在RA2E1中,Data Flash分布如下所示。
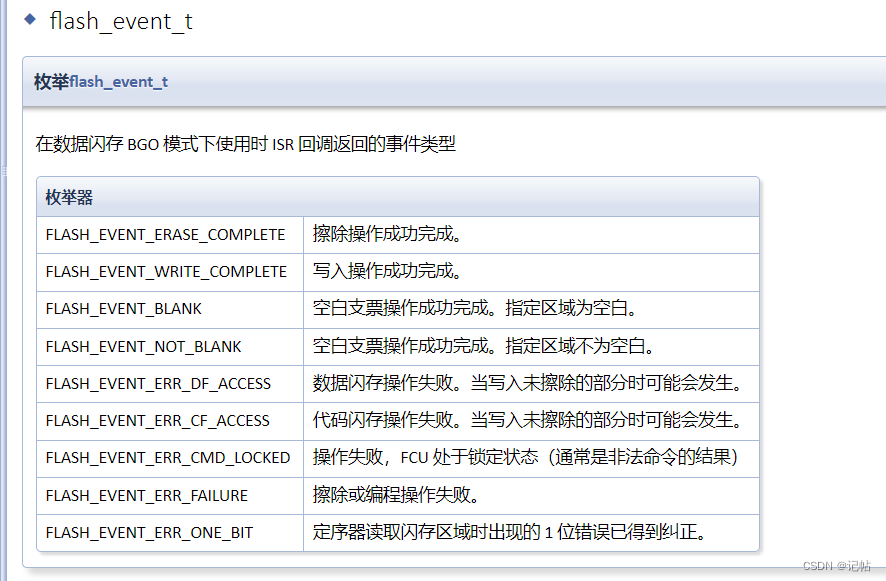
回調(diào)函數(shù)的話有下列事件會進(jìn)行觸發(fā)。
新建flash_smg.c和flash_smg.h。 在主程序中加入該頭文件

回調(diào)函數(shù)如下所示,在flash_smg.c里。
volatile bool               interrupt_called;
volatile flash_event_t      flash_event;


void flash_callback (flash_callback_args_t * p_args)
{
    interrupt_called = true;
    flash_event      = p_args- >event;
}
向Block0種寫入時間分鐘數(shù)據(jù)和小時數(shù)據(jù),地址范圍是0x40100000 - 0x40100FFF,在flash_smg.c里定義
extern fsp_err_t err ;
/*FLASH寫入程序*/
void WriteFlashTest(uint32_t L,uint8_t Data[],uint32_t addr)
{


    interrupt_called = false;
    /* Erase 1 block of data flash starting at block 0. */
    err = R_FLASH_LP_Erase(&g_flash0_ctrl, FLASH_DF_BLOCK_0, 1);
    assert(FSP_SUCCESS == err);
    while (!interrupt_called)
    {
    ;
    }
    assert(FLASH_EVENT_ERASE_COMPLETE == flash_event);
    interrupt_called = false;
    flash_status_t status;
    /* Write 32 bytes to the first block of data flash. */
    err = R_FLASH_LP_Write(&g_flash0_ctrl, (uint32_t) Data, addr, L);
    assert(FSP_SUCCESS == err);

    /* Wait until the current flash operation completes. */
    do
    {
        err = R_FLASH_LP_StatusGet(&g_flash0_ctrl, &status);
    } while ((FSP_SUCCESS == err) && (FLASH_STATUS_BUSY == status));


    /* If the interrupt wasn't called process the error. */
    assert(interrupt_called);
    /* If the event wasn't a write complete process the error. */
    assert(FLASH_EVENT_WRITE_COMPLETE == flash_event);
    /* Verify the data was written correctly. */
    assert(0 == memcmp(Data, (uint8_t *) FLASH_DF_BLOCK_0, L));


}
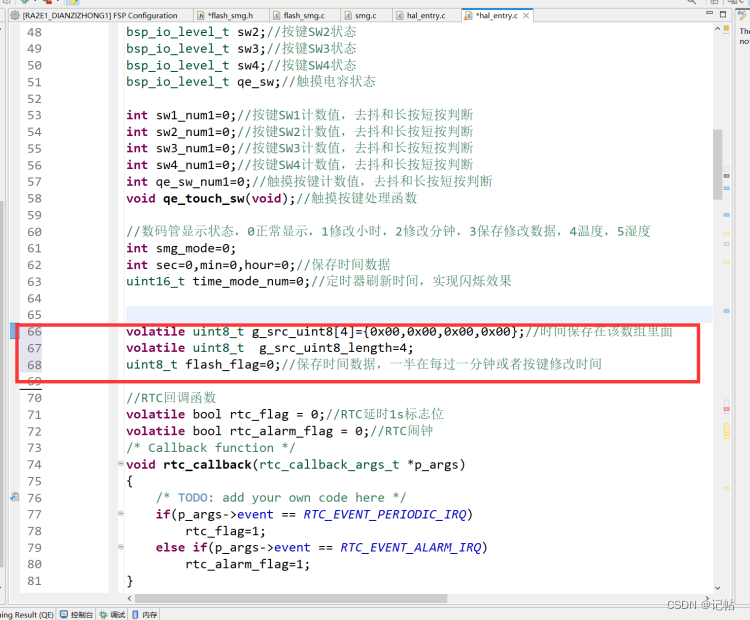
在主程序中定義標(biāo)志位進(jìn)行數(shù)據(jù)保存判斷。
volatile uint8_t g_src_uint8[4]={0x00,0x00,0x00,0x00};//時間保存在該數(shù)組里面
volatile uint8_t  g_src_uint8_length=4;
uint8_t flash_flag=0;//保存時間數(shù)據(jù),一半在每過一分鐘或者按鍵修改時間
在main主程序中,定義在按鍵修改完畢數(shù)據(jù)后進(jìn)行保存。
if(flash_flag)//按鍵修改完畢數(shù)據(jù)后進(jìn)行保存
           {
               g_src_uint8[0]=hour;
               g_src_uint8[1]=min;
               WriteFlashTest(4,g_src_uint8 ,FLASH_DF_BLOCK_0);
               flash_flag=0;
           }
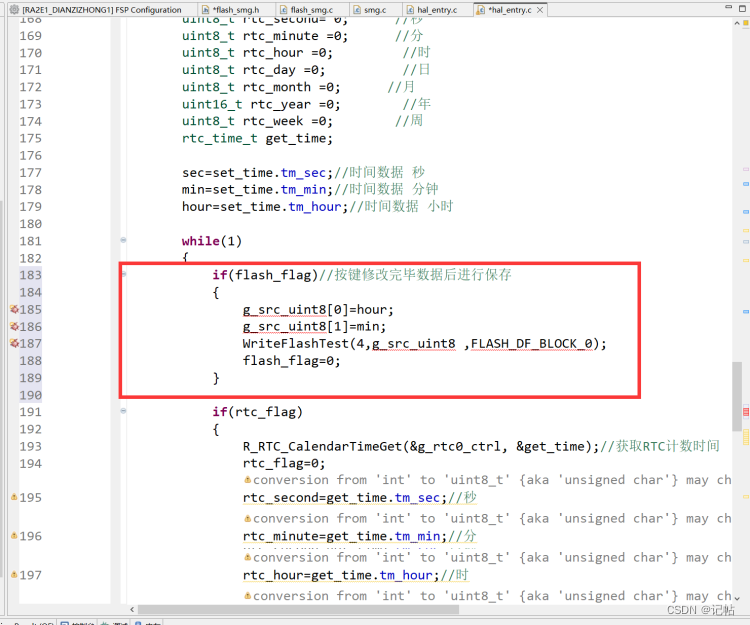
同時需要在按鍵設(shè)置完畢進(jìn)行數(shù)據(jù)保存,模式3中需要定義標(biāo)志位為1。
flash_flag=1;//保存數(shù)據(jù)
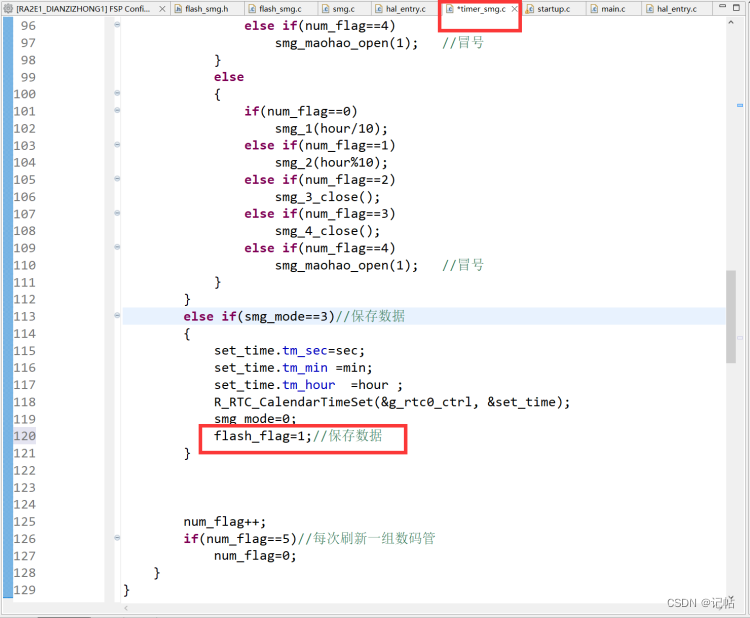
同時需要注意變量引入到timer_smg.c。
extern uint8_t flash_flag;//保存時間數(shù)據(jù),一半在每過一分鐘或者按鍵修改時間
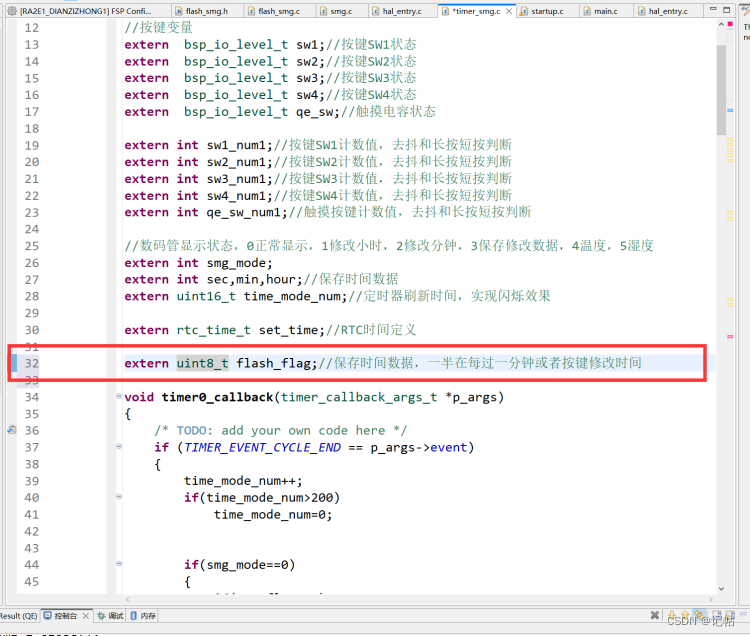
同時在RTC時鐘走到0秒時候保存一次數(shù)據(jù)。
g_src_uint8[0]=hour;
                   g_src_uint8[1]=min;
                   WriteFlashTest(4,g_src_uint8 ,FLASH_DF_BLOCK_0);
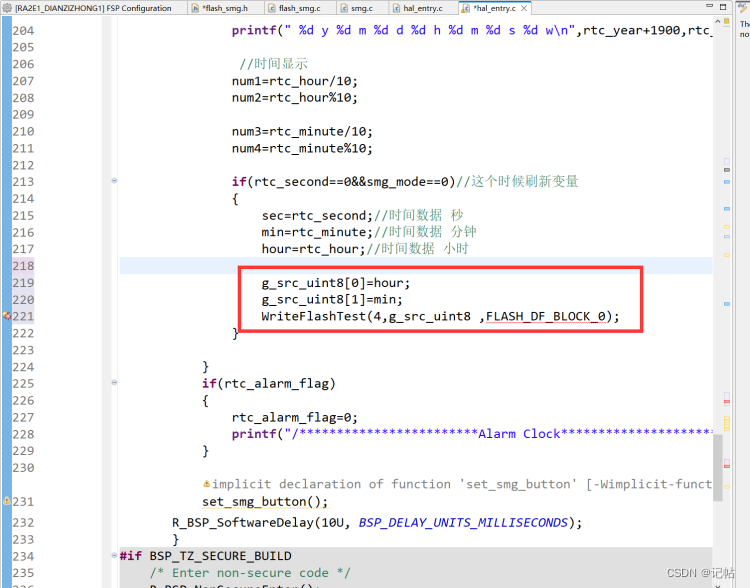
讀取函數(shù)如下所示,在flash_smg.h中。
extern int sec,min,hour;//保存時間數(shù)據(jù)
/*FLASH讀取打印程序*/
void PrintFlashTest(uint32_t addr)
{
    hour=*(__IO uint8_t*)(addr);
    min=*(__IO uint8_t*)(addr+1);

    if(hour >=24)
        hour=0;
    if(min >=60)
        min=0;
}
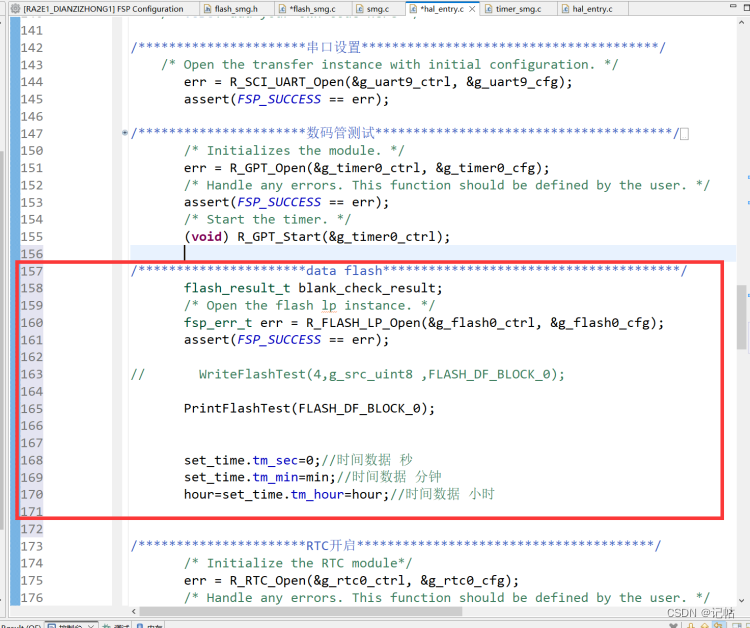
同時在主程序中開啟flash以及將保存的數(shù)據(jù)讀取出來。 由于需要在RTC開啟時放入該數(shù)據(jù) ,故需要放在RTC開啟前面。
/**********************data flash***************************************/
       flash_result_t blank_check_result;
       /* Open the flash lp instance. */
        err = R_FLASH_LP_Open(&g_flash0_ctrl, &g_flash0_cfg);
       assert(FSP_SUCCESS == err);

//       WriteFlashTest(4,g_src_uint8 ,FLASH_DF_BLOCK_0);

       PrintFlashTest(FLASH_DF_BLOCK_0);


       set_time.tm_sec=0;//時間數(shù)據(jù) 秒
       set_time.tm_min=min;//時間數(shù)據(jù) 分鐘
       hour=set_time.tm_hour=hour;//時間數(shù)據(jù) 小時
flash_smg.c
/*
 * flash_smg.c
 *
 *  Created on: 2023年7月5日
 *      Author: a8456
 */
#include "flash_smg.h"

volatile bool               interrupt_called;
volatile flash_event_t      flash_event;


void flash_callback (flash_callback_args_t * p_args)
{
    interrupt_called = true;
    flash_event      = p_args- >event;
}


extern fsp_err_t err ;
/*FLASH寫入程序*/
void WriteFlashTest(uint32_t L,uint8_t Data[],uint32_t addr)
{


    interrupt_called = false;
    /* Erase 1 block of data flash starting at block 0. */
    err = R_FLASH_LP_Erase(&g_flash0_ctrl, FLASH_DF_BLOCK_0, 1);
    assert(FSP_SUCCESS == err);
    while (!interrupt_called)
    {
    ;
    }
    assert(FLASH_EVENT_ERASE_COMPLETE == flash_event);
    interrupt_called = false;
    flash_status_t status;
    /* Write 32 bytes to the first block of data flash. */
    err = R_FLASH_LP_Write(&g_flash0_ctrl, (uint32_t) Data, addr, L);
    assert(FSP_SUCCESS == err);

    /* Wait until the current flash operation completes. */
    do
    {
        err = R_FLASH_LP_StatusGet(&g_flash0_ctrl, &status);
    } while ((FSP_SUCCESS == err) && (FLASH_STATUS_BUSY == status));


    /* If the interrupt wasn't called process the error. */
    assert(interrupt_called);
    /* If the event wasn't a write complete process the error. */
    assert(FLASH_EVENT_WRITE_COMPLETE == flash_event);
    /* Verify the data was written correctly. */
    assert(0 == memcmp(Data, (uint8_t *) FLASH_DF_BLOCK_0, L));


}

extern int sec,min,hour;//保存時間數(shù)據(jù)
/*FLASH讀取打印程序*/
void PrintFlashTest(uint32_t addr)
{
    hour=*(__IO uint8_t*)(addr);
    min=*(__IO uint8_t*)(addr+1);

    if(hour >=24)
        hour=0;
    if(min >=60)
        min=0;
}
flash_smg.h
/*
 * flash_smg.h
 *
 *  Created on: 2023年6月29日
 *      Author: a8456
 */

#ifndef FLASH_SMG_H_
#define FLASH_SMG_H_

#include "hal_data.h"

#define FLASH_DF_BLOCK_0                0x40100000U/*   1 KB: 0x40100000 - 0x401003FF */

/*FLASH寫入程序*/
void WriteFlashTest(uint32_t L,uint8_t Data[],uint32_t addr);
/*FLASH讀取打印程序*/
void PrintFlashTest(uint32_t addr);

#endif /* FLASH_SMG_H_ */
主程序
#include “hal_data.h”
#include < stdio.h >
#include “smg.h”
#include “timer_smg.h”
#include “flash_smg.h”
FSP_CPP_HEADER
void R_BSP_WarmStart(bsp_warm_start_event_t event);
FSP_CPP_FOOTER

//數(shù)碼管變量
uint8_t num1=1,num2=4,num3=6,num4=8;//4個數(shù)碼管顯示的數(shù)值
uint8_t num_flag=0;//4個數(shù)碼管和冒號輪流顯示,一輪刷新五次

//RTC變量
/* rtc_time_t is an alias for the C Standard time.h struct ‘tm’ /
rtc_time_t set_time =
{
.tm_sec = 50, / 秒,范圍從 0 到 59 /
.tm_min = 59, / 分,范圍從 0 到 59 /
.tm_hour = 23, / 小時,范圍從 0 到 23*/
.tm_mday = 29, /* 一月中的第幾天,范圍從 0 到 30*/
.tm_mon = 11, /* 月份,范圍從 0 到 11*/
.tm_year = 123, /* 自 1900 起的年數(shù),2023為123*/
.tm_wday = 6, /* 一周中的第幾天,范圍從 0 到 6*/
// .tm_yday=0, /* 一年中的第幾天,范圍從 0 到 365*/
// .tm_isdst=0; /* 夏令時*/
};

//RTC鬧鐘變量
rtc_alarm_time_t set_alarm_time=
{
.time.tm_sec = 58, /* 秒,范圍從 0 到 59 /
.time.tm_min = 59, / 分,范圍從 0 到 59 /
.time.tm_hour = 23, / 小時,范圍從 0 到 23*/
.time.tm_mday = 29, /* 一月中的第幾天,范圍從 1 到 31*/
.time.tm_mon = 11, /* 月份,范圍從 0 到 11*/
.time.tm_year = 123, /* 自 1900 起的年數(shù),2023為123*/
.time.tm_wday = 6, /* 一周中的第幾天,范圍從 0 到 6*/


 .sec_match        =  1,//每次秒到達(dá)設(shè)置的進(jìn)行報警
 .min_match        =  0,
 .hour_match       =  0,
 .mday_match       =  0,
 .mon_match        =  0,
 .year_match       =  0,
 .dayofweek_match  =  0,
};

bsp_io_level_t sw1;//按鍵SW1狀態(tài)
bsp_io_level_t sw2;//按鍵SW2狀態(tài)
bsp_io_level_t sw3;//按鍵SW3狀態(tài)
bsp_io_level_t sw4;//按鍵SW4狀態(tài)
bsp_io_level_t qe_sw;//觸摸電容狀態(tài)

int sw1_num1=0;//按鍵SW1計數(shù)值,去抖和長按短按判斷
int sw2_num1=0;//按鍵SW2計數(shù)值,去抖和長按短按判斷
int sw3_num1=0;//按鍵SW3計數(shù)值,去抖和長按短按判斷
int sw4_num1=0;//按鍵SW4計數(shù)值,去抖和長按短按判斷
int qe_sw_num1=0;//觸摸按鍵計數(shù)值,去抖和長按短按判斷
void qe_touch_sw(void);

//數(shù)碼管顯示狀態(tài),0正常顯示,1修改小時,2修改分鐘,3保存修改數(shù)據(jù),4溫度,5濕度
int smg_mode=0;
int sec=0,min=0,hour=0;//保存時間數(shù)據(jù)
uint16_t time_mode_num=0;//定時器刷新時間,實現(xiàn)閃爍效果

volatile uint8_t g_src_uint8[4]={0x00,0x00,0x00,0x00};//時間保存在該數(shù)組里面
volatile uint8_t g_src_uint8_length=4;
uint8_t flash_flag=0;//保存時間數(shù)據(jù),一半在每過一分鐘或者按鍵修改時間

//RTC回調(diào)函數(shù)
volatile bool rtc_flag = 0;//RTC延時1s標(biāo)志位
volatile bool rtc_alarm_flag = 0;//RTC鬧鐘
/* Callback function */
void rtc_callback(rtc_callback_args_t p_args)
{
/ TODO: add your own code here */
if(p_args- >event == RTC_EVENT_PERIODIC_IRQ)
rtc_flag=1;
else if(p_args- >event == RTC_EVENT_ALARM_IRQ)
rtc_alarm_flag=1;
}

fsp_err_t err = FSP_SUCCESS;
volatile bool uart_send_complete_flag = false;
void user_uart_callback (uart_callback_args_t * p_args)
{
if(p_args- >event == UART_EVENT_TX_COMPLETE)
{
uart_send_complete_flag = true;
}
}

#ifdef GNUC //串口重定向
#define PUTCHAR_PROTOTYPE int __io_putchar(int ch)
#else
#define PUTCHAR_PROTOTYPE int fputc(int ch, FILE *f)
#endif

PUTCHAR_PROTOTYPE
{
err = R_SCI_UART_Write(&g_uart9_ctrl, (uint8_t *)&ch, 1);
if(FSP_SUCCESS != err) __BKPT();
while(uart_send_complete_flag == false){}
uart_send_complete_flag = false;
return ch;
}

int _write(int fd,char *pBuffer,int size)
{
for(int i=0;i< size;i++)
{
__io_putchar(*pBuffer++);
}
return size;
}

/*******************************************************************************************************************//**

main() is generated by the RA Configuration editor and is used to generate threads if an RTOS is used. This function

is called by main() when no RTOS is used.
*********************************************************************************************************************/
void hal_entry(void)
{
/ TODO: add your own code here */

/* Open the transfer instance with initial configuration. /
err = R_SCI_UART_Open(&g_uart9_ctrl, &g_uart9_cfg);
assert(FSP_SUCCESS == err);
/數(shù)碼管測試****************/
// ceshi_smg();
/定時器開啟*****************/
/* Initializes the module. /
err = R_GPT_Open(&g_timer0_ctrl, &g_timer0_cfg);
/ Handle any errors. This function should be defined by the user. /
assert(FSP_SUCCESS == err);
/ Start the timer. */
(void) R_GPT_Start(&g_timer0_ctrl);

/data flash*****************/
flash_result_t blank_check_result;
/* Open the flash lp instance. */
err = R_FLASH_LP_Open(&g_flash0_ctrl, &g_flash0_cfg);
assert(FSP_SUCCESS == err);


//       WriteFlashTest(4,g_src_uint8 ,FLASH_DF_BLOCK_0);

PrintFlashTest(FLASH_DF_BLOCK_0);


set_time.tm_sec=0;//時間數(shù)據(jù) 秒
set_time.tm_min=min;//時間數(shù)據(jù) 分鐘
hour=set_time.tm_hour=hour;//時間數(shù)據(jù) 小時


/RTC開啟*****************/
/* Initialize the RTC module*/
err = R_RTC_Open(&g_rtc0_ctrl, &g_rtc0_cfg);
/* Handle any errors. This function should be defined by the user. */
assert(FSP_SUCCESS == err);


/* Set the RTC clock source. Can be skipped if "Set Source Clock in Open" property is enabled. */
R_RTC_ClockSourceSet(&g_rtc0_ctrl);


/* R_RTC_CalendarTimeSet must be called at least once to start the RTC /
R_RTC_CalendarTimeSet(&g_rtc0_ctrl, &set_time);
/ Set the periodic interrupt rate to 1 second */
R_RTC_PeriodicIrqRateSet(&g_rtc0_ctrl, RTC_PERIODIC_IRQ_SELECT_1_SECOND);


       R_RTC_CalendarAlarmSet(&g_rtc0_ctrl, &set_alarm_time);
       uint8_t rtc_second= 0;      //秒
       uint8_t rtc_minute =0;      //分
       uint8_t rtc_hour =0;         //時
       uint8_t rtc_day =0;          //日
       uint8_t rtc_month =0;      //月
       uint16_t rtc_year =0;        //年
       uint8_t rtc_week =0;        //周
       rtc_time_t get_time;


       sec=set_time.tm_sec;//時間數(shù)據(jù) 秒
        min=set_time.tm_min;//時間數(shù)據(jù) 分鐘
        hour=set_time.tm_hour;//時間數(shù)據(jù) 小時

   while(1)
   {
       if(flash_flag)//按鍵修改完畢數(shù)據(jù)后進(jìn)行保存
       {
           g_src_uint8[0]=hour;
           g_src_uint8[1]=min;
           WriteFlashTest(4,g_src_uint8 ,FLASH_DF_BLOCK_0);
           flash_flag=0;
       }


       if(rtc_flag)
       {
           R_RTC_CalendarTimeGet(&g_rtc0_ctrl, &get_time);//獲取RTC計數(shù)時間
           rtc_flag=0;
           rtc_second=get_time.tm_sec;//秒
           rtc_minute=get_time.tm_min;//分
           rtc_hour=get_time.tm_hour;//時
           rtc_day=get_time.tm_mday;//日
           rtc_month=get_time.tm_mon;//月
           rtc_year=get_time.tm_year; //年
           rtc_week=get_time.tm_wday;//周
           printf(" %d y %d m %d d %d h %d m %d s %d wn",rtc_year+1900,rtc_month,rtc_day,rtc_hour,rtc_minute,rtc_second,rtc_week);

            //時間顯示
           num1=rtc_hour/10;
           num2=rtc_hour%10;

           num3=rtc_minute/10;
           num4=rtc_minute%10;
           if(rtc_second==0&&smg_mode==0)//這個時候刷新變量
           {
               sec=rtc_second;//時間數(shù)據(jù) 秒
               min=rtc_minute;//時間數(shù)據(jù) 分鐘
               hour=rtc_hour;//時間數(shù)據(jù) 小時

               g_src_uint8[0]=hour;
               g_src_uint8[1]=min;
               WriteFlashTest(4,g_src_uint8 ,FLASH_DF_BLOCK_0);


           }
       }
       if(rtc_alarm_flag)
       {
           rtc_alarm_flag=0;
           printf("/************************Alarm Clock********************************/n");
       }
       set_smg_button();
       R_BSP_SoftwareDelay(10U, BSP_DELAY_UNITS_MILLISECONDS);
   }


#if BSP_TZ_SECURE_BUILD
/* Enter non-secure code */
R_BSP_NonSecureEnter();
#endif
}
審核編輯:湯梓紅
-
FlaSh
+關(guān)注
關(guān)注
10文章
1623瀏覽量
147781 -
瑞薩
+關(guān)注
關(guān)注
35文章
22294瀏覽量
86098 -
RTC
+關(guān)注
關(guān)注
2文章
530瀏覽量
66325 -
電子時鐘
+關(guān)注
關(guān)注
11文章
197瀏覽量
24503
發(fā)布評論請先 登錄
相關(guān)推薦
電子時鐘制作(瑞薩RA)(6)----配置RTC時鐘及顯示時間

基于RASC的keil電子時鐘制作(瑞薩RA)(2)----配置keil以及使用串口進(jìn)行打印
基于RASC的keil電子時鐘制作(瑞薩RA)(5)----驅(qū)動LED數(shù)碼管

基于RASC的keil電子時鐘制作(瑞薩RA)(7)----配置RTC時鐘及顯示時間

基于RASC的keil電子時鐘制作(瑞薩RA)(9)----保存數(shù)據(jù)到flash

【瑞薩RA4系列開發(fā)板體驗】開箱
瑞薩電子RA家族推出RA8系列高算力通用MCU


 電子時鐘制作(瑞薩RA)(8)----保存數(shù)據(jù)到flash


評論