引言
在過去的幾年里,機械臂技術經歷了前所未有的發展,其應用領域從傳統的制造業擴展到了醫療、服務、物流等多個新興行業。這種跨界擴展得益于科技的飛速進步,尤其是在傳感器、控制系統和人工智能領域的突破。特別是去年,人工智能技術的熱潮為機械臂的智能化升級提供了更多的可能性,從而極大地拓寬了其應用場景和提高了作業效率與智能水平。
隨著這些技術的融合與創新,我們見證了許多令人印象深刻的應用案例,它們不僅展示了機械臂技術的先進性,還反映了未來發展的趨勢。本文將分享去年我們平臺上發布的五個精選案例,這些案例涉及到了機械臂與深度相機、人臉跟蹤等技術的結合應用。
案例1:ChatGPT for Robotics: Design Principles and Model Abilities
背景介紹
自2022年ChatGPT發布以來,它一直備受全世界人的關注,一個強大的人工智能聊天機器人。隨著各界的研發人員不斷的對ChatGPT進一步的研究和探索,衍生出來了很多富有創意的功能。其中就包括Microsft-Autonomous Systems and Robotics Group將ChatGPT的能力擴展到機器人領域,用語言直觀的控制機械臂,無人機,家庭機器人等等。
https://youtu.be/NYd0QcZcS6Q
你可能會覺得我現在也可以做到跟一個機器人說讓他去做一些操作指令,他也會完成那個指令,這能有什么區別。其實不然,這里頭有這你無法想象的一個強大的功能。以前那些功能個的實現都是依賴于寫代碼來控制機器人。
例如:我想要機械臂聽到命令之后往前走,就必須得提前編程接收到命令 往前走的代碼,之后觸發這個功能。

這個團隊探索改變這個現狀,用OpenAI的AI語言模型ChatGPT使自然的人機交互成為可能。不再需要大量的代碼提前編寫好一些固定的程序,只需要簡單的跟ChatGPT進行對話,就可以實現某種功能,希望能夠幫助人們更加輕松的與機器人進行交互,不需要學習復雜的編程語言或者有關機器人的詳細信息。
例如:預想的是,我們提前編程好相對應的 APIs功能,告訴ChatGPT這個功能是做什么的,然后通過跟 ChatGPT進行對話,ChatGPT根據對話的需求以及對應的API的 功能,自行的調用API控制機械臂。

技術實現
文中舉了一個例子,用myCobot 280M5用木塊構建Microsoft的logo。
Step 1:
首先定義一組控制機械臂的API或函數庫,這里用到的是pymycobot,專門控制myCobot的一個功能庫。直接使用就可以了,需要稍加注釋一下API的功能。
pymycobot:https://github.com/elephantrobotics/pymycobot
里面有詳細的介紹API
Step 2:
緊接著我們得給ChatGPT編寫一個文本提示,描述任務目標,明確pymycobot庫里面的功能哪些可以用 ,以及怎么使用。
User:
Imagine we are working with a manipulator robot. This is a robotic arm with 6 degrees of freedom that has a suction pump attached to its end effector. I would like you to assist me in sending commands to this robot given a scene and a task.

At any point, you have access to the following functions:

grab(): Turn on the suction pump to grab an object
release(): Turns off the suction pump to release an object
get_position(object): Given a string of an object name, returns the coordinates and orientation of the vacuum pump to touch the top of the object [X, Y, Z, Yaw, Pitch, Roll]
move_to(position): It moves the suction pump to a given position [X, Y, Z, Yaw, Pitch, Roll].
You are allowed to create new functions using these, but you are not allowed to use any other hypothetical functions.

Keep the solutions simple and clear. The positions are given in mm and the angles in degrees. You can also ask clarification questions using the tag "Question - ". Here is an example scenario that illustrates how you can ask clarification questions.

Let's assume a scene contains two spheres.pick up the sphere.
Step 3:
通過不斷的溝通Chat,最終實現我們想要的效果,讓ChatGPT生成相對應的變成代碼
User:
Awesome! I want now to use the blocks to build the logo from Microsoft on top of the white pad. It consists of four colors forming a square, blue on the bottom left, yellow on the bottom right, red on the top left and green on the top right.

ChatGPT:
Sure! Here's the Python code to build the Microsoft logo on top of the white pad using the blocks:
# get the positions of the blocks and the white pad
white_pad_pos = get_position("white pad")
blue_pos = get_position("blue block")
yellow_pos = get_position("yellow block")
red_pos = get_position("red block")
green_pos = get_position("green block")
# pick up the blue block
pick_up_object("blue block")
# calculate the position to place the blue block
place_pos = [white_pad_pos[0]-20, white_pad_pos[1]-20, white_pad_pos[2]+40, 0, 0, 0]
# place the blue block on the white pad
place_object(place_pos)
# pick up the yellow block
pick_up_object("yellow block")
# calculate the position to place the yellow block
place_pos = [white_pad_pos[0]+20, white_pad_pos[1]-20, white_pad_pos[2]+40, 0, 0, 0]
# place the yellow block on the white pad
place_object(place_pos)
# pick up the red block
pick_up_object("red block")
# calculate the position to place the red block
place_pos = [white_pad_pos[0]-20, white_pad_pos[1]+20, white_pad_pos[2]+40, 0, 0, 0]
# place the red block on the white pad
place_object(place_pos)
# pick up the green block
pick_up_object("green block")
# calculate the position to place the green block
place_pos = [white_pad_pos[0]+20, white_pad_pos[1]+20, white_pad_pos[2]+40, 0, 0, 0]
# place the green block on the white pad
place_object(place_pos)
案例2:人臉跟蹤技術在機械臂中的應用
背景介紹:
這個案例 備受大家喜歡,因為作者本身也是一名剛開始接觸機械臂的愛好者,想要做機械臂的人臉識別跟蹤 ,一共分為了上下兩篇,上篇講的是使用OpenCV算法提供的人臉識別以及講述了項目的框架,需要什么來實現。下篇介紹的是機械臂運動控制的算法。
技術實現:全程使用的是以樹莓派為主板的mechArm 270 ,6自由度的機械臂 。
想要實現人臉識別功能以及機械臂跟蹤,那么機器視覺是少不了的,目前市面上最熱門的識別算法是OpenCV的算法,里面的技術相對比較成熟,可以直接使用。

人臉識別一般由兩個部分組成,人臉檢測和人臉識別,在人臉檢測中,主要任務是構造能夠區分包含人臉的實例和不包含人臉的實例的分類器。OpenCV 中提供了三個經過訓練的級聯分類器。顧名思義,級聯分類器逐步篩選不同的特征,以得出其所屬的分類。分類器的link:http ://face-rec.org/databases/

調用分類器和opencv算法就可以獲取到視頻流對人臉進行檢測
import cv2
import matplotlib.pyplot as plt
import time
def video_info():
# Loading classifiers
   face_cascade =             cv2.CascadeClassifier('haarcascade_frontalface_default.xml')
# Input video stream
   cap = cv2.VideoCapture(0)
# To use a video file as input
#cap = cv2.VideoCapture('demo.mp4')
   while True:
       _, img = cap.read()
# Conversion to greyscale
       gray = cv2.cvtColor(img, cv2.COLOR_BGR2GRAY)
# Detecting faces
       faces = face_cascade.detectMultiScale(gray, 1.1, 4)
# Drawing the outline
       for (x, y, w, h) in faces:
           cv2.rectangle(img, (x, y), (x+w, y+h), (255, 0, 0), 2)
           center_x = (x+w-x)//2+x
           center_y = (y+h-y)//2+y
           cv2.circle(img,(center_x,center_y),10,(0,255,255),2)
# Display effects
       cv2.imshow('img', img)
       k = cv2.waitKey(30) & 0xff
       if k==27:
       break
       cap.release()
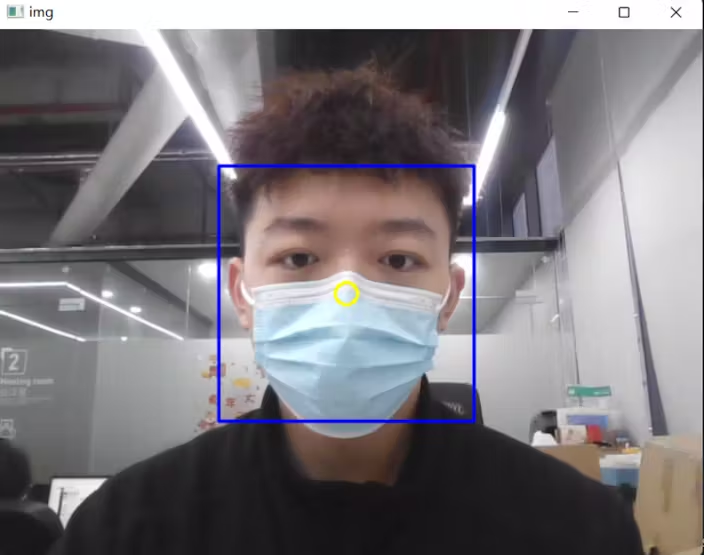
設定機械臂末端來獲取視頻信息,就需要固定好位置,因為在這里涉及到一個機械臂的知識-手眼標定。手眼標定可以讓機械臂知道相機拍攝的物體相對于機械臂的位置,或者說,建立相機坐標系和機械臂坐標系之間的映射。
換句話也就是說 ,獲得相機的畫面下的 人臉的參數,相對于機械臂的位置是怎樣的,這個是相當重要的為了能夠準確并且實時的撲捉到人臉相對應的坐標。
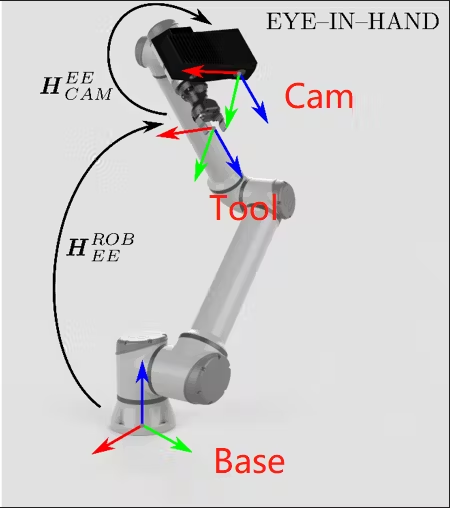
經過實踐之后,發現raspberry pi 4b的算力有所欠缺,如果用手眼標定來做的話看起來效果并不好,而且會有許多未知參數。所以作者決定使用相對位移來進行運動控制。這樣的話就需要設計一種采樣運動機制,保證在一個周期內完全獲取人臉的偏移量并且實現跟蹤,我們一起來看看效果如何。
https://youtu.be/dNdqrkggr9c
如果你感興趣可以了解更多 :Facial Recognition and Tracking Project with mechArm - Hackster.io
案例3:Operate myCobot with the spatial recognition of D455
背景介紹:
為了滿足更多的場景需求,現在深度相機被使用的十分的廣泛,就例如下面這個用戶做的案例。使用到的是realsense D455,這是一款微軟的深度相機,能夠獲取某個物體的多個參數。該項目是用深度相機結合機械臂做一個空間上的物體跟蹤。
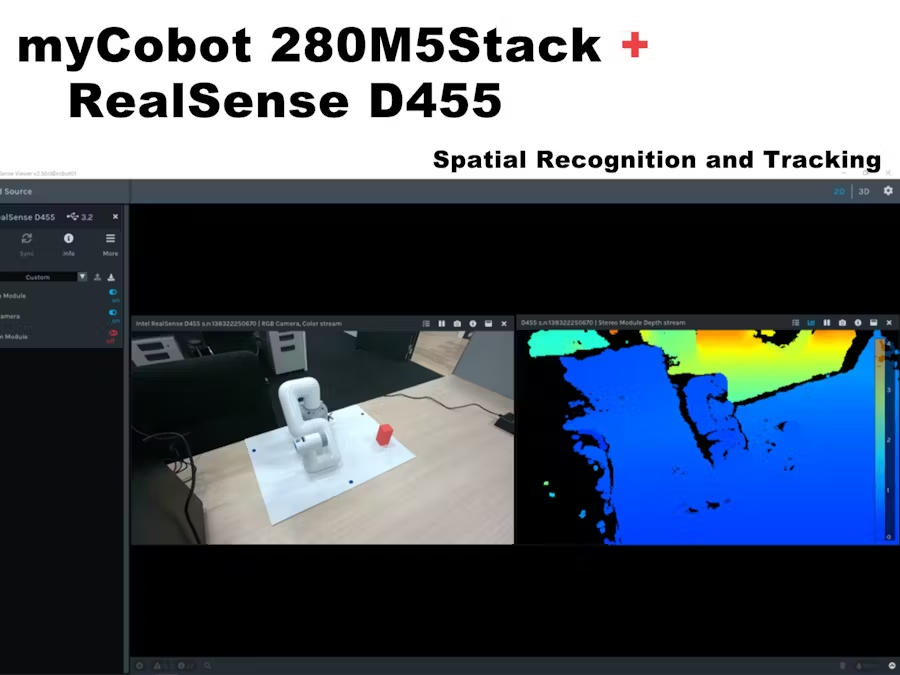
技術實現:
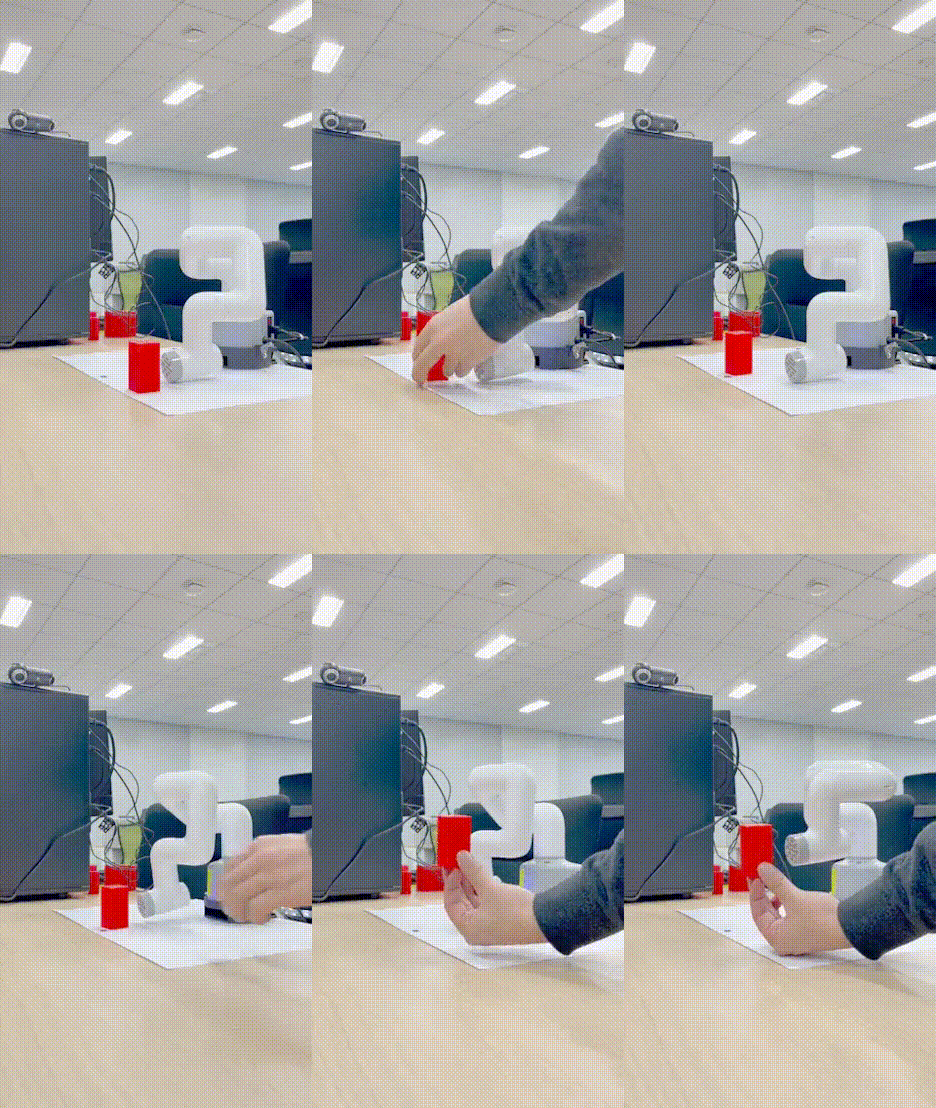
可以看到場景里面,在左上角有一個攝像頭,獲取紅色物體的坐標,然后返回給機械臂,機械臂再去進行移動。
這個案例跟上一個案例有點相似,也不大一樣,相似的點在于都是機械臂視覺的應用,不太相似的點在于這個案例用的是深度相機,通過相機內置的算法能夠獲取到木塊的參數,可以比較方便的進行手眼標定。里面也介紹了realsense的運動模塊的信息,里面的設置可以為0.01m,甚至設置到0.001m左右,可以獲取到十分精細的參數。
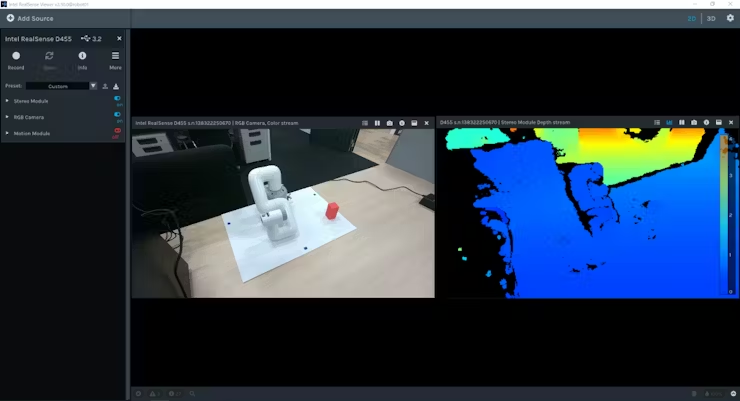
最后整個項目是在ROS當中完成的,將Realsense d455和 myCobot鏈接到一起。
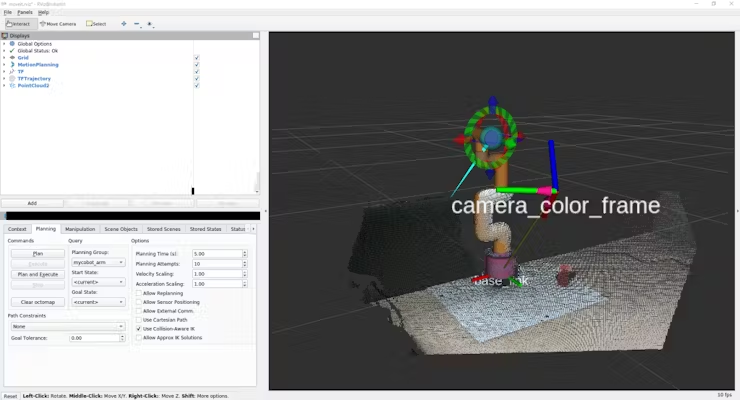
這篇文章能夠很好的幫助了購買了機械臂或深度相機但不知道如何使用它的人。
案例4:
Automating Fruit Harvesting and Sorting
背景介紹:這一篇技術案例就比較偏向一個模擬場景的建設了,它里面有多臺mechArm 270協同合作,一臺傳送帶,多個攝像模組。主要是模擬一個果實的采摘然后進行分類。
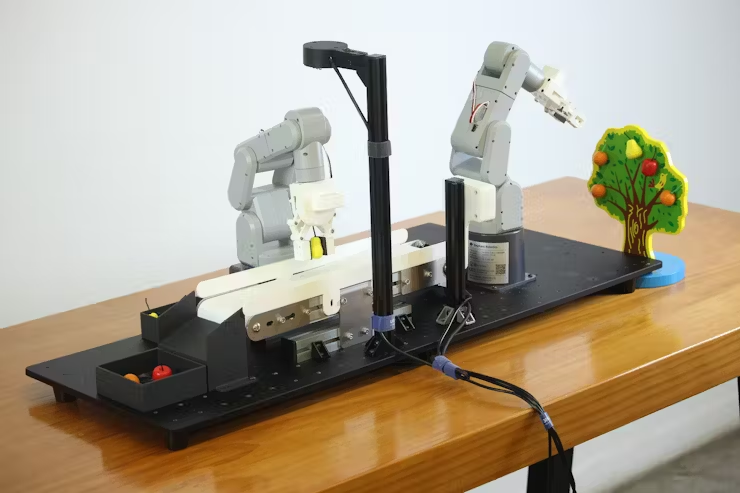
技術亮點:
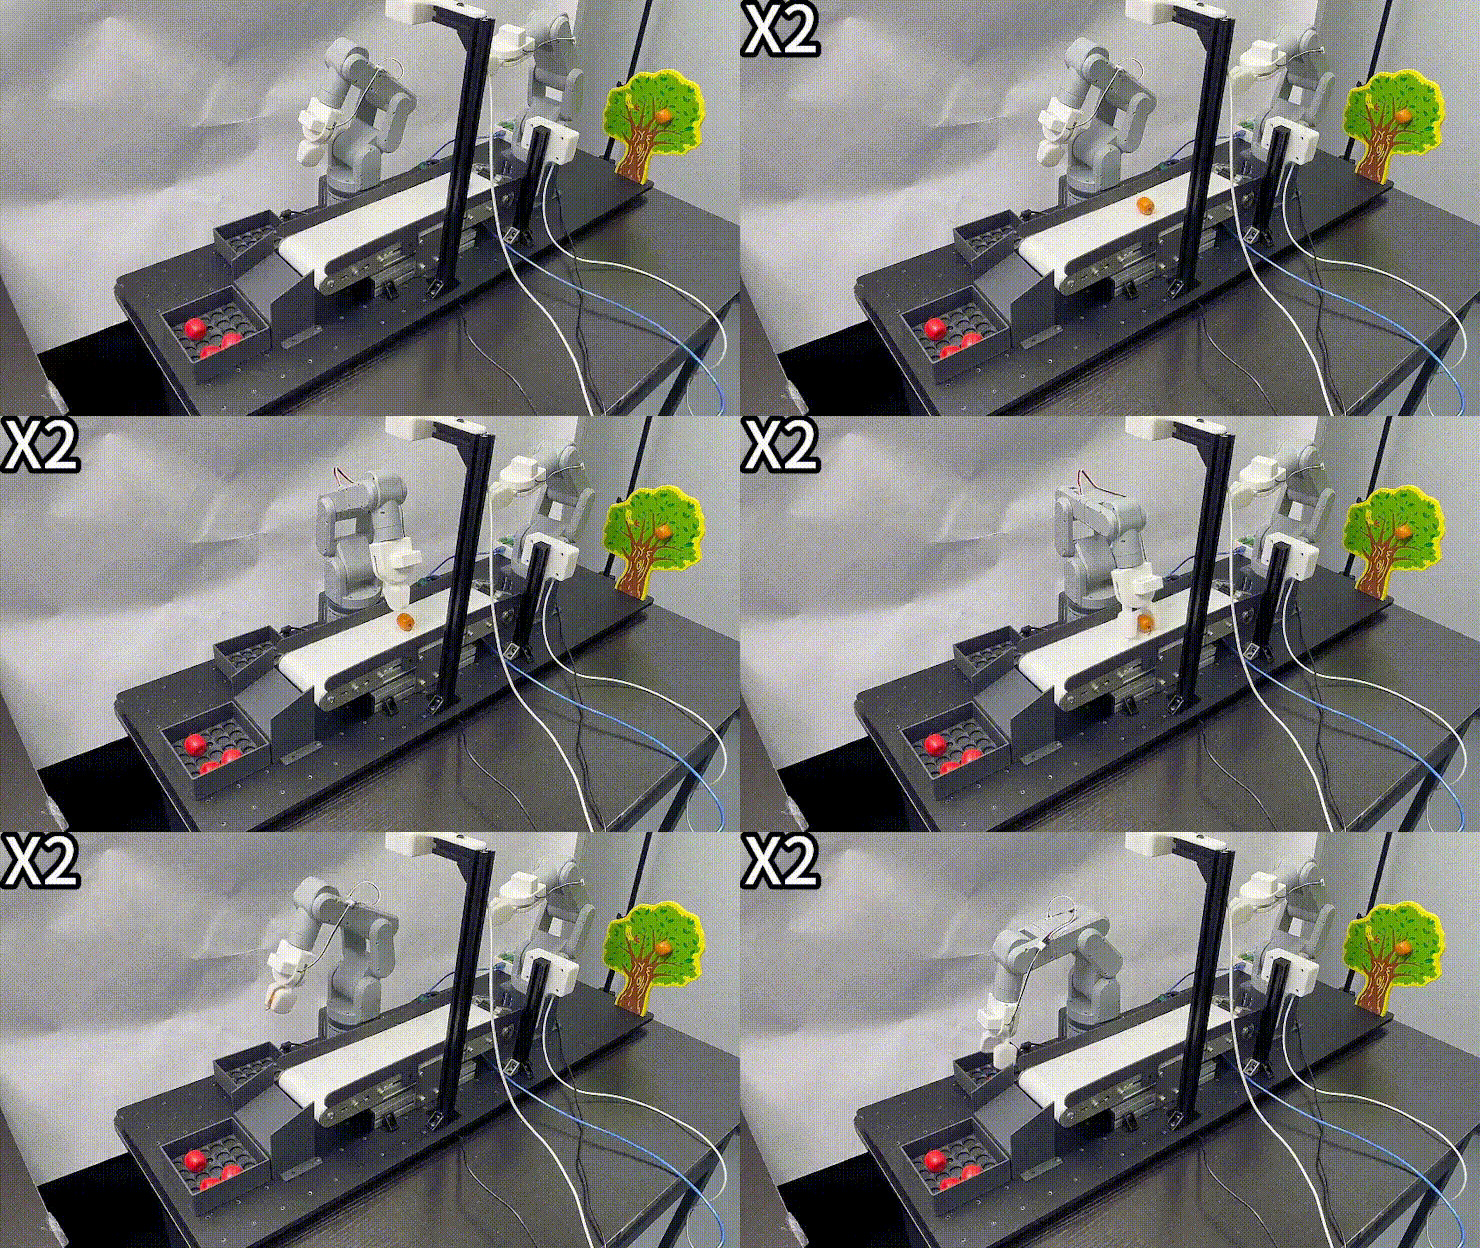
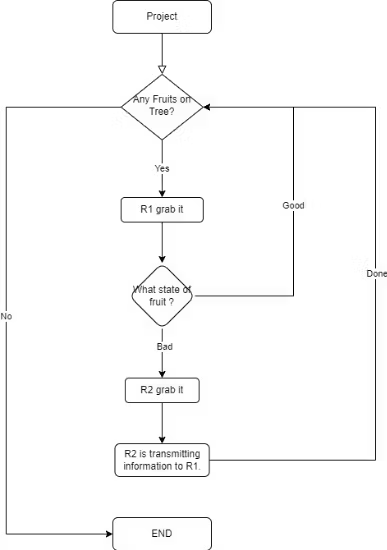
可以看到整個場景的流程,這個案例主要關注幾個技術點:
1.機器視覺的識別,目標果實坐標的獲取。
2.機械臂之間協同關系,和傳送帶邏輯的關系。
從案例1到案例4只要是要做一些場景應用的話都會要用到機器視覺,就少不了攝像頭,要想做一個好項目機器視覺的知識是必不可少的。讓我們來一起看看如何處理這里的視覺。
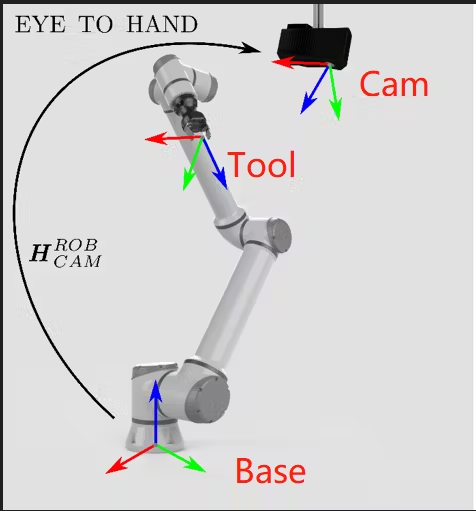
案例當中是用到的是深度攝像頭,相比2D攝像頭就少去了一些標志物,我們可以依賴深度相機的參數來直接做手眼標定,這里我們的“眼”是固定的,稱為眼在手外,目標找到一個變換矩陣,該矩陣被描述了攝像頭坐標系相對于機器人基座坐標系的位置和方向。
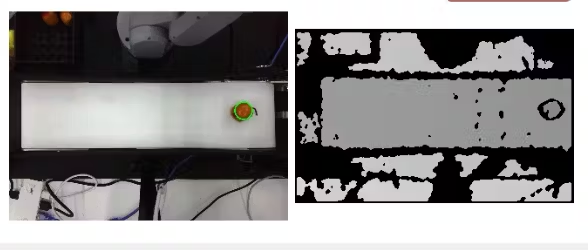
識別物體做的是OpenCV的顏色識別,通過顏色來區別果實的情況。
Detection and identification class
"""
HSV_DIST = {
"redA": (np.array([0, 120, 50]), np.array([3, 255, 255])),
"redB": (np.array([118, 120, 50]), np.array([179, 255, 255])),
"orange": (np.array([8, 150, 150]), np.array([20, 255, 255])),
"yellow": (np.array([28, 100, 150]), np.array([35, 255, 255])),
}
先定義好可能會出現的結果,就可以精準的識別,得到目標果實的坐標了。
機械臂抓取果實的路徑主要考慮幾個方面:
初始姿勢
抓握的姿勢
避障的姿勢
基本上考慮這幾個方面,達到不會影響抓取目標,碰到場景中其他的物件。
接下來較為關鍵的是處理,兩臺機械臂和傳送帶之間的邏輯關系,分配好角色哪個機械臂先動,哪個機械臂動,保證整個流程下來是順暢的,不會導致程序的死鎖。
這個場景應用,涉及到了多方面的功能,可以幫助初學者怎么將機械臂運用起來,怎么搭建一個場景。也能幫助掌握機械臂運動控制,視覺識別,物體抓取技術等等相關知識,如果你有興趣了解的話點擊查看。
總結
在2023年,機械臂技術的飛速發展引起了廣泛關注,幾個備受矚目的案例展示了其在創新與應用方面的巨大可能性。我們歡迎所有有興趣探索這一領域、愿意分享新奇想法的朋友與我們交流。讓我們共同見證并體驗科技如何塑造未來世界的奇跡!
審核編輯:湯梓紅
-
人工智能
+關注
關注
1787文章
46041瀏覽量
234923 -
開源
+關注
關注
3文章
3123瀏覽量
42066 -
機械臂
+關注
關注
12文章
502瀏覽量
24285
發布評論請先 登錄
相關推薦
基于LabVIEW和SolidWorks改進機械臂的設計流程
【NanoPC-T4試用申請】NanoPC-T4智能機械臂
關于機械臂的設計問題
機械臂的控制學習
工業機械臂


 機械臂技術的前沿探索:年度案例回顧!


評論