今天小編給大家帶來了來自印度的Arnov Sharma 制作的基于XIAO SAMD21的數字鍵盤項目,該項目可以通過按鍵在電腦和OLED的屏幕上輸入0-9的阿拉伯數字,可以當作一個數字副鍵盤來使用。
這個項目的核心是 XIAO SAMD21 開發板和 XIAO 擴展板配對,其中包含一個板載 OLED 顯示屏,我們在這個項目中使用它來顯示按鈕按下。擴展板固定在3D打印的特制外殼上。外殼內包含了 9個12x12 毫米的觸覺按鈕。這些按鈕由在Fusion360中建模的支架部件牢固地固定。
材料清單
XIAO SAMD21開發板
XIAO擴展板
3D打印零件
12x12mm 點動按鈕*9
第一步:代碼實現
由Seeed Studio制造的 XIAO SAMD21 微控制器和 XIAO 擴展板構成了該項目的核心。它配備了豐富的外設,包括 OLED、RTC、SD 卡 Sot、無源蜂鳴器、復位/用戶按鈕、5V 伺服連接器和 Grove 連接器,用于將多個 Grove 設備與 XIAO 配對。它還包含一個電池充電 IC,用于將此設置與鋰電池作為電源進行分級。
項目的第一步相當簡單:我們將測試代碼上傳到 XIAO SAMD21 ,并利用擴展板的板載按鈕(連接到 D1)用作輸入數字 1 的小鍵盤。
#include         //TEST SKETCH
int buttonPin = 1;  // Set a button to any pin


void setup()
{
  pinMode(buttonPin, INPUT_PULLUP);  // Set the button as an input
  digitalWrite(buttonPin, HIGH);  // Pull the button high
}


void loop()
{
  if (digitalRead(buttonPin) == 0)  // if the button goes low
  {
    Keyboard.write('1');  // send a '1' to the computer via Keyboard HID
    delay(500);  // delay so there aren't a kajillion z's
  }
}
測試結束后,我們可以準備更多的功能,比如從 9 個按鈕中獲取輸入,并通過 XIAO 內部 SAMD21 微控制器的 HID 協議輸出數字。
以下為鍵盤中使用的主要代碼
#include


#include
#include
#include


#define OLED_WIDTH 128
#defineOLED_HEIGHT64

#define OLED_ADDR   0x3C
Adafruit_SSD1306display(OLED_WIDTH,OLED_HEIGHT);

int buttonPin1 = 0;
int buttonPin2 = 1;
int buttonPin3 = 2;
int buttonPin4 = 3;
int buttonPin5 = 6;
int buttonPin6 = 7;
int buttonPin7 = 8;
int buttonPin8 = 9;
intbuttonPin9=10;


void setup()
{
  pinMode(buttonPin1, INPUT_PULLUP);  // Set the button as an input
  digitalWrite(buttonPin1, HIGH);  // Pull the bu11tton high


  pinMode(buttonPin2, INPUT_PULLUP);  // Set the button as an input
  digitalWrite(buttonPin2, HIGH);  // Pull the bu11tton high


  pinMode(buttonPin3, INPUT_PULLUP);  // Set the button as an input
  digitalWrite(buttonPin3, HIGH);  // Pull the bu11tton high


  pinMode(buttonPin4, INPUT_PULLUP);  // Set the button as an input
  digitalWrite(buttonPin4, HIGH);  // Pull the bu11tton high


  pinMode(buttonPin5, INPUT_PULLUP);  // Set the button as an input
  digitalWrite(buttonPin5, HIGH);  // Pull the bu11tton high


  pinMode(buttonPin6, INPUT_PULLUP);  // Set the button as an input
  digitalWrite(buttonPin6, HIGH);  // Pull the bu11tton high


  pinMode(buttonPin7, INPUT_PULLUP);  // Set the button as an input
  digitalWrite(buttonPin7, HIGH);  // Pull the bu11tton high


  pinMode(buttonPin8, INPUT_PULLUP);  // Set the button as an input
  digitalWrite(buttonPin8, HIGH);  // Pull the bu11tton high


  pinMode(buttonPin9, INPUT_PULLUP);  // Set the button as an input
digitalWrite(buttonPin9,HIGH);//Pullthebu11ttonhigh

  display.begin(SSD1306_SWITCHCAPVCC, OLED_ADDR);
  display.clearDisplay();
}


void loop()
{
  if (digitalRead(buttonPin1) == 0) // 01
  {
    Keyboard.write('1');

  display.clearDisplay();
  display.setTextSize(4);
  display.setTextColor(WHITE);
  display.setCursor(55, 20);
  display.println("1");
  display.display();
  delay(500);
  }
    display.clearDisplay();


  if (digitalRead(buttonPin2) == 0) // 02
  {
    Keyboard.write('2');

  display.clearDisplay();
  display.setTextSize(4);
  display.setTextColor(WHITE);
  display.setCursor(55, 20);
  display.println("2");
  display.display();
  delay(500);
  }


display.clearDisplay();


  if (digitalRead(buttonPin3) == 0)  // 03
  {
    Keyboard.write('3');

  display.clearDisplay();
  display.setTextSize(4);
  display.setTextColor(WHITE);
  display.setCursor(55, 20);
  display.println("3");
  display.display();
  delay(500);
  }


display.clearDisplay();


  if (digitalRead(buttonPin4) == 0)  // 04
  {
    Keyboard.write('4');

  display.clearDisplay();
  display.setTextSize(4);
  display.setTextColor(WHITE);
  display.setCursor(55, 20);
  display.println("4");
  display.display();
  delay(500);
  }


display.clearDisplay();


  if (digitalRead(buttonPin5) == 0)  // 05
  {
    Keyboard.write('5');

  display.clearDisplay();
  display.setTextSize(4);
  display.setTextColor(WHITE);
  display.setCursor(55, 20);
  display.println("5");
  display.display();
  delay(500);
}

display.clearDisplay();


  if (digitalRead(buttonPin6) == 0)  // 06
  {
    Keyboard.write('6');

  display.clearDisplay();
  display.setTextSize(4);
  display.setTextColor(WHITE);
  display.setCursor(55, 20);
  display.println("6");
  display.display();
  delay(500);
  }


display.clearDisplay();


  if (digitalRead(buttonPin7) == 0)  // 07
  {
    Keyboard.write('7');

  display.clearDisplay();
  display.setTextSize(4);
  display.setTextColor(WHITE);
  display.setCursor(55, 20);
  display.println("7");
  display.display();
  delay(500);
  }


display.clearDisplay();


  if (digitalRead(buttonPin8) == 0)  // 08
  {
    Keyboard.write('8');

  display.clearDisplay();
  display.setTextSize(4);
  display.setTextColor(WHITE);
  display.setCursor(55, 20);
  display.println("8");
  display.display();
  delay(500);
  }


display.clearDisplay();


  if (digitalRead(buttonPin9) == 0)  // 09
  {
    Keyboard.write('9');

  display.clearDisplay();
  display.setTextSize(4);
  display.setTextColor(WHITE);
  display.setCursor(55, 20);
  display.println("9");
  display.display();
  delay(500);
  }

display.clearDisplay();


}
此代碼實質上充當一個簡單的鍵盤輸入系統,模擬在按下相應的物理按鈕時按鍵盤上的按鍵。此外,它還在OLED顯示屏上提供視覺反饋,以指示已按下哪個按鈕。
我們使用的是 Adafruit SSD1306 OLED 庫,您需要先下載并安裝該庫,然后再上傳此草圖。
第二步:外觀設計
該項目的第二步從外觀設計開始,它由首先創建的 XIAO 擴展板模型組成,該模型放置在一個矩形主體上,該主體從內部容納了九個按鈕。
XIAO擴展板使用四個M2螺釘從頂部安裝。
我們從外殼內部安裝了按鈕,并創建了九個方形開口來放置開關同時創造了一個開關支架,它用四個 M2 螺釘固定到位,以便將開關固定在原位。
此外,我們還創建了一個蓋子,可以從后面關閉設備。該設備通過蓋子上的矩形延伸部分從頂部抬高,使其有點傾斜。
設計完成后,我們導出了設計的所有網格文件,并使用帶有 0.4mm 噴嘴的 Ender 3 打印它們。
主體采用橙色PLA印刷,蓋子和開關支架均采用透明PLA印刷。
組裝過程:添加按鈕
對于開關,我們將使用 12mm x 12mm 方形觸覺按鈕。
首先,我們只需在主體內一次一個地將每個開關拾取并插入其指定位置,將它們全部放入插槽中。
接下來,我們將 3D 打印的開關支架添加到其位置,并使用四個 M2 螺釘使其靜止。該支架將保持所有開關完好無損地固定在原位。
接線方法
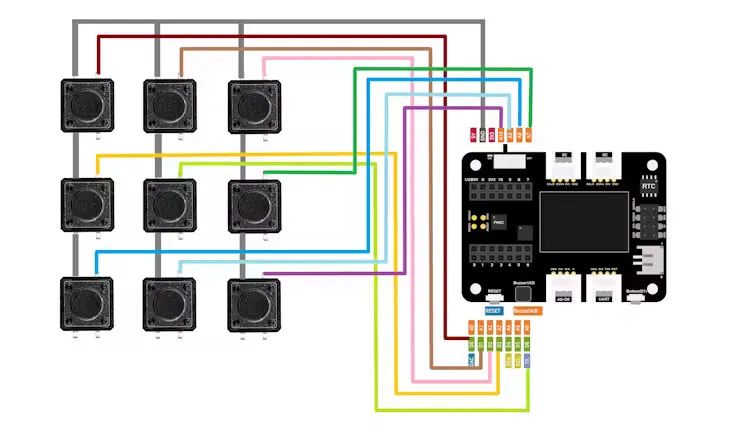
l每個開關的 GND 端子使用烙鐵和銀銅線相互連接。對于此階段,我們堅持使用提供的接線圖。
l接下來,我們在每個開關上放置連接線;該連接線將添加 XIAO 的數字引腳,用于開關輸入。

XIAO 擴展板使用從頂部插入的四個 M2 螺釘安裝在其適當的位置。接下來,我們開始最后一個接線步驟,該步驟涉及根據提供的接線圖將 XIAO 上的數字引腳與每個開關上的連接線對齊。對于此過程,使用烙鐵。最后,我們將蓋子放在底部,并用六個 M2 螺釘將其固定到主體上。
該項目已完全組裝完成。
總結
這是這個簡單而實用的構建的結果:一個功能齊全的 HID 數字鍵盤,如果您的筆記本電腦缺少專用的數字鍵盤,您可以使用它來輸入數字。您還可以修改此項目,通過為每個按鈕分配字母或函數來代替數字來操作宏鍵盤。
-
微控制器
+關注
關注
48文章
7489瀏覽量
151048 -
鍵盤
+關注
關注
4文章
858瀏覽量
39585 -
開發板
+關注
關注
25文章
4945瀏覽量
97193
原文標題:創客項目秀|基于XIAO SAMD21的HID數字鍵盤
文章出處:【微信號:ChaiHuoMakerSpace,微信公眾號:柴火創客空間】歡迎添加關注!文章轉載請注明出處。
發布評論請先 登錄
相關推薦
單機數值輸入控件,彈出數字鍵盤,單擊數字輸入值
LCD和數字鍵盤實現的人機交互式界面
如何制作一個小數字鍵盤
如何利用CH549開發一款觸摸的數字鍵盤?
如何切換筆記本小鍵盤
基于Raspberry Pi Pico實現的數字鍵盤設計方案


 基于XIAO SAMD21開發板的數字鍵盤制作方案


評論