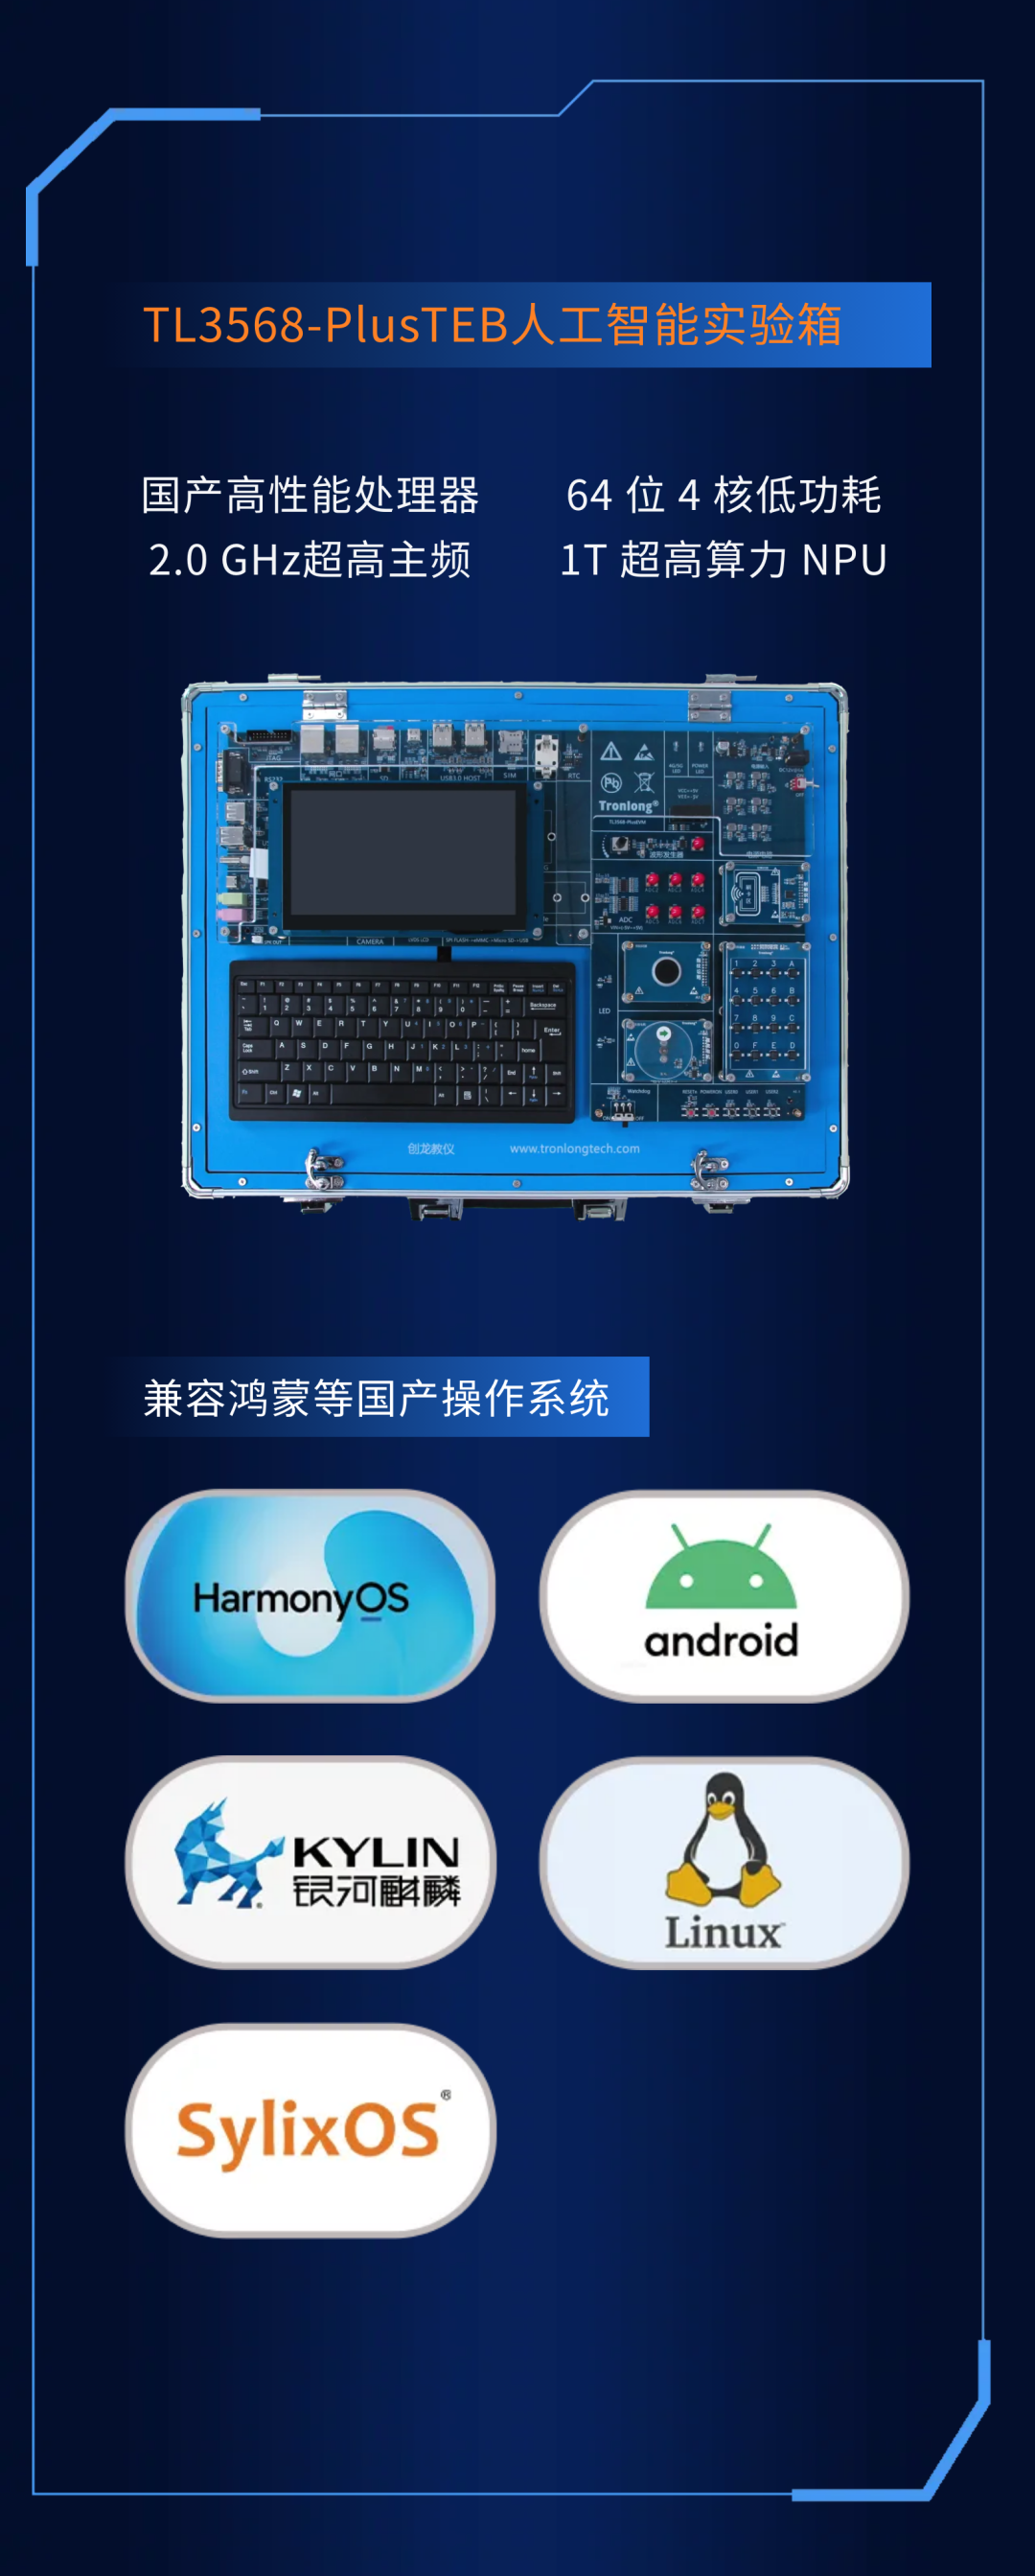
本文基于創(chuàng)龍教儀 TL3568-PlusTEB 嵌入式教學(xué)實(shí)驗(yàn)箱實(shí)現(xiàn) ubuntu 系統(tǒng)移植。
瑞芯微平臺(tái)提供的SDK支持buildroot、Debian、yocto,但Ubuntu需要自行定制文件系統(tǒng)。
本文詳細(xì)介紹了如何在Ubuntu虛擬機(jī)中使用ubuntu-base構(gòu)建根文件系統(tǒng),包括設(shè)置軟件源、配置DNS、安裝必要軟件和桌面環(huán)境,以及修改系統(tǒng)配置。以及如何打包鏡像文件,并將其燒錄到瑞芯微RK3568開(kāi)發(fā)板上,涉及掛載、格式化、修復(fù)和調(diào)整鏡像大小的步驟。
Ubuntu 系統(tǒng)簡(jiǎn)介
Ubuntu是一個(gè)以桌面應(yīng)用為主的Linux發(fā)行版操作系統(tǒng),其名稱來(lái)自非洲南部祖魯語(yǔ)或豪薩語(yǔ)的“ubuntu"一詞,意思是“人性”“我的存在是因?yàn)榇蠹业拇嬖?,是非洲傳統(tǒng)的一種價(jià)值觀。
Ubuntu基于Debian發(fā)行版和GNOME桌面環(huán)境,而從11.04版起,Ubuntu發(fā)行版放棄了GNOME桌面環(huán)境,改為Unity。
此前人們認(rèn)為L(zhǎng)inux難以安裝、難以使用,在Ubuntu出現(xiàn)后這些都成為了歷史。Ubuntu也擁有龐大的社區(qū)力量,用戶可以方便地從社區(qū)獲得幫助。自Ubuntu 18.04 LTS起,Ubuntu發(fā)行版重新開(kāi)始使用GNOME3桌面環(huán)境。

ubuntu-base 構(gòu)建根文件系統(tǒng)
1.獲取 ubuntu
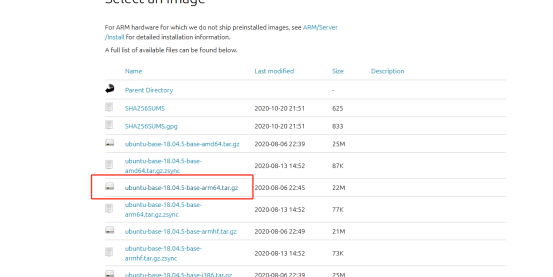
在ubuntu官網(wǎng)獲取 ubuntu-base-18.04.5-base-arm64.tar.gz,創(chuàng)龍教儀提供對(duì)應(yīng)的文件:
2.解壓、拷貝文件
執(zhí)行以下命令將文件拷貝到ubuntu虛擬機(jī),新建目錄,解壓:
mkdir ubuntu_rootfs
sudo tar -xpf ubuntu-base-18.04.5-base-arm64.tar.gz -C ubuntu_rootfs/
3.安裝qemu-user-static
qemu-user-static是一個(gè)仿真器,可以選取arm64配置文件仿真開(kāi)發(fā)板運(yùn)行環(huán)境,然后掛載下載的ubuntu-base文件,從而構(gòu)建ubuntu文件系統(tǒng):
sudo apt install qemu-user-static
由于下載的ubuntu-base是aarch64架構(gòu)的,因此需要拷貝 qemu-aarch64-static到ubuntu_rootfs/usr/bin/下:
sudo cp /usr/bin/qemu-aarch64-static ubuntu_rootfs/usr/bin
4.設(shè)置軟件源
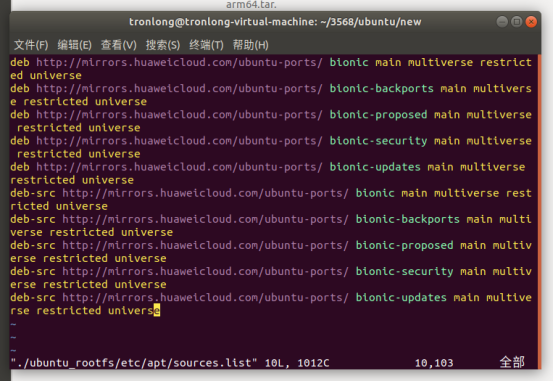
需要注意的是,這里要用 ARM 源,不能復(fù)制我們本機(jī)的源:
sudo vim ./ubuntu_rootfs/etc/apt/sources.list
這里我們選擇華為國(guó)內(nèi)下載源,如下圖所示:
5.配置DNS
為了可以聯(lián)網(wǎng)更新軟件,我們拷貝本機(jī)的dns配置文件到根文件系統(tǒng):
sudo cp /etc/resolv.conf ubuntu_rootfs/etc/resolv.conf
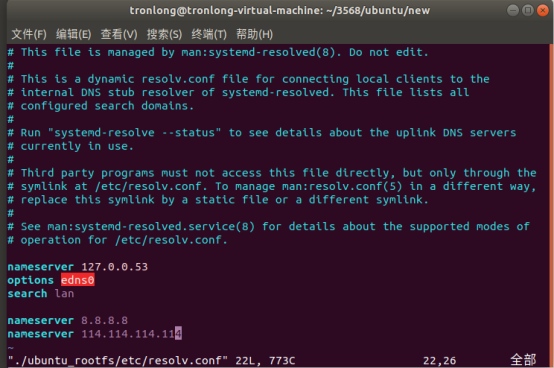
然后在/etc/resolv.conf文件中添加dns
sudo vim ./ubuntu_rootfs/etc/resolv.conf
添加內(nèi)容如下:
如下圖所示:
nameserver 8.8.8.8
nameserver 114.114.114.114
6.掛載ubuntu-base文件系統(tǒng)
編寫(xiě)掛載腳本:
#!/bin/bash
mnt() {
echo "MOUNTING"
sudo mount -t proc /proc ${2}proc
sudo mount -t sysfs /sys ${2}sys
sudo mount -o bind /dev ${2}dev
sudo mount -o bind /dev/pts ${2}dev/pts
sudo chroot ${2}
}
umnt() {
echo "UNMOUNTING"
sudo umount ${2}proc
sudo umount ${2}sys
sudo umount ${2}dev/pts
sudo umount ${2}dev
}
if [ "$1" == "-m" ] && [ -n "$2" ] ;
then
mnt $1 $2
elif [ "$1" == "-u" ] && [ -n "$2" ];
then
umnt $1 $2
else
echo ""
echo "Either 1'st, 2'nd or both parameters were missing"
echo ""
echo "1'st parameter can be one of these: -m(mount) OR -u(umount)"
echo "2'nd parameter is the full path of rootfs directory(with trailing '/')"
echo ""
echo "For example: ch-mount -m /media/sdcard/"
echo ""
echo 1st parameter : ${1}
echo 2nd parameter : ${2}
fi
增加腳本執(zhí)行權(quán)限:
sudo chmod +x mount.sh
掛載文件系統(tǒng):
bash mount.sh -m ubuntu_rootfs/
7. 安裝必要軟件
apt-get update
apt-get install net-tools
apt-get install ethtool
apt-get install ifupdown
apt-get install psmisc
apt-get install nfs-common
apt-get install htop
apt-get install vim
apt-get install rsyslog
apt-get install iputils-ping
apt-get install language-pack-en-base
apt-get install sudo
apt-get install network-manager
8. 安裝桌面環(huán)境
apt-get install ubuntu-desktop
9. 修改root用戶密碼
為了方便,我們可以把密碼也設(shè)置為:
tronlong
passwd root
10. 添加新用戶
adduser tronlong
需要輸入用戶的一些信息,也可以直接回車保留默認(rèn)值即可:
11. 新用戶使用sudo命令
默認(rèn)情況下新用戶是不能使用 sudo 命令的,我們需要修改/etc/sudoers 文件。
/etc/sudoers 文件默認(rèn)是只讀的,因此需要先修改此文件的寫(xiě)權(quán)限,使用如下命令:
chmod u+w /etc/sudoers
然后使用 vim 打開(kāi)/etc/sudoers,找到“root ALL=(ALL:ALL) ALL”這一行,在這一行下面添加:
vim /etc/sudoers
tronlong ALL=(ALL:ALL) ALL
修改完成以后保存退出,重新恢復(fù)/etc/sudoers 的只讀屬性,使用如下命令:
chmod u-w /etc/sudoers
12. 設(shè)置主機(jī)名稱和IP
echo "rk3568" > /etc/hostname
echo "127.0.0.1 localhost" >> /etc/hosts
echo "127.0.0.1 rk3568" >> /etc/hosts
13. 配置DHCP
我們配置一下網(wǎng)絡(luò) DHCP,這樣系統(tǒng)啟動(dòng)以后就會(huì)自動(dòng)設(shè)置好網(wǎng)絡(luò)
RK3568默認(rèn)有兩個(gè)網(wǎng)卡:
網(wǎng)卡eth0:
echo auto eth0 > /etc/network/interfaces.d/eth0
echo iface eth0 inet dhcp >> /etc/network/interfaces.d/eth0
網(wǎng)卡eth1:
echo auto eth1 > /etc/network/interfaces.d/eth1
echo iface eth1 inet dhcp >> /etc/network/interfaces.d/eth1
在實(shí)際測(cè)試中網(wǎng)口必須接入網(wǎng)線系統(tǒng)才能正常啟動(dòng),就是在不聯(lián)網(wǎng)的情況下,每次開(kāi)機(jī)都要等待很久,卡在網(wǎng)絡(luò)連接上5分鐘,這里我們可以修改下面這個(gè)文件:
vim /lib/systemd/system/networking.service
將里面的TimeoutStartSec=5min 修改為:
TimeoutStartSec=10sec
14. 修改系統(tǒng)重啟默認(rèn)等待時(shí)間
重啟開(kāi)發(fā)板的時(shí)候,如果有進(jìn)程沒(méi)有結(jié)束,系統(tǒng)就會(huì)等待,默認(rèn)等待時(shí)間很長(zhǎng),導(dǎo)致重啟速度慢。
我們可以修改默認(rèn)等待時(shí)間:
vim /etc/systemd/system.conf
找到這幾行:
#DefaultTimeoutStartSec=90s
#DefaultTimeoutStopSec=90s
#DefaultTRestartSec=100ms
解除注釋并將 DefaultTimeoutStopSec=90s 改為:
DefaultTimeoutStopSec=1s
保存退出
15. 設(shè)置開(kāi)機(jī)免密登錄到圖形界面
我們使用以下命令修改 50-ubuntu.conf 文件:
vim /usr/share/lightdm/lightdm.conf.d/50-ubuntu.conf
在文件末尾加入以下內(nèi)容,添加完成如下圖所示:
greeter-show-manual-login=true
all-guest=false
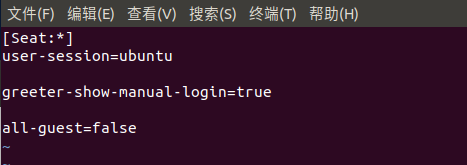
修改完成后保存退出,然后輸入以下命令修改 gdm-autologin 文件內(nèi)容,修改完成如下圖所示:
vim /etc/pam.d/gdm-autologin
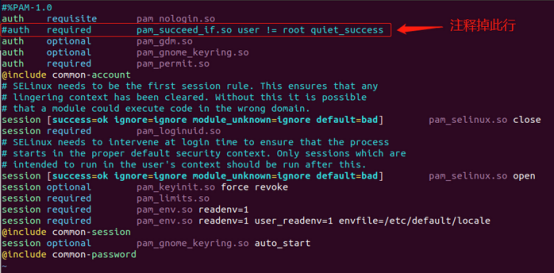
接著輸入以下命令修改 gdm-password 文件內(nèi)容,修改完成如下圖所示:
vim /etc/pam.d/gdm-password
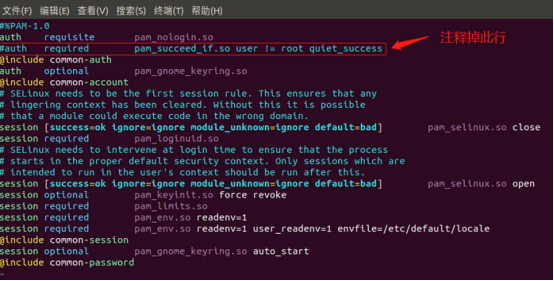
然后輸入以下命令修改/root/.profile 文件:
vim /root/.profile
將文件最后一行改為以下內(nèi)容,修改完成如下圖所示:
tty -s && mesg n || true
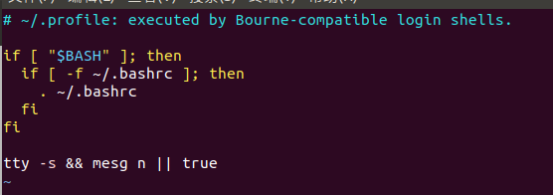
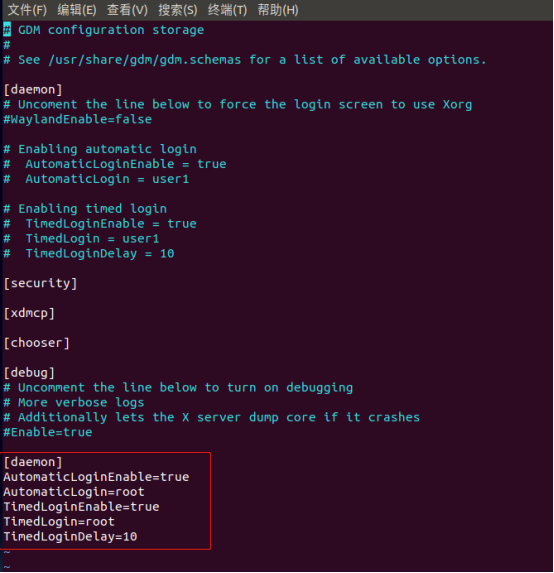
然后輸入以下命令修改 custom.conf 文件:
vim /etc/gdm3/custom.conf
到文件末尾添加以下內(nèi)容,添加完成如下圖所示(紅框部分):
[daemon]
AutomaticLoginEnable=true
AutomaticLogin=root
TimedLoginEnable=true
TimedLogin=root
TimedLoginDelay=10
17. 禁用系統(tǒng)休眠
查看:
sudo systemctl status sleep.target
禁用:
sudo systemctl mask sleep.target suspend.target hibernate.target hybrid-sleep.target
18. 卸載文件系統(tǒng)
退出仿真環(huán)境:
exit
卸載文件系統(tǒng):
bash mount.sh -u ubuntu_rootfs/
三、打包鏡像文件
18. 創(chuàng)建空鏡像文件
大小為20480MB(大概20G左右,注意這里需要根據(jù)實(shí)際EMMC的大小進(jìn)行修改,以我的為例子是32G版本的EMMC):
dd if=/dev/zero of=ubuntu_rootfs.img bs=1M count=20480
19. 將該文件格式化成ext4文件系統(tǒng)
mkfs.ext4 ubuntu_rootfs.img
20.鏡像文件掛載
將該鏡像文件掛載到一個(gè)空的文件夾上,然后將ubuntu_rootfs的文件復(fù)制到該空文件夾中:
mkdir ubuntu_base_rootfs
sudo mount ubuntu_rootfs.img ubuntu_base_rootfs
sudo cp -rfp ubuntu_rootfs/* ubuntu_base_rootfs/
21.修復(fù)鏡像文件
復(fù)制完后用e2fsck修復(fù)及檢測(cè)鏡像文件系統(tǒng),resize2fs 減小鏡像文件的大小:
sudo umount ubuntu_base_rootfs/
e2fsck -p -f ubuntu_rootfs.img
22.修改文件夾名稱
將ubuntu_rootfs.img拷貝到SDK的rockdev文件夾,并將ubuntu_rootfs.img改名為rootfs.img:

23.修改parameter.txt文件
這里需要注意要根據(jù)實(shí)際的emmc大小進(jìn)行修改,以我為例子是32G版本的EMMC:
修改前:

修改后

0x03200000@0x00058000(rootfs),0x00040000@0x03258000(oem),0x00010000@0x03298000(amp),-@0x032a8000(userdata:grow)
@之前是大小,@之后的是地址
每0x100000為512MB,那么我這里rootfs分配的為25G.當(dāng)然修改了前面的,后面的oem,amp,userdata的起始地址也需要需改。
然后回到SDK,運(yùn)行./build.sh updateimg


-
嵌入式
+關(guān)注
關(guān)注
5071文章
19026瀏覽量
303496 -
Ubuntu
+關(guān)注
關(guān)注
5文章
560瀏覽量
29586 -
實(shí)驗(yàn)箱
+關(guān)注
關(guān)注
0文章
58瀏覽量
9036
發(fā)布評(píng)論請(qǐng)先 登錄
相關(guān)推薦
國(guó)產(chǎn)處理器RK3568教學(xué)實(shí)驗(yàn)箱操作案例:LED燈控制實(shí)驗(yàn)

RK3568教學(xué)實(shí)驗(yàn)箱_操作案例:5-19 超聲波測(cè)距實(shí)驗(yàn)
RK3568教學(xué)實(shí)驗(yàn)箱_操作教程:5-15 直流電機(jī)控制實(shí)驗(yàn)
基于RK3568教學(xué)實(shí)驗(yàn)箱操作案例分享:4-1 LED燈控制實(shí)驗(yàn)
深度探索RK3568嵌入式教學(xué)平臺(tái)實(shí)戰(zhàn)案例:設(shè)備驅(qū)動(dòng)開(kāi)發(fā)實(shí)驗(yàn)
【北京迅為】《stm32mp157開(kāi)發(fā)板嵌入式linux開(kāi)發(fā)指南》第五章 Ubuntu使用apt-get下載
RK3568J“麒麟”+“翼輝”國(guó)產(chǎn)系統(tǒng)正式發(fā)布,“鴻蒙”也正在路上!
飛凌嵌入式FET3568/3568J-C核心板現(xiàn)已適配OpenHarmony4.1

為什么更推薦Cortex-A55教學(xué)實(shí)驗(yàn)箱?我來(lái)告訴您!

基于“中國(guó)芯”RK3568 ARM Cortex-A55教學(xué)實(shí)驗(yàn)箱強(qiáng)勢(shì)首發(fā)

創(chuàng)龍教儀基于瑞芯微3568的ARM Cortex A-55教學(xué)實(shí)驗(yàn)箱 適用于人工智能 傳感器 物聯(lián)網(wǎng)等領(lǐng)域
AMP“雙系統(tǒng)”加持,飛凌嵌入式RK3568核心板強(qiáng)實(shí)時(shí)性再升級(jí)

RK3568J“麒麟”+“翼輝”國(guó)產(chǎn)系統(tǒng)正式發(fā)布,“鴻蒙”也正在路上!


 Ubuntu系統(tǒng)遷移指南:輕松駕馭國(guó)產(chǎn)3568嵌入式實(shí)驗(yàn)箱


評(píng)論