下面是經(jīng)驗(yàn)分享:
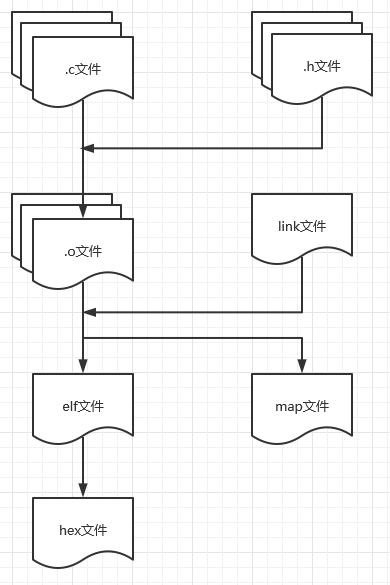
一、gcc編譯的流程
gcc的編譯流程分為4步:(詳見:http://xredman.iteye.com/blog/700901)
預(yù)處理(Pre-Processing) -》 編譯(Compling) -》 匯編(Assembling) -》 連接(Linking)
預(yù)處理:處理#include、#define、#ifdef 等宏命令
編譯:把預(yù)處理完的文件編譯為匯編程序.s
匯編:把匯編程序.s編譯為.o二進(jìn)制文件
鏈接:把多個(gè)二進(jìn)制文件.o集合(鏈接)成一個(gè)可執(zhí)行文件
由此可見,
多頭文件.h時(shí),在預(yù)處理階段處理,指明頭文件所在地址,但通常在makefile中是一個(gè)命令完成到第3步,生成.o
多源文件.c時(shí),在鏈接階段處理,gcc命令要寫出所有源文件,不然會(huì)出現(xiàn)引用了卻未定義的函數(shù)\變量等
二、多文件,多頭文件時(shí)的gcc經(jīng)驗(yàn)分享
情況1、一步直接由.c生成執(zhí)行文件
[objc] view plain copygcc [-I包含文件.h的目錄1 -I包含文件.h的目錄2.。。] 源文件1.c [源文件2.c 源文件3.c.。。] -o 執(zhí)行文件名
情況2、先編譯成.o,再由.o鏈接為執(zhí)行文件(makefile中常見,因?yàn)樵诖笮晚?xiàng)目時(shí),可以實(shí)現(xiàn)重編譯部分文件而不需要每次都全部編譯源文件文件)
[objc] view plain copya、gcc [-I源文件1包含的文件.h的目錄] 源文件1.c [-o 源文件1.o]
//可以通過-o指定生成的二進(jìn)制文件地址和位置
gcc [-I源文件2包含的文件.h的目錄] 源文件2.c [-o 源文件2.o]
。。。。
b、gcc 源文件1.o 源文件2.o 。。。。。。 -o 生成的執(zhí)行文件(默認(rèn)為a.out)
三、多文件,多頭文件時(shí)的makefile經(jīng)驗(yàn)分享
以例子說明最好理解,文件結(jié)構(gòu)如下圖:
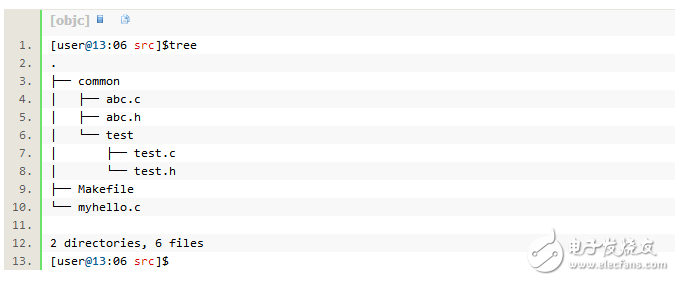
(以下為源文件+頭文件的展示,沒興趣的可以跳過此部分,不影響整體理解)
《myhello.c》:
[objc] view plain copy[user@13:08 src]$cat myhello.c
#include 《stdio.h》
#include “test.h”
#include “abc.h”
void printhelloworld(void);
int main()
{
abc();
printtest();
printf(“\n”);
printhelloworld();
return 0;
}
void printhelloworld(void){
printf(“hello world\n”);
}
[user@13:08 src]$
《abc.c && abc.h》
[objc] view plain copy[user@13:10 src]$cat 。/common/abc.c
#include “abc.h”
void abc(void)
{
printf(“\nit is in funciton abc”);
}
[user@13:10 src]$cat 。/common/abc.h
#include 《stdio.h》
void abc(void);
[user@13:11 src]$
《test.c && test.h》
[objc] view plain copy[user@13:11 src]$cat 。/common/test/test.c
#include 《stdio.h》
void printtest(void)
{
printf(“\nit is in test.c”);
}
[user@13:11 src]$cat 。/common/test/test.h
void printtest(void);
[user@13:11 src]$
(代碼展示到此結(jié)束)
簡單來說,在myhello.c的main中,需要調(diào)用。/common/abc.c的abc函數(shù)和。/common/test.c的printtest函數(shù),因而包含了他們的頭文件abc.h test.h
重點(diǎn)來了,makefile可以怎么寫(只是我的寫法的參考)
[objc] view plain copy[user@13:11 src]$cat Makefile
//目標(biāo)(要生成的文件名)
TARGET := myhello
//編譯器的選擇(在Linux中其實(shí)可以忽略,因?yàn)閏c指向的本來就是gcc)
CC := gcc
//編譯的參數(shù)
CFLAG := -Wall
//編譯包含的頭文件所在目錄
INCLUDES := -I. -Icommon/ -Icommon/test
//所有用到的源文件,注意:非當(dāng)前目錄的要+上詳細(xì)地址
SRCS = myhello.c 。/common/abc.c 。/common/test/test.c
//把源文件SRCS字符串的后綴.c改為.o
OBJS = $(SRCS:.c=.o)
//匹配所有的偽目標(biāo)依賴,即執(zhí)行目標(biāo)myhello.o & 。/common/abc.c & 。/common/test/test.c
.PHONY:all //all為偽目標(biāo)all:$(OBJS)
//當(dāng)所有依賴目標(biāo)都存在后,鏈接,即鏈接myhello.o & 。/common/abc.c & 。/commontest/test.c
$(CC) $(LDFLAG) -o $(TARGET) $^
//重定義隱藏規(guī)則,匹配上述目標(biāo):myhello.o & 。/common/abc.c & 。/common/test/test.c
%.o:%.c
//生成.o文件,注意,由于SRCS有個(gè)別包含詳細(xì)地址的,生成的.o文件也是詳細(xì)地址
$(CC) -c $(INCLUDES) $(CFLAG) $(CPPFLAG) $《 -o $@
//清空除源文件外的所有生成文件
clean: rm -rf $(basename $(TARGET)) $(SRCS:.c=.o)[user@13:14 src]$
make執(zhí)行下,結(jié)果怎么樣呢:
[objc] view plain copy[user@13:35 src]$make
//編譯了myhello.c,自動(dòng)處理了頭文件abc.h test.h的包含關(guān)系
gcc -c -I. -Icommon/ -Icommon/test -Wall myhello.c -o myhello.o gcc -c -I. -Icommon/ -Icommon/test -Wall common/abc.c -o common/abc.o gcc -c -I. -Icommon/ -Icommon/test -Wall common/test/test.c -o common/test/test.o
//把生成的所有.o文件鏈接為執(zhí)行文件,如果有缺失,會(huì)提示函數(shù)/變量未定義
gcc -o myhello myhello.o common/abc.o common/test/test.o[user@13:35 src]$
說明:由于當(dāng)前博文編寫代碼是在Objective-C上,因此為了觀看方便而用注釋//,實(shí)際在makefile中注釋為#
此時(shí)的文件結(jié)構(gòu):
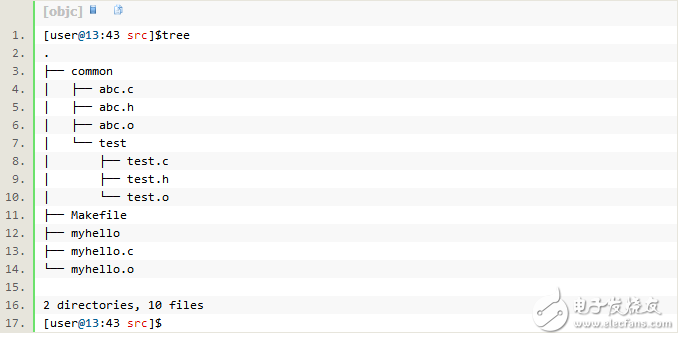
不知道注意到了沒,我通過-o指定地址,把生成的.o與源文件.c放在一起的,例如abc.o放在了abc.c的目錄,但同時(shí)的,鏈接時(shí)也需要給出詳細(xì)地址。
結(jié)論:
在gcc時(shí),會(huì)自動(dòng)解決頭文件.h的依賴關(guān)系,只需要指明頭文件的地址
在gcc鏈接時(shí),才需要把所有的源文件.o列出了,否則出現(xiàn)引用了未定義的變量/函數(shù)
 電子發(fā)燒友App









評(píng)論