本文主要是詳細(xì)講解zybo硬件系統(tǒng)搭建,u-boot,linux-kernel移植,linaro文件系統(tǒng)移植。過程中需要生成的文件有system.bit,fsbl.elf,u-boot.elf,devicetree.dtb,uImage(zImage和uImage區(qū)別請看),linaro文件系統(tǒng)(linaro.org可以下載)
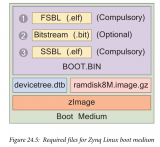
If you are new to linux I would recommend reading through some of the references at the bottom of the page. For this tutorial I am working on a Linux Ubuntu 14.04 vm. Figure 1 is an important overview of the entire design process and how everything comes together to create the necessary components to boot linux on the Zynq-7000 SoC. The end goal of this tutorial is to cover the steps from the beginning stages all the way to booting a Linaro Linux distribution with a graphical user interface on the ZYBO. At this point the tutorial only covers the stages up to booting to a Linaro root shell.

Things you will need!!
1、Xilinx Vivado 2014
2、Xilinx SDK 2014
3、Digilent’s ZYBO board
4、Linux-Digilent-Dev master-next branch obtained here.
5、u-boot-Digilent-Dev master-next branch obtained here.
6、 zybo base system( zybo_base_system.zip) here
Step 1: Obtaining necessary files and repositories
I would recommend making a project folder to work from. I am working from zee-bow on the desktop but it is up to you as to where you want to setup. Also create two more folders to put the boot files and root system files as we create them. I named these folders sd_boot and sd_fs.
1) Download the zybo base system from the Digilnets ZYBO product page.
2) Download the Digilent Inc. u-boot-Digilent-Dev and Linux-Digilent-Dev repositories. Make sure to get the master-next branch as these contain the necessary zybo config and dts files. These will be used to create the kernel and u-boot.elf.

Figure 2: Cloning Linux-Digilent-Dev and u-boot-Digilent-Dev into my working folder.
注意:一定要在master-next branch中下載zybo相應(yīng)的配置文件,u-boot和kernel默認(rèn)不包含這些文件的


默認(rèn)DigilentInc/u-boot-Digilent-Dev中boards.cfg文件中也不會包含zybo的配置文件,我們也必須在master-next branches中去下載boards.cfg文件

Step 2: Compiling U-Boot
目的:編譯u-boot,生成u-boot.elf文件
編譯u-boot需要做以下兩部修改:
1、修改環(huán)境變量,使得編譯器GCC指向交叉編譯器xilinx-linux-gnueabi-
目標(biāo)處理器類型為arm

In order to compile the U-Boot and later the kernel we need to set up the tools and extend the $PATH environment variable to find the tools. I would recommend moving the first two exports and the source into your .bashrc so you don’t have to set them again after closing the terminal.
2、修改 u-boot-Digilent-Dev/include/configs/zynq_zybo.h ,刪除圖片中的綠色一行,以此保證啟動時候不會去加載ramdisk,因為本文采用的文件系統(tǒng)是linaro的桌面ubuntu。
The next step is to configure and compile the U-Boot. Navigate to the u-boot-Digilent-Dev folder in the terminal. before compiling the u-boot we need to change the zynq_zybo.h file to prevent the u-boot from loading the ramdisk. Instead we want it to pass to the root filesystem.

Figure 4: Configure and building U-Boot for ZYBO.
Now lets compile the u-boot. Run make with the specific board zynq_zybo_config file and then run make and the execute and link u-boot should compile.

Figure 5: Configure and building U-Boot for ZYBO.
If you get an error during this step your $PATH environment variable most likely can not find the tools necessary to compile the u-boot. If the u-boot compiled correctly you should see a u-boot in the top level of the u-boot-Digilent-Dev folder. Lets move this to the sd_boot folder and add an elf extenstion. This will be used to generate the BOOT.bin in the following step.
Figure 6: Adding the elf extension to U-Boot.
Step 3: Building the base design(vivado)
 電子發(fā)燒友App







評論